
Transform your cramped cooking space with our essential Small Kitchen Declutter Checklist. This guide provides practical, step-by-step instructions to help you sort, organize, and optimize every inch of your kitchen, turning chaos into a functional and inviting area. Discover smart storage solutions and simple routines to maintain a beautifully organized home, making your small kitchen feel much larger and more efficient.
Small Kitchen Declutter Checklist: Your Guide to a Functional & Beautiful Space
Do you ever feel like your small kitchen is constantly overflowing? Are you struggling to find counter space, locate ingredients, or even cook comfortably? You are not alone! Many homeowners face the challenge of maximizing functionality and style in a compact culinary space. But here’s the good news: with a strategic approach and a dedicated small kitchen declutter checklist, you can transform your kitchen from chaotic to charming, from cramped to comfortable.
This comprehensive guide will walk you through a step-by-step small kitchen declutter checklist designed specifically for compact spaces. We’ll show you how to identify clutter, make tough decisions, optimize every nook and cranny, and implement smart storage solutions. By the end, you’ll have a kitchen that not only looks bigger but also works more efficiently, making cooking and entertaining a joy. Get ready to reclaim your kitchen and enjoy a space that truly serves you!
Key Takeaways
- Embrace a Zone-by-Zone Approach: Tackle your small kitchen declutter checklist by focusing on one small area at a time. This prevents overwhelm and makes the process manageable.
- Empty and Assess Everything: The most crucial step is to remove all items from a chosen zone. This allows you to truly see what you have and make informed decisions about its necessity.
- Utilize the “Keep, Donate/Sell, Toss” System: Be ruthless but realistic. Categorize each item to ensure only truly essential, frequently used, or beloved pieces remain in your small kitchen.
- Maximize Vertical and Wall Space: In a small kitchen, conventional storage is limited. Think upwards by installing shelves, magnetic strips, and wall organizers to free up valuable counter and cabinet space.
- Invest in Smart, Multi-functional Storage: Choose items like stackable bins, drawer dividers, and clear containers that help organize and contain items efficiently, preventing clutter from creeping back.
- Prioritize Countertop Clarity: Aim for as few items as possible on your countertops. Store frequently used small appliances in cabinets and group necessary items on trays to maintain a clean, spacious feel.
- Establish a Consistent Maintenance Routine: Decluttering is not a one-time event. Implement daily tidying and weekly resets to keep your small kitchen organized and prevent new clutter from accumulating.
Step 1: Prepare for Your Declutter Mission
Before you dive headfirst into pulling everything out of your cabinets, it’s wise to do a little preparation. Think of this as laying the groundwork for a successful and less stressful decluttering session. A well-prepared approach is key to tackling your small kitchen declutter checklist effectively.
Gather Your Supplies
You’ll need a few essentials to make the process smooth. Having these ready means you won’t have to stop mid-task to hunt for supplies.
- Cleaning Supplies: All-purpose cleaner, sponges, cloths. You’ll want to clean surfaces as you empty them.
- Boxes or Bins: At least three distinct containers labeled “Keep,” “Donate/Sell,” “Toss,” and possibly “Relocate.”
- Trash Bags: For items destined for the bin.
- Recycling Bin: For paper, plastic, and glass that can be recycled.
- Timer: Helps you stay focused and prevents burnout.
- Pen and Paper: For making notes, shopping lists for organizational tools, or recording items to repair.
Set Realistic Goals
Decluttering a whole kitchen, especially a small one, can feel overwhelming. Break it down. Don’t try to do everything in one go. Maybe you’ll focus on just one cabinet today, or maybe just the junk drawer. Setting small, achievable goals will keep you motivated. This small kitchen declutter checklist is designed to be followed in stages, not all at once.
Enlist Help (If Needed)
If you live with others, communicate your plan. Encourage them to participate. If they’re resistant, explain the benefits of a more organized space. Perhaps a friend can offer an objective eye if you struggle with letting go of items.
Pick Your Declutter Zone
Starting with one manageable area is crucial for a small kitchen. Don’t open every cabinet and drawer at once! Choose a logical starting point, like one upper cabinet, a single drawer, or under the sink. This focused approach makes working through your small kitchen declutter checklist much easier.
Step 2: Empty and Assess Everything
This is where the magic (and sometimes the mess) happens! To truly declutter your small kitchen, you need to see everything you own. This step is fundamental to any effective small kitchen declutter checklist.
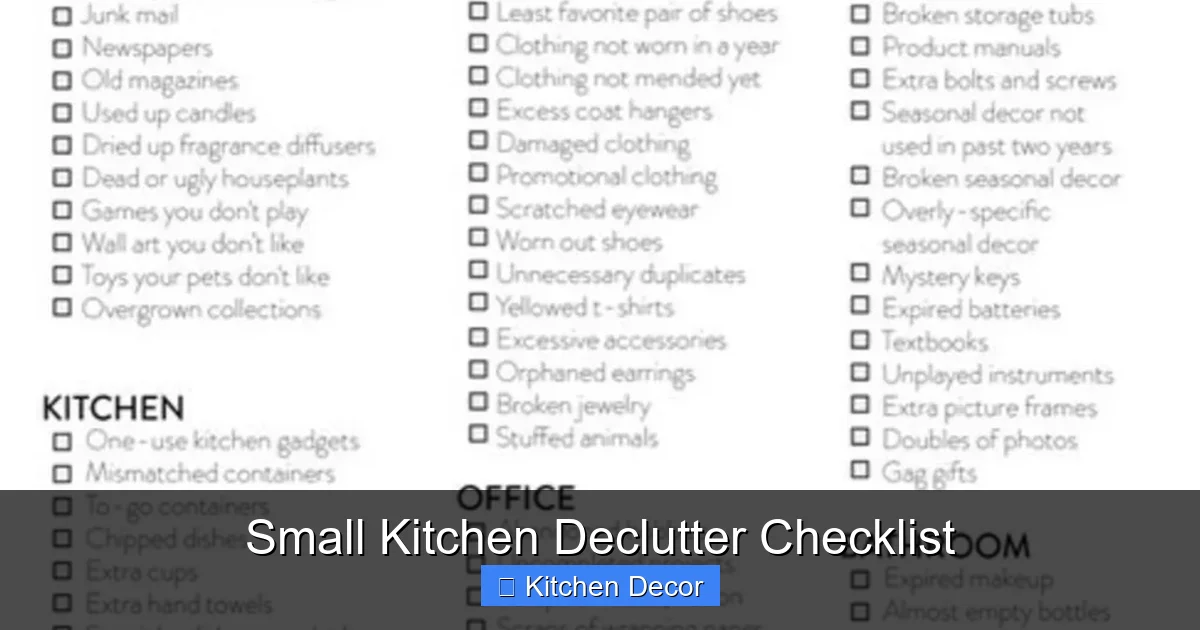
Visual guide about Small Kitchen Declutter Checklist
Image source: i.pinimg.com
Clear One Zone Completely
Take every single item out of your chosen cabinet, drawer, or shelf. Place everything on your countertop, dining table, or even a clean floor area. Seeing it all laid out can be quite eye-opening. You’ll likely discover items you forgot you even had!
Touch Every Item
As you pick up each item, ask yourself a series of critical questions. This is the heart of effective decluttering for a small kitchen:
- Do I use this? Be honest. When was the last time you used it? If it’s been over six months to a year, seriously consider letting it go.
- Do I love this? Some items, while not used daily, bring you joy or have sentimental value. These can stay, but be discerning, especially in a small space.
- Do I need this? Is it truly essential for cooking, baking, or storing food? Does it serve a unique purpose that no other item fulfills?
- Do I have duplicates? You probably don’t need three can openers or five spatulas. Keep the best one (or two, if genuinely needed).
- Is it broken or damaged? If it’s chipped, cracked, or simply doesn’t work, it’s trash unless you plan to fix it immediately (and actually will).
Be Honest About Usage
Many items in our kitchens are “aspirational” – bought with good intentions but rarely used. That fancy bread maker, the juicer that’s a nightmare to clean, or the specialized gadget for a dish you make once a year. In a small kitchen, space is a premium. These items take up valuable real estate that could be used for things you use every day. This honesty is a tough but necessary part of your small kitchen declutter checklist.
Step 3: The “Keep, Donate/Sell, Toss” System
Now that you’ve assessed each item, it’s time to sort them into your designated piles. This systematic approach is crucial for efficiently working through your small kitchen declutter checklist.
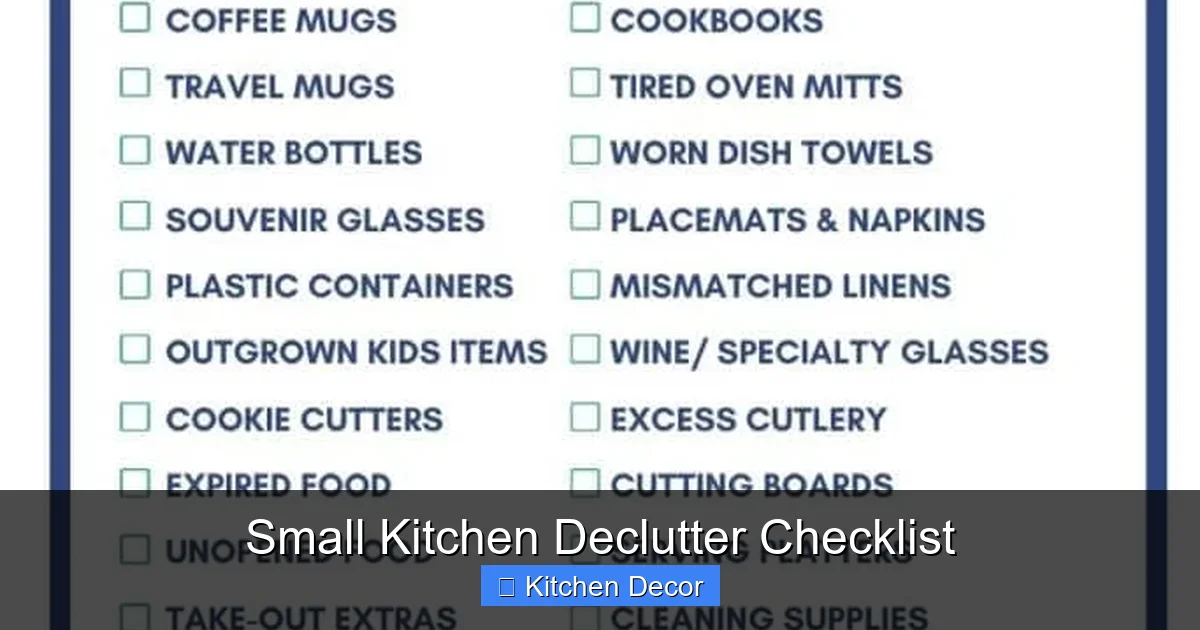
Visual guide about Small Kitchen Declutter Checklist
Image source: everydayoldhouse.com
The “Keep” Pile
These are the items that genuinely earn their spot back in your small kitchen. They are used frequently, loved, or absolutely essential. When deciding, think about the prime real estate in your kitchen. Only the best and most useful items should get to stay. Consider if an item is multi-functional – a stockpot that doubles as a pasta cooker, for instance, is a keeper.
The “Donate/Sell” Pile
This pile is for items that are in good condition but you no longer need or use. Think about kitchen gadgets you’ve upgraded, extra dishware, or small appliances that are perfectly functional but don’t fit your current lifestyle. Donating gives them a second life, and selling can earn you a little extra cash. Ensure items are clean and in working order before adding them here. This part of the small kitchen declutter checklist helps items find new homes.
The “Toss” Pile
This pile is for broken items, expired food, mismatched storage container lids without bottoms (or vice-versa), rusty pans, or anything that’s simply no longer functional or hygienic. Be ruthless! If it’s broken and you haven’t fixed it yet, you likely won’t. If it’s expired, it’s gone. Don’t let guilt keep junk in your small kitchen.
The “Relocate” Pile
Sometimes, items simply don’t belong in the kitchen. Are there tools, craft supplies, office items, or medicines that have migrated? Place them in this pile to be moved to their correct home after your kitchen declutter is complete. This keeps the focus squarely on your small kitchen declutter checklist.
Step 4: Optimize Your Cabinets and Drawers
Once you’ve sorted everything, it’s time to put back only the “Keep” items in an organized way. This is where strategic thinking really helps a small kitchen feel larger and more efficient.
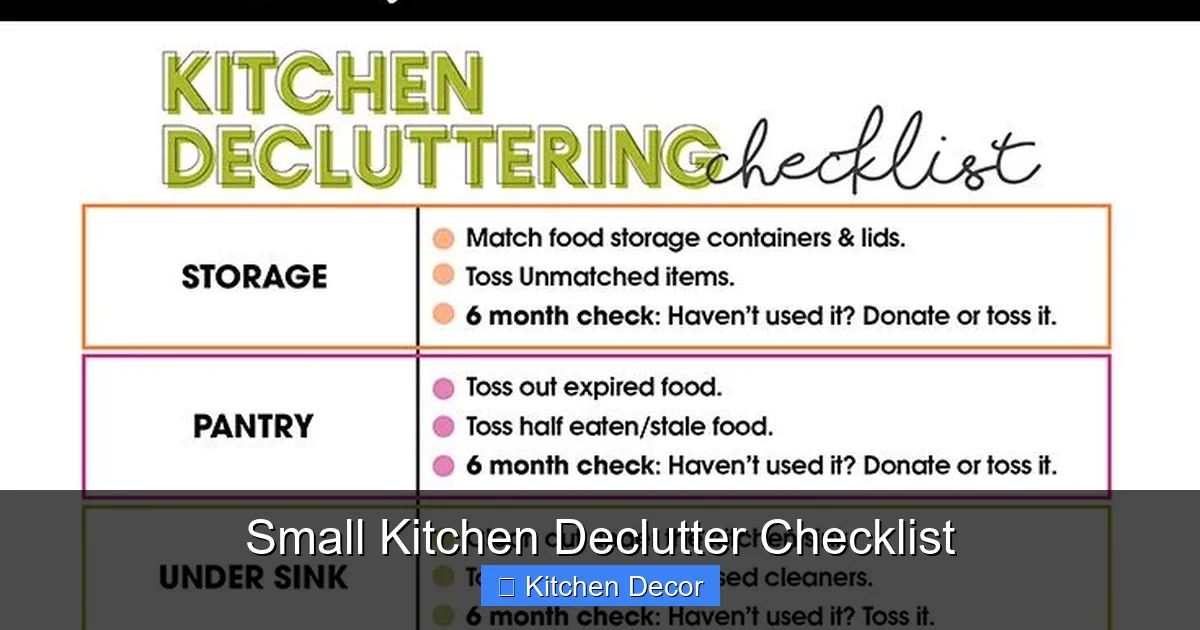
Visual guide about Small Kitchen Declutter Checklist
Image source: i.pinimg.com
Maximize Cabinet Space
- Zone for Function: Group similar items together. All baking supplies in one cabinet, all pots and pans near the stove, dishes near the dishwasher.
- Shelf Risers: These are lifesavers for creating vertical storage within cabinets. Stack plates, bowls, or mugs on them to double your capacity.
- Deep Cabinets: Use pull-out shelves or deep bins to easily access items at the back without having to unload the front.
- Lids and Pans: Store pot and pan lids vertically using tension rods or lid organizers. Stack pans by size, or use a pot rack if space allows.
Organize Drawers for Efficiency
- Drawer Dividers: Essential for keeping cutlery, utensils, and small gadgets from becoming a jumbled mess. Choose adjustable ones for flexibility.
- Nest and Stack: For smaller items like measuring cups and spoons, ensure they nest neatly.
- Designate Drawers: Assign specific categories to each drawer – one for baking tools, one for cooking utensils, one for wraps and foils.
Stackable Solutions
Look for containers and storage solutions that can stack securely. This applies to food storage containers, pantry bins, and even some dishware. Vertical stacking is paramount when working with a small kitchen declutter checklist.
Step 5: Tackle Your Countertops
Countertops are often the first casualty in a small kitchen. They quickly become dumping grounds for mail, keys, and rarely used appliances. Clearing them will instantly make your kitchen feel bigger and more inviting.
Embrace a “Less is More” Philosophy
Aim for minimal items on your countertops. Ask yourself: “Do I use this every single day?” If not, it probably belongs in a cabinet or drawer. This includes small appliances, decorative items, and anything that isn’t essential for immediate daily tasks.
Group Similar Items
If you absolutely must keep a few items on the counter (like olive oil, salt, and pepper), group them together on a small tray or in a caddy. This creates a visually cleaner look and makes daily wiping easier. A small kitchen declutter checklist emphasizes visual order.
Use Wall Space
Instead of occupying counter space, consider wall-mounted knife blocks, spice racks, or even paper towel holders. Command hooks can hold oven mitts or small utensils, freeing up valuable surface area.
Step 6: Organize Your Pantry (Even a Small One)
Whether you have a dedicated pantry closet or just a cabinet for food, organizing it is vital for efficient cooking and reducing waste. This is a critical section of your small kitchen declutter checklist.
Categorize and Contain
- Group Like Items: All baking supplies together, all pastas, all canned goods, all snacks.
- Clear Bins and Canisters: Use clear, airtight containers for dry goods like flour, sugar, pasta, and cereal. This keeps food fresh, looks tidy, and allows you to see what you have at a glance, preventing overbuying.
- Lazy Susans: Perfect for corners or deep shelves, allowing easy access to small jars and bottles.
Check Expiration Dates
Go through every item. Toss anything expired or stale. This is an important step often overlooked on a small kitchen declutter checklist.
Decant When Possible
Remove bulky packaging from items like cereal boxes, pasta, or snacks and transfer them into uniform, clear containers. This not only looks tidier but can often save space.
Step 7: Address Under the Sink
The space under the sink is notorious for becoming a chaotic collection of cleaning supplies, trash bags, and forgotten items. It’s often neglected on the small kitchen declutter checklist, but crucial.
Remove Everything
Just like with cabinets, pull everything out from under the sink. Wipe down the area thoroughly. Check for any leaks or water damage while it’s empty.
Contain Chemicals Safely
Keep cleaning products upright in small caddies or bins. This prevents spills and makes it easy to grab what you need. Consider child-proof locks if you have little ones.
Utilize Risers and Shelves
An under-sink shelf expander or a two-tier organizer can double your storage capacity in this awkward space. Use tension rods to hang spray bottles, freeing up the bottom. Your small kitchen declutter checklist should always include this often-messy zone.
Step 8: Vertical Space is Your Friend
In a small kitchen, the mantra is “go vertical!” Don’t forget the untapped potential of walls and the backs of doors.
Wall Shelves and Racks
Install floating shelves for cookbooks, decorative items, or frequently used spices. Magnetic knife strips are excellent for freeing up drawer space. Open shelving can also make a small kitchen feel more open, provided it’s kept tidy.
Pot and Pan Racks
If you have high ceilings, a hanging pot and pan rack can be a stylish and functional way to store cookware, freeing up precious cabinet space. For smaller kitchens, a wall-mounted rail with hooks for utensils and small pans can also work wonders.
Door Organizers
The back of a pantry door or a cabinet door can be perfect for hanging spice racks, measuring cups, or even a small cutting board with hooks. Over-the-cabinet door organizers can hold trash bags or cleaning cloths.
Step 9: Implement Smart Storage Solutions
Once you’ve decluttered, the right tools can help you maintain order. These thoughtful additions are key to solidifying your small kitchen declutter checklist.
Drawer Dividers and Inserts
Customizable bamboo or plastic dividers keep your utensils, gadgets, and odds and ends perfectly organized. No more rummaging!
Clear Containers
For pantry items, fridge leftovers, or even snacks, clear containers are invaluable. They let you see what you have, which prevents duplicate purchases and reduces food waste. Choose stackable, airtight options for maximum efficiency.
Magnetic Strips
Perfect for knives (freeing up drawer or counter space) or even for small metal spice tins. Install them on an empty wall section or inside a cabinet door.
Command Hooks
These temporary, damage-free hooks are incredibly versatile. Use them inside cabinet doors for oven mitts, measuring spoons, or dish towels. They can also hold lightweight cutting boards or utensils on a wall.
Rolling Carts
A slim rolling cart can provide extra counter space or storage for frequently used items, and can be tucked away when not in use. It’s a mobile storage hero for a small kitchen.
Appliance Garages
If you have a few small appliances you use frequently but don’t want on your counter, designate a cabinet or a section of your pantry as an “appliance garage.” This keeps them accessible but out of sight.
Step 10: Create a Maintenance Routine
Decluttering is not a one-time event. To keep your small kitchen organized and functional, you need to establish a consistent maintenance routine. This final step on your small kitchen declutter checklist is arguably the most important.
Daily Tidy-Up
Spend 5-10 minutes each evening doing a quick clean-up. Put away clean dishes, wipe down counters, and put items back in their designated spots. This prevents clutter from building up overnight.
Weekly Reset
Dedicate 30 minutes once a week for a deeper reset. Go through one drawer or a small section of a cabinet. Check expiration dates in the fridge. Give your counters a more thorough wipe-down. This helps catch clutter before it gets out of hand.
Quarterly Review
Every few months, revisit your small kitchen declutter checklist. Do a quick audit of your entire kitchen. Are there new items that have crept in? Are there items you’re no longer using? This regular review keeps your kitchen optimized and prevents backsliding.
The “One In, One Out” Rule
Whenever you buy a new kitchen item, commit to getting rid of an old one. This simple rule is powerful for preventing clutter accumulation, especially in a small kitchen. For example, if you buy a new coffee mug, get rid of an old one.
Troubleshooting Common Decluttering Challenges
Even with the best small kitchen declutter checklist, you might encounter hurdles. Here’s how to overcome some common issues.
“But I Might Need It Someday!”
This is the most common reason people hold onto clutter. For kitchen items, consider the “Rule of 20.” If you can replace an item for under $20 and acquire it in less than 20 minutes, then you probably don’t need to keep it “just in case.” Also, remember that space in a small kitchen is precious. Is the potential future use worth the daily clutter?
Dealing with Sentimental Items
Kitchens can hold sentimental value (grandma’s mixer, a gift from a loved one). If it’s truly cherished but rarely used, consider if it needs to be *in* the kitchen. Can it be displayed elsewhere? If not, and it’s taking up prime space, perhaps store it in a designated “memory box” outside the kitchen, or take a photo and let the item go.
When Storage Solutions Aren’t Enough
If you’ve decluttered ruthlessly and still feel you don’t have enough space, it might be time for a deeper assessment. Are you trying to fit a large family’s worth of items into a tiny kitchen? Do you truly need every single small appliance? Sometimes, a fundamental shift in what you *expect* to store in your kitchen is necessary. Consider multi-functional items (e.g., an instant pot instead of a slow cooker and a rice cooker).
Battling Clutter Drift
Clutter has a way of migrating back. To combat this, ensure every item has a designated home. If an item doesn’t have a home, it’s more likely to end up on the counter. Use your daily and weekly maintenance routines to immediately address items that are out of place. This consistent effort is vital for keeping your small kitchen declutter checklist effective long-term.
Conclusion
Congratulations! By following this small kitchen declutter checklist, you’ve taken significant steps toward transforming your cooking space. You’ve identified unused items, made tough decisions, and implemented smart storage solutions that truly maximize your small kitchen’s potential. Remember, decluttering is a journey, not a destination, especially in a high-traffic area like the kitchen. Your small kitchen declutter checklist will guide you.
The benefits of a decluttered kitchen extend far beyond just aesthetics. You’ll experience less stress, more efficient cooking, easier cleaning, and a greater sense of calm every time you step into your organized space. Embrace the joy of a functional, beautiful small kitchen. Keep up with your maintenance routine, and enjoy your newly reclaimed culinary haven!