Maximize your kitchen space instantly with simple DIY under cabinet shelves! These clever additions not only organize your essentials but also free up valuable countertop area, transforming your kitchen into a more functional and clutter-free zone. With a few basic materials and some easy steps, you can create customized shelves that fit perfectly under your cabinets, making better use of every inch of your space.
A quick solution to add extra storage is to install DIY under cabinet shelves, which are affordable, customizable, and simple to build. They help keep your belongings accessible and neatly organized without taking up additional room. In this article, you’ll discover practical tips and easy steps to craft your own shelves, turning your kitchen chaos into an organized haven.
In many homes, storage is limited, especially in the kitchen where space is precious. Thankfully, creating your own under cabinet shelves offers a budget-friendly way to increase storage and improve organization. By building these shelves yourself, you can tailor them to your specific needs and kitchen dimensions, saving money and ensuring a perfect fit. This project requires minimal tools and materials, making it accessible even for those new to DIY. Plus, once installed, these shelves will help you keep everything from spices to utensils within easy reach, reducing clutter and enhancing your cooking experience.

DIY under cabinet shelves for extra space
Why build your own under cabinet shelves?
Building your own shelves under cabinets is a great way to create extra storage without cluttering your space. It is also cost-effective and allows for customization to fit your unique needs. DIY shelves can be tailored to match your kitchen or workspace decor, making your environment both functional and attractive.
Planning your custom DIY shelves
Before starting, measure the available space carefully. Decide what you plan to store on these shelves to determine the right size and weight capacity. Sketch out a simple plan, including shelf dimensions and support placement, to guide your project.
Choosing the right materials
Select materials that are sturdy and suitable for your environment. Common options include:
- Wood: Plywood or solid wood for durability and a natural look.
- Metal: Steel or aluminum for a modern, industrial style.
- Laminate or veneer: For a polished finish that resists moisture.
Ensure the materials you choose can handle the weight of the items you plan to store.
Tools you’ll need
Gather essential tools to streamline your DIY project:
- Screwdriver or drill
- Measuring tape
- Level
- Saw (hand or power)
- Hammer (if needed)
- Sandpaper or a sander
- Clamps
Having all tools ready will help you work smoothly and efficiently.
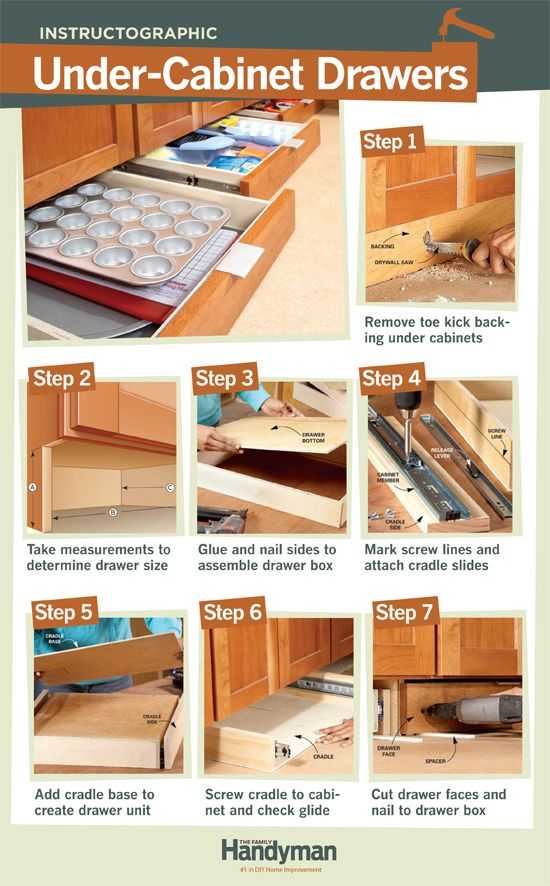
Step-by-step instructions for installing under cabinet shelves
Follow these simple steps to build your shelves:
Step 1: Measure and mark
Use a measuring tape and level to mark where each shelf will sit. Ensure the marks are even and level to prevent shelves from tilting.
Step 2: Cut the shelving material
Cut your chosen material to match your measurements. Sand the edges smooth to prevent splinters and make handling easier.
Step 3: Attach supports or brackets
Securely fasten supports or brackets to the underside of the cabinet using screws. Use a level to verify that supports are straight.
Step 4: Position and secure the shelves
Place the cut shelves on the supports or brackets. Secure the shelves with screws if your design requires it for extra stability.
Step 5: Finishing touches
If desired, paint or stain the shelves to match your decor. Seal the wood with a protective coat for moisture resistance, especially in kitchens.
Tips for ensuring safety and durability
It is essential to make strong support systems for your shelves. Use heavy-duty brackets if storing heavier items. Regularly check support screws and brackets for looseness and tighten as needed. Avoid overloading shelves beyond their capacity to prevent accidents and damage.
Creative ideas for customizing your DIY shelves
Personalize your shelves to fit your style and needs with these ideas:
- Painted designs: Use bright colors or patterns to add visual interest.
- Decorative brackets: Choose brackets with interesting shapes or finishes.
- Additional features: Incorporate hooks or magnetic strips for versatility.
- Lighting: Add LED strips underneath for a functional and aesthetic touch.
Such customization makes your shelves not only useful but also a part of your home decor.
Benefits of DIY under cabinet shelves
Building your own shelves offers several advantages. It saves money, provides tailored storage solutions, and gives a sense of accomplishment. Well-designed shelves can organize your space better, making daily tasks easier and more efficient.
Maintenance and care for your DIY shelves
Keep your shelves in top condition by cleaning them regularly with a soft cloth. Avoid overloading to prevent warping or damage. If you notice any loose screws or supports, tighten them promptly. Applying a fresh coat of paint or sealant periodically can prolong shelf lifespan and keep them looking new.
Additional considerations
Ensure your shelves are properly anchored to avoid accidents. If unsure about mounting techniques, consult tutorials or seek advice from DIY forums. Proper installation ensures your shelves will be safe and durable for years to come.
Related DIY projects for extra organization
Expand your organization with complementary projects such as:
- Adding drawer organizers
- Installing wall-mounted racks
- Creating custom spice racks
- Building storage bins for under-sink areas
These projects can maximize your space and keep everything neatly arranged.
Maximizing small spaces with clever shelving ideas
Use vertical space by stacking shelves or adding corner units. Incorporate multi-tier supports for more storage levels. Think about using translucent or light-colored materials to make your space feel larger and more open.
Choosing the right placement for your shelves
Place shelves where they will be most useful—near frequently used items or in awkward corners. Avoid blocking access to electrical outlets or vents. Consider the weight distribution when selecting support locations for safety.
Cost estimate and budgeting tips
DIY shelves can cost as little as a few dollars for basic materials. Budget for quality supports and tools to ensure longevity. Compare prices at local hardware stores and look for sales or discounts on materials.
Building DIY under cabinet shelves for extra space is straightforward, affordable, and highly customizable. It can significantly improve your storage options and make your home more organized. With some planning and effort, you can create shelves that are both functional and attractive, perfectly suited to your needs. Whether you’re storing daily essentials or decorative items, your new shelves will help keep your space tidy and inviting.
Easy! Convert Cabinet Shelves to Roll Outs for $10
Frequently Asked Questions
What tools and materials do I need to build DIY under cabinet shelves?
You will need basic carpentry tools such as a drill, screwdriver, level, measuring tape, and saw. For materials, gather sturdy wood or plywood for the shelves, brackets or cleats to support them, screws, and wall anchors if mounting onto drywall. Consider using waterproof or treated wood if the shelves might be exposed to moisture to ensure longevity.
How can I ensure my shelves are properly supported and won’t sag over time?
To prevent sagging, select brackets or supports that can handle the weight of your items. Use heavy-duty brackets and mount them into wall studs whenever possible for extra stability. Distribute weight evenly across the shelves, and avoid overloading them beyond their recommended capacity, which helps maintain their shape and functionality over time.
What measurement tips should I follow when designing my under cabinet shelves?
Measure the space carefully, considering the height, width, and depth of the area under your cabinets. Leave enough room for items you plan to store and ensure the shelves won’t interfere with cabinet doors or appliances. Use a level to mark even lines on the wall for precise placement, and double-check measurements before cutting or drilling.
Can I customize the thickness and height of my DIY shelves?
Yes, customizing the thickness and height allows you to tailor shelves to your storage needs. Thicker shelves support heavier items and provide a sturdy surface, while adjusting the height can maximize available space. Be mindful of the load capacity of your chosen materials and supports to ensure safety and durability.
What are some tips for maintaining and cleaning my under cabinet shelves?
Regularly dust and wipe down the shelves using a damp cloth to prevent dirt buildup. Avoid using harsh chemicals that might damage the material. Check frequently for signs of wear or loose supports, and tighten screws or replace brackets as needed. Proper maintenance helps your shelves stay functional and looking neat over time.
Final Thoughts
DIY under cabinet shelves for extra space offers a simple yet effective solution to maximize your storage. Installing these shelves requires minimal tools and allows customization to fit your needs.
By adding these shelves, you create more room for kitchen items, books, or decorative pieces. This easy project helps keep your space organized and functional.
In conclusion, incorporating DIY under cabinet shelves for extra space enhances your home by providing practical storage options and a personalized touch.