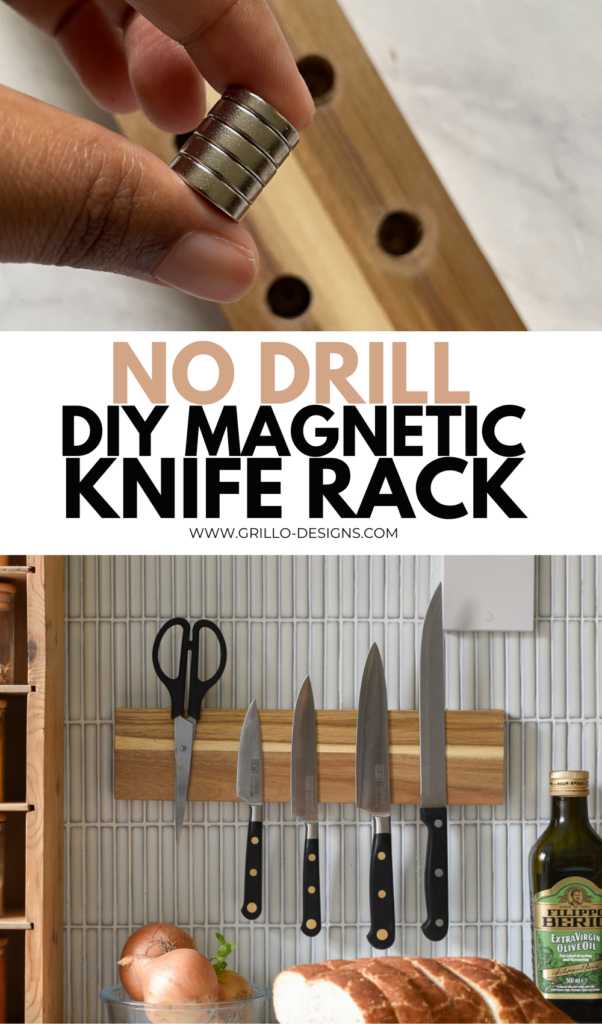
If you want to keep your knives organized and easily accessible, making your own magnetic knife strip is a simple and cost-effective solution. Just gather some basic materials like magnets and a sturdy base, and you can create a sleek, custom organizer that fits your kitchen perfectly. This DIY project not only saves money but also adds a personal touch to your culinary space.
To make your own magnetic knife strip, you’ll need strong magnets, a suitable backing like wood or metal, and some basic tools. Attach the magnets to the backing in an even pattern, ensuring they are secure. Once assembled, mount it on your wall, and you have a stylish, functional knife storage solution that keeps your blades safe and within reach.
Thinking about how to organize your knives without clutter? Making a magnetic knife strip is an easy and affordable way to do it. It allows you to display your knives proudly while keeping them safe and accessible. Plus, crafting your own adds a personal touch to your kitchen decor, making it both practical and stylish. Whether you’re a seasoned DIYer or a beginner, this project is perfect for creating a custom storage solution that suits your needs.

Make your own magnetic knife strip
Creating a magnetic knife strip at home is a smart and budget-friendly way to organize your kitchen. It keeps your knives safe, accessible, and adds a modern look to your space. Making your own gives you control over size, material, and style, fitting your kitchen perfectly. Let’s explore how you can design and build your own magnetic knife strip step by step.
Understanding the benefits of a homemade magnetic knife strip
Having a custom-made magnetic knife strip can improve your cooking experience. It saves counter space and keeps your knives within easy reach. Plus, it reduces clutter and makes your kitchen look tidy. Building your own also allows you to choose materials that match your décor and budget.
Safety and knife preservation
A well-made magnetic strip keeps knives securely in place, reducing risk of accidents. Properly designed strips prevent blades from bumping into each other, which helps keep them sharp. Making your own means you can customize wall height and angle for safe and easy access.
Cost savings and customization options
Compared to buying commercial magnetic strips, DIY options are much cheaper. You can customize length, width, and style to fit your space and preferences. Choose your favorite materials and finish to create a unique look for your kitchen.
Choosing the right materials for your magnetic knife strip
Selecting the proper materials is crucial for safety and durability. The main components include a sturdy base, a strong magnetic strip, and protective covers. Here are options to consider:
Base materials
- Wood: Popular choice for its aesthetic appeal and ease of customization. Hardwoods like oak or maple are durable and look great.
- Metal: Aluminum or steel bases are strong and modern, but may require additional finishing.
- Recycled materials: Using reclaimed wood or metal can be eco-friendly and unique.
Magnetic strip options
- Neodymium magnets: Provide powerful magnetic force essential for holding heavy knives securely.
- Magnetic sheets: Thin, flexible magnets that can be easily cut to size and attached to various bases.
Protective covering
Using a protective surface helps preserve your knives’ blades. Options include:
- Rubber strips: Offer cushioning and prevent blades from scratching.
- Leather: Adds style and soft backing for blades.
- Paint or sealant: Protects the wood or metal from moisture and wear.
Gathering tools and supplies
Before starting, gather everything needed to build your magnetic knife strip efficiently. Here’s a list:
- Wood or metal base material
- Strong magnets (neodymium or magnetic sheets)
- Adhesive (industrial-strength glue or double-sided tape)
- Cutting tools (saw, scissors, utility knife)
- Drill and screws (if mounting with hardware)
- Sandpaper or file
- Sealant or varnish (optional)
- Measuring tape and ruler
- Pencil or marker for marking
Step-by-step process to make your magnetic knife strip
Follow these instructions carefully to create a secure and attractive magnetic knife holder.
Step 1: Measure and cut your base material
Decide on the appropriate length and width for your kitchen space. Use the measuring tape to mark your chosen size. Cut the base material using the saw or scissors, ensuring clean edges.
Step 2: Prepare the magnetic strip
Cut the magnetic sheet or arrange neodymium magnets to match the length of your base. If using magnetic sheets, cut them with scissors. For individual magnets, glue or attach them evenly along the back of the base.
Step 3: Attach the magnets securely
Apply a strong adhesive on the back of each magnet before sticking them onto the base. Press firmly and ensure they are aligned straight. Allow sufficient drying time as per the adhesive instructions.
Step 4: Finish the surface
Sand any rough edges of your base for a smooth finish. If desired, paint, stain, or seal the surface to match your kitchen decor. Let the finish dry completely before mounting.
Step 5: Install the magnetic knife strip
Decide where you want to mount your strip on the wall. Use a level to ensure it’s straight. Secure it with screws or hooks, making sure it’s firmly attached. Now you’re ready to hang your knives!
Additional tips for a successful DIY magnetic knife strip
Making your own magnetic strip can be simple and rewarding with these tips:
Ensuring strength and safety
Use enough magnets to hold knives securely, especially heavier ones. Test the strip with different knives before final mounting.
Proper positioning on the wall
Place the strip at a comfortable height for easy access. Keep it away from water sources or humid areas to prevent rust or damage.
Creative design ideas
Decorate the wooden base with paint or stencils for a personalized touch. Add hooks or small shelves for additional storage options.
Maintaining your magnetic knife strip
Regular cleaning ensures your magnetic strip stays effective and attractive. Use a damp cloth to wipe away dust or debris. Check the magnets periodically to confirm they hold knives securely.
Related topics to consider
In addition to making a magnetic knife strip, you might explore:
- Building other kitchen organizers like spice racks or utensil holders
- Choosing the best knives for your kitchen
- Tips for maintaining and sharpening knives
- Creative ways to decorate your kitchen with DIY projects
Designing your own magnetic knife strip combines functionality with customization. By choosing the right materials and following the steps carefully, you can create a safe, attractive, and unique piece for your kitchen. This project not only saves money but also adds a personal touch to your culinary space.
Make a Magnetic Knife Holder 3 Different Ways
Frequently Asked Questions
What materials are best suited for creating a DIY magnetic knife strip?
Opt for sturdy materials like wood, metal strips, or MDF boards as the base. To add magnetic properties, attach strong magnets such as neodymium or ferrite magnets. These materials ensure the strip holds knives securely and is durable for everyday use.
How do I attach magnets effectively to ensure my knife strip holds securely?
Apply a strong adhesive, like epoxy or super glue, to secure the magnets onto your chosen base material. Position the magnets evenly to distribute magnetic force uniformly. Testing the strength after installation helps confirm that knives stay in place safely.
Can I customize the length and design of my homemade magnetic knife strip?
Absolutely. Measure your available space and cut the base material to your desired length. You can paint, stain, or add decorative elements to match your kitchen style. Customizing the design allows you to create a functional and attractive storage solution that fits perfectly in your space.
What safety precautions should I take when making a magnetic knife strip?
Wear gloves when handling magnets to prevent injuries from snapping magnets. Work in a well-ventilated area if you’re using adhesives or paints. Keep magnets away from electronic devices and credit cards to avoid damage. Ensuring proper handling during assembly keeps the process safe and effective.
How can I ensure my homemade magnetic strip is long-lasting and resistant to wear?
Choose high-quality magnets and secure them firmly with durable adhesives. Protect the surface with a sealant or varnish to prevent moisture damage and scratches. Regularly check that the magnets remain secure and clean the strip to maintain its magnetic effectiveness.
Final Thoughts
Making your own magnetic knife strip offers a practical and customizable kitchen solution. It allows you to design a space that fits your needs perfectly and saves counter space. Using simple materials, you can create a stylish, functional organizer.
In conclusion, make your own magnetic knife strip to enhance your kitchen’s organization and style efficiently. It provides a cost-effective way to keep your knives accessible and safe. Enjoy the process and the customized touch it brings to your space.