Looking to make your deep cabinets more accessible and organized without spending a fortune? Pull-out shelves are the perfect solution to maximize storage space and eliminate the hassle of reaching into the back of those deep cabinets. Instead of struggling to find what you need or installing expensive custom solutions, a simple DIY project can give you the convenience you crave. With a few basic tools and materials, you can build sturdy pull-out shelves tailored to your cabinet’s dimensions, making your kitchen more functional and less cluttered. This guide will walk you through easy steps to create your own pull-out shelves, transforming your deep cabinets into efficient storage spaces without breaking the bank.
In short, DIY pull-out shelves are a cost-effective way to improve access in deep cabinets. They are simple to build with common tools and can be customized to fit your space perfectly. This project not only enhances organization but also saves time and effort when retrieving stored items. Whether you’re a seasoned DIYer or a beginner, creating your own pull-out shelves is a rewarding and practical upgrade for your kitchen.

DIY Pull Out Shelves for Deep Cabinets: A Step-by-Step Guide to Better Storage
Understanding the Need for Pull Out Shelves
Deep cabinets often pose a challenge when it comes to accessing items stored at the back. Without proper organization, reaching for pots, pans, or pantry items can become frustrating. Installing DIY pull out shelves helps improve accessibility and keeps your space organized.
Pull out shelves make it easier to see everything stored inside deep cabinets at a glance. They prevent the need to crawl into a cabinet or remove multiple items to reach what’s at the back. This simple upgrade can save time and reduce clutter.
Benefits of Installing DIY Pull Out Shelves
- Enhanced Accessibility: Reach all items easily without stretching or crawling.
- Better Organization: Group similar items for quick retrieval.
- Saves Space: Use your cabinet space more efficiently by stacking items properly.
- Cost-Effective: Build your own shelves instead of buying expensive commercial units.
- Custom Fit: Create shelves that perfectly fit your cabinet dimensions.
Tools and Materials Needed
Before starting, gather these essential tools:
- Saw (circular saw or hand saw)
- Drill and drill bits
- Screwdriver
- Measuring tape
- Level
- Pencil for marking
- Clamps (optional but helpful)
And for materials:
- Plywood or solid wood planks (depending on desired strength)
- Slide rails or drawer slides (heavy-duty for weight)
- Screws and wood glue
- Sandpaper for smooth edges
- Finish or paint (optional for aesthetics)
Measuring Your Space Accurately
Start by measuring the interior dimensions of your deep cabinet. Measure the width, depth, and height where you want to install the shelves.
Make note of any obstructions like hinges or handles that could affect shelf placement. Write down these measurements for reference during cutting.
It’s best to add a small margin (around 1/8 inch) to the width and depth measurements for easier installation and movement.
Designing Your Pull Out Shelves
Selecting the Right Size and Style
Decide on the number of shelves based on your storage needs. For example, dividing a 24-inch deep cabinet into three 8-inch shelves usually works well.
Consider whether you want full extension slides for easy access or partial extension. Full extension slides allow you to pull out the shelf entirely.
Think about whether you prefer open shelving or adding a front lip to prevent items from falling off.
Determining Shelf Dimensions
- Width: Match the interior width of your cabinet minus a small clearance for sliding.
- Depth: Usually about 18 to 20 inches for typical deep cabinets.
- Height: Set the height based on what you plan to store and the available space.
Cutting and Preparing the Shelves
Use your measurements to mark the wood with a pencil. Cut the plywood or wood planks to size using a saw. Smooth the edges with sandpaper to prevent splinters.
If you’re adding a front lip or side panels, measure and cut these pieces accordingly. Sand all surfaces for a professional finish.
Pre-drill holes to prevent wood splitting when attaching slides or brackets.
Installing the Sliding Mechanism
Attaching Slides to Shelves
Follow the manufacturer’s instructions to attach the slide rails to the sides of your shelves. Ensure they are perfectly aligned for smooth operation.
Use a level during installation to keep the slides straight and prevent binding.
Screw the slides into place securely, making sure they are flush with the shelf edges.
Mounting Shelves in the Cabinet
Attach the corresponding slide parts to the inside walls of the cabinet. Use a level to confirm the slides are aligned horizontally.
Slide the shelves into the mounted slides, testing for smooth movement. Adjust if necessary.
Secure any additional brackets or supports needed for stability, especially if the shelf will hold heavy items.
Enhancing Functionality and Safety
Adding soft-close mechanisms or bumpers can make your pull out shelves quieter and prevent sudden stops. These accessories are easy to install and extend the lifespan of your shelves.
Consider labeling shelves or using baskets for small items, making retrieval even simpler.
Always check for stability before loading shelves with heavy or delicate items to ensure safety.
Maintaining Your DIY Pull Out Shelves
- Periodically clean the slides and tracks to prevent dust buildup.
- Lubricate the slides if movement becomes stiff. Use a silicone-based lubricant for best results.
- Inspect screws and brackets regularly, tightening as needed to keep shelves secure.
- Replace worn components promptly to maintain smooth operation.
Tips for a Successful DIY Project
- Plan your design carefully to match your storage needs.
- Take accurate measurements to ensure proper fit and function.
- Use quality slides for durability and smooth operation.
- Follow safety precautions when cutting and drilling.
- Don’t rush; take your time to measure and assemble accurately.
Additional Ideas for Deep Cabinets
- Install dividers or baskets inside shelves to organize smaller items.
- Use non-slip pads to keep items from shifting during pull-outs.
- Paint or stain shelves for a finish that matches your cabinet or décor.
Related Topics
- How to Install Lazy Susans in Deep Cabinets
- Best Storage Solutions for Pantry Cabinets
- Choosing the Right Drawer Slides for Heavy Cabinets
Creating your own pull out shelves for deep cabinets is a straightforward project that can lead to better organization and easier access. With proper planning, the right tools, and careful execution, you can significantly improve your kitchen or storage space. Remember, measuring twice and working patiently will result in a professional-looking and functional upgrade. Happy building!
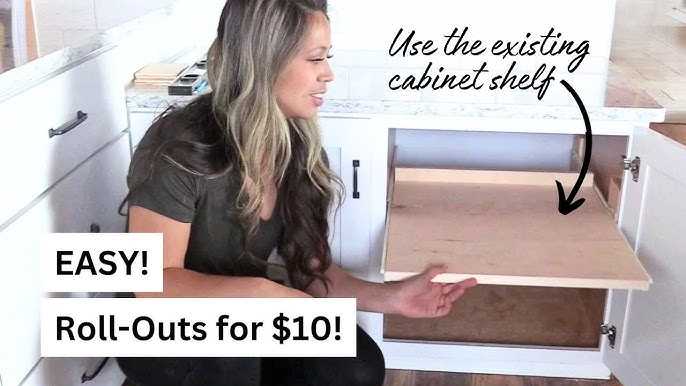
Easy! Convert Cabinet Shelves to Roll Outs for $10
Frequently Asked Questions
How can I measure my cabinets accurately for installing pull-out shelves?
To measure your cabinets accurately, start by removing any existing shelves. Use a tape measure to determine the interior width, depth, and height of the space. Record these measurements carefully, accounting for any obstructions or irregularities inside the cabinet. It’s a good idea to measure at multiple points to ensure consistency. This way, you can customize your pull-out shelves to fit perfectly and function smoothly.
What tools and materials do I need to build DIY pull-out shelves?
You will need a saw (such as a circular saw or hand saw), a drill with various drill bits, a screwdriver, a measuring tape, and a level. Materials include wooden boards or plywood for the shelves, side panels or slides for the pull-out mechanism, screws, and possibly drawer handles. Choosing quality materials helps ensure the shelves are durable and operate smoothly. Having all tools and supplies ready before beginning saves time and makes the process easier.
How do I ensure my DIY pull-out shelves will support the weight of stored items?
Choose strong, sturdy materials like plywood or hardwood for your shelves. Reinforce the sides with additional brackets or supports if necessary. When attaching slides or runners, select high-quality options rated for the weight you plan to store. Properly secure all components using appropriate screws and ensure they are aligned correctly. Testing the shelves with weight gradually will help you confirm their capacity and stability.
Can I customize the depth and height of my pull-out shelves?
Yes, you can customize the depth and height of your shelves during the measurement and cutting process. Measure the interior dimensions of your cabinet carefully, and cut the shelves and side panels to fit those measurements. Consider leaving a small gap for ease of sliding and to prevent jamming. Customization allows you to optimize space usage based on what you plan to store, whether it’s tall bottles, small containers, or other items.
What are some common challenges faced during DIY pull-out shelf installation?
Common challenges include ensuring precise measurements, aligning the slides correctly, and securing components firmly. Misalignment may cause shelves to jam or not slide smoothly. To avoid these issues, double-check measurements, use a level during installation, and follow the manufacturer’s instructions carefully. Patience and attention to detail help create a functional, long-lasting pull-out system in your deep cabinets.
Final Thoughts
DIY pull out shelves for deep cabinets offer an affordable and practical solution for better storage management. They make accessing items easier and help keep your space organized. Building these shelves requires simple tools and straightforward steps, making it accessible for any DIY enthusiast. In conclusion, creating your own DIY pull out shelves for deep cabinets enhances functionality and maximizes storage efficiency easily and effectively.