Looking to maximize your kitchen space and make meal prep more efficient? A DIY pull-out cutting board hack is the perfect solution to keep your countertops clutter-free while providing a handy workspace. By creating a sliding cutting board that easily tucks away when not in use, you can enjoy a cleaner, more organized kitchen.
In short, this hack involves converting a small section of your cabinet or countertop into a pull-out platform equipped with a durable cutting board. It’s simple to build with basic tools and materials, and it instantly adds functionality to your kitchen. Whether you want to save space or improve your cooking flow, this DIY project is a smart and practical fix that transforms your kitchen into a more streamlined space.
If you’re tired of cluttered counters and want a clever way to keep your cutting board handy yet hidden, this hack is for you. It’s easy to do, budget-friendly, and customizes your kitchen to suit your needs perfectly. Keep reading to learn how to craft your own pull-out cutting board and make meal prep easier than ever.

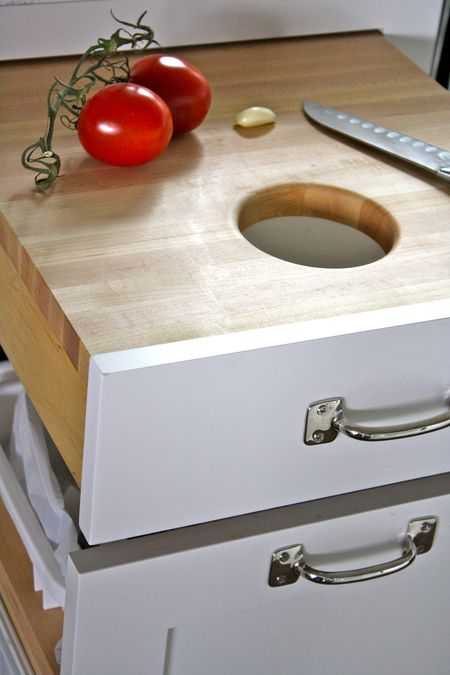
DIY pull out cutting board hack
Creating a pull out cutting board in your kitchen cabinet can make food prep easier and more convenient. This DIY project combines functionality with a simple design that saves space. It is an affordable way to add a valuable feature to your kitchen without expensive renovations.
Why choose a pull out cutting board?
A pull out cutting board adds versatility to your kitchen. It allows you to have a dedicated space for chopping and slicing that can be tucked away when not in use. This feature helps keep your countertops clear and reduces clutter. It is especially useful for small kitchens where space is limited.
Materials needed for your DIY pull out cutting board
Before starting your project, gather all the necessary materials to ensure a smooth build. Here is a list of common supplies:
- Wooden board (size depends on your cabinet dimensions)
- Adjustable drawer slides
- Screws compatible with your slides and wood
- Measuring tape
- Drill with drill bits
- Saw (preferably a circular saw or hand saw)
- Sandpaper or a sander
- Wood finish or sealant (optional for durability)
- Handles or pull knobs (optional for easier access)
Choosing the right wood for your cutting board
Select a durable, food-safe wood for your cutting surface. Hardwoods such as maple, oak, or beech tend to work well due to their resilience and ease of cleaning. Avoid softwoods like pine or cedar, which can dent easily and harbor bacteria.
Measuring and planning your pull out board
Accurate measurements are critical for a functional pull out cutting board. Measure the interior width, height, and depth of your cabinet opening. Decide on the size of the board, remembering to leave some space around for slides and mounting hardware.
Sketch a simple plan, noting where the slides will be attached. Ensuring the board fits snugly without excess play will help it slide smoothly and stay stable during use.
Preparing the wood
Cut your wooden board according to your measurements. Use a saw to achieve a clean, straight edge. Sand all surfaces thoroughly, especially the edges, to prevent splinters and give the surface a smooth finish.
If desired, apply a food-safe sealant or finish to protect the wood from moisture and stains. Let the finish dry completely before proceeding.
Installing the drawer slides
Attach the drawer slides to your wood panel first. Follow the manufacturer’s instructions carefully. Usually, you will secure one part of the slide to the edges of the board and the other to the inside of the cabinet.
Use a level to ensure the slides are straight. Proper alignment ensures smooth operation and prevents jamming.
Mounting the pull out board in your cabinet
Position the board inside the cabinet, lining up the slides. Carefully slide it in to confirm it moves smoothly and fits well. Adjust if necessary by loosening and repositioning the slides.
Secure the slides firmly to both the board and the cabinet with screws. Double-check stability and ease of movement before finishing.
Adding handles or pull knobs
For easier access, consider installing handles or knobs on the front of your pull out cutting board. Choose hardware that complements your kitchen style and provides a comfortable grip.
Attach the handles securely with screws, ensuring they do not interfere with the sliding mechanism. Handles also add a finished look to your project.
Enhancing the functionality of your pull out cutting board
Make your DIY pull out cutting board even more useful with these additions:
- Non-slip pads: Attach pads underneath the board to prevent slipping during use.
- Divider or compartments: Use small boards or inserts to organize ingredients or tools.
- Over-the-counter storage: Install hooks or small baskets underneath for holding knives or utensils.
Maintaining your pull out cutting board
Regular cleaning is essential for food safety. Wash your board with warm, soapy water after each use. Avoid soaking or using abrasive scrubbers that can damage the surface.
Periodically reapply a food-safe finish to maintain the wood’s durability. Keep the slides clean and lubricated to ensure smooth operation over time.
Tips for a successful DIY project
Ensure precise measurements and take your time during assembly. Using quality materials results in a more durable and attractive finish. Don’t rush the sanding process—it impacts the comfort and safety of your cutting surface.
If you are new to woodworking, consider watching tutorials online or seeking advice from experienced DIYers. Remember, patience and attention to detail lead to the best results.
Related DIY projects to consider
If you enjoyed creating your pull out cutting board, you might also like these projects:
- Custom spice rack: Organize your spices within easy reach.
- Hidden trash can: Save space and hide waste bins under the sink or in cabinets.
- Pull out pot and pan storage: Maximize cabinet space with pull out shelves.
Benefits of a DIY pull out cutting board
This project offers multiple benefits beyond saving space. It provides a dedicated chopping station that keeps your counters clear. Additionally, customizing it to fit your cabinet makes it a perfect fit for your kitchen.
Finally, building it yourself allows you to choose quality materials and design features that suit your needs and style. This investment in your kitchen improves both function and appearance.
Brilliant Kitchen Hack! Save Counter Space with This Pull-Out Cutting Board 🍽️✨
Frequently Asked Questions
How can I ensure the pull-out cutting board stays securely in place during use?
To keep the pull-out cutting board stable, use sturdy sliding tracks or rails designed for kitchen drawers. Install a locking mechanism or latch to prevent the board from shifting when not in use. Additionally, choosing a cutting board that fits snugly within the compartment helps maintain stability during chopping or slicing tasks.
What materials work best for creating a DIY pull-out cutting board?
Select durable, food-safe materials such as hardwoods like maple or bamboo for the cutting surface, which resist knife marks and are easy to clean. For the sliding mechanism, high-quality metal or heavy-duty plastic rails ensure smooth operation and longevity. Combining these materials results in a functional and long-lasting pull-out cutting board.
Can I install a pull-out cutting board in any kitchen cabinet?
While many cabinets can accommodate a pull-out cutting board, check the internal dimensions to ensure the space is adequate. Measure the height, width, and depth carefully before installation. If your cabinet has adjustable shelves or sufficient clearance, you can retrofit it with a custom or pre-made pull-out unit without major modifications.
What are some tips for maintaining and cleaning my DIY pull-out cutting board?
Clean the cutting surface with warm soapy water after each use, and periodically sanitize with a mixture of vinegar and water or food-safe disinfectant. Avoid soaking the board and ensure it dries completely to prevent warping or mold growth. Regularly inspect sliding tracks for debris or corrosion and lubricate them as needed for smooth operation.
How can I customize the size of my pull-out cutting board to fit my needs?
Measure the available space within your cabinet carefully, then cut or select a board that matches those dimensions. You can also add extensions or redesign the slide mechanism to accommodate larger or smaller boards. Planning ahead and tailoring the size ensures the board functions effectively without wasting space or compromising stability.
Final Thoughts
A DIY pull out cutting board hack offers a simple solution to save space and improve kitchen organization. By installing a sliding mechanism, you can conveniently access your cutting board whenever needed without cluttering your countertops. This easy project requires minimal tools and instant gratification.
Implementing this hack enhances efficiency and keeps your kitchen tidy. It’s a practical upgrade that anyone can achieve with basic skills. Ultimately, the DIY pull out cutting board hack proves how small adjustments can make everyday tasks more comfortable and accessible.