Quick answer: Use distinct zones with clear boundaries, such as island counters or designated countertops, and organize tools and storage separately for cooking and prepping. Incorporate visual cues like different flooring, lighting, or color schemes to differentiate these areas effectively.
Creating an efficient kitchen layout that clearly divides cooking and prep zones can dramatically improve both functionality and flow. By logically separating these spaces, you reduce clutter, streamline your workflow, and make cooking more enjoyable. The key lies in thoughtful placement—positioning prep counters near the sink and fridge for easy access, and setting up cooking stations away from busy prep areas. Incorporating visual cues like contrasting flooring or color themes further enhances clarity. Properly dividing these zones helps prevent cross-traffic, keeps messes contained, and ensures everything is within reach when needed. With a little planning, your kitchen can become a well-organized, welcoming space that simplifies meal preparation and encourages efficiency.

How to divide cooking and prep zones in a layout
Understanding the importance of zoning in kitchen design
Dividing your kitchen into distinct zones can make cooking more efficient and enjoyable. It helps reduce clutter and minimizes movement between tasks. Well-planned zones also improve safety by keeping hot or sharp tools separate from prep stations.
Key considerations before designing your zones
Before creating zones, consider the size of your kitchen and your cooking habits. Think about how many people use the space and what appliances or tools you use most often. Prioritize accessibility and flow to ensure each zone feels natural and practical.
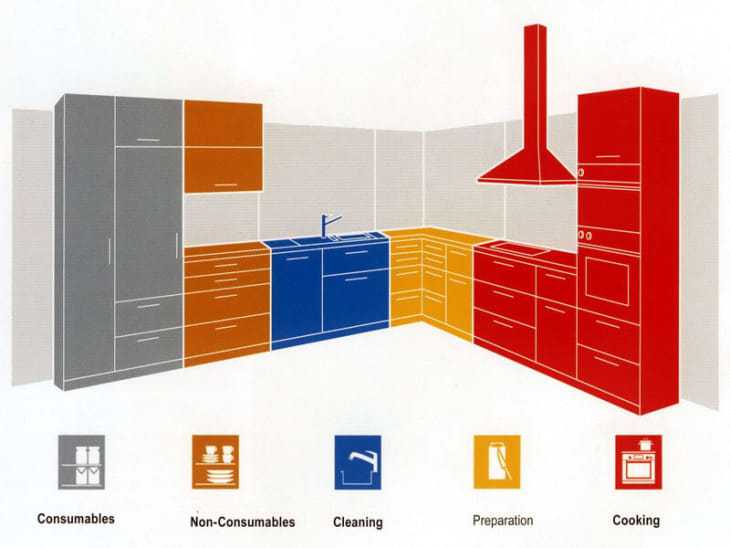
Core zones in a functional kitchen layout
Most kitchens benefit from three primary zones: prep, cooking, and cleaning. Sometimes, an additional storage zone is added. Recognizing these core zones helps in organizing your kitchen logically for smoother workflows.
How to define the prep zone
The prep zone should be close to your main storage and refrigerator. It’s the area where you chop, mix, and assemble ingredients. Make sure it has ample counter space and easy access to knives, cutting boards, and mixing bowls.
Design tips for an effective prep zone
- Place frequently used tools within reach
- Use a large, sturdy countertop surface
- Include task lighting for better visibility
- Keep ingredients easily accessible, possibly in nearby drawers or cabinets
Creating an efficient cooking zone
The cooking zone contains your stove, oven, and microwave. It should be positioned near the prep area but also allow easy access to ventilation, such as an exhaust fan. This layout minimizes movement and keeps your cooking space safe.
Key features of a well-designed cooking zone
- Stove and oven aligned for easy transfer of ingredients
- Nearby countertop for placing hot pots or pans
- Accessible storage for pots, pans, and utensils
- Good ventilation system to clear smoke and odors
Designing the cleaning zone
The cleaning zone typically includes your sink, dishwasher, and trash. Place it near the cooking zone for convenience but separate enough to prevent splashes from reaching other areas. Good water supply and drainage are essential here.
Tips for an effective cleaning area
- Position near the plumbing lines for easy installation
- Include space for drying dishes or sorting recyclables
- Ensure easy access to cleaning supplies and trash bins
- Use a durable countertop surface that resists water damage
Arranging storage zones for maximum efficiency
Storage zones are crucial for keeping your kitchen organized. They should be close to their respective activity zones for quick access. For example, Pantry items near prep, cookware near the stove, and cleaning supplies near the sink.
Types of storage zones and their placement
| Zone | Items Stored | Best Placement |
|---|---|---|
| Pantry | Dry goods, canned foods | Near prep area |
| Cookware | Pots, pans, baking sheets | Near stove and oven |
| Utensils | Spoons, spatulas, knives | Near prep and cooking zones |
| Cleaning supplies | Detergents, scrub brushes | Near sink and trash area |
Creating a smooth workflow between zones
Arrange your zones in a logical sequence that matches your cooking process. The typical flow is from storage to prep, then to cooking, and finally to cleaning. Avoid crossing paths or creating bottlenecks to keep your kitchen efficient.
Strategies for seamless transitions
- Align zones along a natural work triangle
- Maintain clear paths without obstructions
- Ensure sufficient counter space between zones
- Use visual cues like lighting or color to distinguish areas
Use of layout styles to divide zones
Different layout styles can help visually and practically separate zones. Common styles like U-shape, L-shape, galley, or open-plan kitchens offer unique advantages for zone placement.
U-shape layout
This style provides a closed workspace, ideal for separating prep, cooking, and cleaning zones. It offers ample storage and surface area for each zone.
L-shape layout
An L-shape is versatile and can be customized for compact or spacious kitchens. It allows for good separation of zones while maintaining open flow.
Galley layout
The galley design is perfect for efficient use of small spaces, with zones aligned along two parallel counters. It encourages a linear workflow.
Open-plan layout
Open-plan kitchens combine zones into a large, communal space. Use island counters or different flooring to visually define each zone.
Incorporating technology for better zoning
Smart kitchen devices can help organize zones more effectively. Automated lighting, sensor-activated faucets, and smart storage solutions enhance functionality.
Smart storage options
- Pull-out pantry shelves for easy access
- Motorized cabinets or drawers for difficult-to-reach spots
- Labeling systems for quick identification
High-tech appliances
Invest in appliances with Bluetooth or Wi-Fi connectivity. They allow you to monitor and control from your phone, making zone management smarter and more efficient.
Maintaining your zones for long-term functionality
Regular cleaning, organization, and assessment help keep your zones working smoothly. Adjustments may be necessary as your cooking habits evolve.
Tips for upkeep
- Declutter countertops and cabinets periodically
- Store appliances not in use to reduce clutter
- Label storage areas for easier access
- Schedule regular deep cleaning of appliances and surfaces
Adapting zones to your lifestyle
Your ideal kitchen layout should reflect your daily routines and preferences. Consider customizing zones for specific needs, such as baking stations or beverage areas.
Personalization tips
- Create a baking corner with dedicated ingredients and tools
- Designate a wine or coffee station for beverage enthusiasts
- Set aside space for kids’ activities or homework stations
Final thoughts on dividing cooking and prep zones
Organizing your kitchen into well-defined zones enhances efficiency, safety, and enjoyment. Focus on logical placement, accessibility, and flow to create a space that works for you. With thoughtful planning and adaptable design, your kitchen can become a harmonious environment tailored to your cooking style.
How to Fix a Messy Kitchen: Separate Wet & Dry Zones!
Frequently Asked Questions
What are effective ways to define distinct cooking and prep areas in a kitchen layout?
To clearly differentiate cooking and prep zones, allocate specific areas based on their functions. Use changes in flooring materials, such as different tiles or rugs, to visually separate these spaces. Incorporate counters or islands to serve as natural boundaries, and position appliances logically to support workflow. Ensuring each zone has dedicated storage and tools can also help maintain order and functionality.
How can flow and accessibility be optimized between the cooking and prep sections?
Arrange the layout so that movement between the prep and cooking zones is smooth and direct. Place frequently used items and appliances close to each other to minimize unnecessary steps. Design pathways wide enough for easy passage and ensure that each zone is easily reachable without crossing other work areas frequently. Proper lighting and logical placement contribute to efficient access and safety.
What design elements can be used to visually distinguish the prep from the cooking zone?
Use visual cues such as different countertop materials, color schemes, or lighting styles to create a clear distinction. Installing a low partition or a half-wall can also separate the spaces without blocking sightlines. Additionally, incorporating decorative elements like open shelving or specific kitchen accessories in each zone reinforces their individual purpose and helps organize the workflow.
Final Thoughts
How to divide cooking and prep zones in a layout involves strategic placement and clear boundaries. Use islands or countertops to create physical separation, ensuring each zone has enough space. Incorporate different flooring or color schemes for visual distinction.
Properly dividing these zones improves workflow and safety, making cooking more efficient. Keep frequently used items within easy reach in each area. Well-planned divisions make your kitchen functional and inviting for everyday tasks.