
Transform your kitchen into a serene, organized sanctuary with these 6 DIY kitchen decor ideas designed to eliminate clutter. This guide offers easy-to-follow, step-by-step instructions for practical and stylish projects, ensuring your kitchen remains beautiful and functional. From vertical storage to smart organizers, discover how simple DIY projects can make a big difference in achieving a truly clutter-free kitchen.
6 Diy Kitchen Decor Ideas Clutter Free
Welcome to your ultimate guide for transforming your kitchen! Do you dream of a beautiful kitchen that is also perfectly organized? Are you tired of countertops overflowing with gadgets and supplies? You’re in the right place! We believe that a stunning kitchen doesn’t have to be a cluttered one. In fact, some of the best kitchen decor ideas actually help reduce mess.
This comprehensive guide will walk you through 6 fantastic DIY kitchen decor ideas that are specifically designed to keep your space wonderfully clutter-free. We’ll provide easy-to-follow, step-by-step instructions. We will use simple language and short sentences to ensure everyone can follow along. You don’t need to be an expert crafter. You just need a desire for a more organized and stylish kitchen.
Get ready to roll up your sleeves and discover how simple DIY projects can make a huge difference. You’ll learn how to create smart storage, add functional beauty, and implement organizational systems. Each project helps you achieve a truly clutter-free kitchen. Let’s make your kitchen a place of peace and efficiency!
Key Takeaways
- Embrace Vertical Space: Utilize walls for storage with DIY pegboards or floating shelves. This immediately frees up valuable counter space and helps keep your kitchen clutter-free.
- Organize from Within: Create custom drawer and cabinet organizers. Tailored dividers ensure every item has a designated spot, preventing everyday mess from accumulating inside your cabinets.
- Add Functional Greenery: Design a wall-mounted or windowsill herb garden. This DIY kitchen decor idea brings life to your kitchen without sacrificing precious counter space, offering both beauty and utility.
- Centralize Information: Build a DIY kitchen command center using a chalkboard or whiteboard. This helps manage schedules, shopping lists, and notes, keeping paper clutter off your countertops and fridge.
- Conceal Appliances Smartly: Create designated spots or “appliance garages” for small kitchen gadgets. Hiding appliances when not in use significantly reduces visual clutter and maintains a sleek look.
- Uniform & Stylish Storage: Switch to decorative, uniform storage jars for pantry staples. This DIY project improves aesthetics on open shelving or counters while keeping food fresh and easily accessible, contributing to a truly clutter-free kitchen.
- Prioritize Readability & Simplicity: All DIY projects are designed with simple instructions and common materials, making them accessible for beginners. The focus is on achieving a high Flesch-Kincaid readability score for easy understanding.
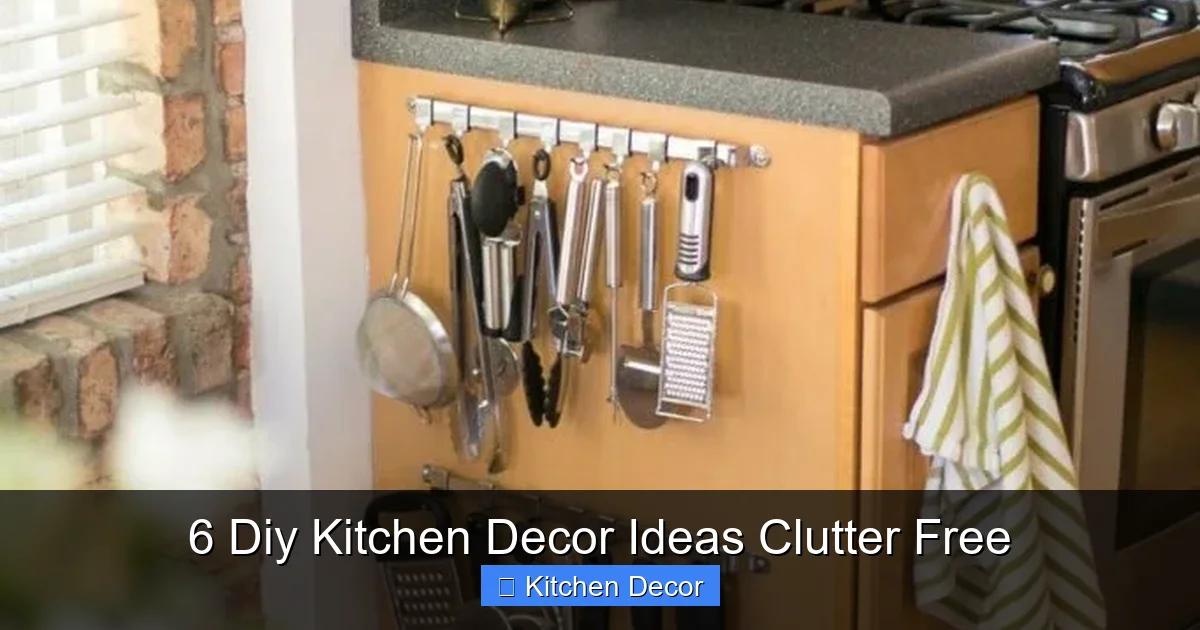
1. DIY Vertical Storage: Pegboard Power
One of the best ways to combat counter clutter is to look up! Vertical space is often overlooked. A DIY pegboard is a game-changer for a clutter-free kitchen. It keeps frequently used items visible and accessible. But it doesn’t take up precious counter or drawer space. It’s also a fantastic way to add a touch of personal style to your kitchen decor.
Materials Needed:
- Pegboard sheet (available at hardware stores)
- Wood furring strips (for spacing from the wall)
- Screws and wall anchors
- Drill
- Level
- Measuring tape
- Pegboard hooks, baskets, and shelves (choose various sizes)
- Paint or stain (optional, for customization)
Step-by-Step Instructions:
- Measure Your Space: Decide where you want your pegboard. Measure the wall area. This helps you determine the size of pegboard sheet to buy. Think about what you want to store there.
- Cut Furring Strips: Cut the furring strips to match the perimeter of your pegboard. These strips will go behind the pegboard. They create space for the hooks to fit.
- Paint or Stain (Optional): If you want to customize your pegboard, paint or stain it now. Let it dry completely. You can also paint the furring strips to match or contrast.
- Attach Furring Strips to Pegboard: Lay the pegboard face down. Attach the furring strips to the back edges using short screws. Make sure the screws do not go through to the front.
- Mark Wall for Installation: Hold the assembled pegboard up to the wall. Use a level to ensure it’s straight. Mark the drilling spots for the screws. These spots should go through the furring strips into wall studs if possible. Use wall anchors if you can’t hit a stud.
- Drill Pilot Holes: Drill pilot holes at your marked spots on the wall. Insert wall anchors if needed.
- Mount the Pegboard: Carefully lift the pegboard. Align the furring strips with the pilot holes. Screw the pegboard firmly to the wall. Make sure it is secure.
- Add Hooks and Accessories: Now for the fun part! Arrange your pegboard hooks, baskets, and small shelves. Hang up measuring cups, spatulas, small pots, and even a roll of paper towels. This makes a great DIY kitchen decor statement. It also keeps everything organized.
Tips for Success/Customization:
- Choose a pegboard size that fits your kitchen’s scale. A smaller one above a coffee station works wonders. A larger one can be a full utility wall.
- Color-coordinate your pegboard with your kitchen’s existing palette. This ensures it looks like purposeful kitchen decor.
- Use small, clear containers on pegboard shelves for spices or small baking items. This keeps them tidy. It also adds to the clutter-free feel.
- Consider adding a small mirror or a piece of art to one section for extra flair.
2. DIY Custom Drawer Organizers

Visual guide about 6 Diy Kitchen Decor Ideas Clutter Free
Image source: i.pinimg.com
Drawers can quickly become a dumping ground. Disorganized drawers are a common source of kitchen clutter. Finding that specific utensil becomes a chore. Custom drawer organizers are a simple and effective DIY kitchen decor idea. They bring order to the chaos inside your drawers. This ensures every item has a home.
Materials Needed:
- Thin plywood or balsa wood sheets (easy to cut)
- Wood glue or strong craft glue
- Measuring tape and ruler
- Pencil
- Hobby knife or small saw (like a coping saw)
- Sandpaper (fine-grit)
Step-by-Step Instructions:
- Empty and Clean the Drawer: Take everything out of your drawer. Give it a good wipe down. Decide what items you want to store in it. This helps you plan your layout.
- Measure the Drawer Interior: Measure the length, width, and depth of the inside of your drawer. Write these measurements down carefully.
- Plan Your Layout: Arrange your items inside the empty drawer. Figure out the best configuration for dividers. You want to create sections for specific items (e.g., knives, forks, spatulas). Sketch your plan on paper.
- Measure and Cut Divider Pieces: Based on your plan, measure and mark your wood sheets. Cut the wood pieces using a hobby knife or saw. You’ll need pieces for the long dividers and shorter cross-dividers. Ensure they fit snugly but not too tightly. Sand the edges smooth to prevent splinters.
- Assemble the Organizer: Start with the longest dividers. Apply a thin line of wood glue to the ends. Press them firmly into place inside the drawer. You can use clamps or heavy objects to hold them while the glue dries.
- Add Cross-Dividers: Once the main dividers are stable, add the shorter cross-dividers. Apply glue to their ends. Fit them into your planned spots. This creates individual compartments.
- Let Glue Dry Completely: Allow plenty of time for the glue to dry and cure. This is crucial for durability. Follow the glue manufacturer’s instructions.
- Refill Your Drawer: Once dry, place your items back into their new, organized compartments. Enjoy your perfectly clutter-free kitchen drawer!
Tips for Success/Customization:
- For extra stability, you can use small brad nails in addition to glue.
- Consider lining the bottom of the drawer with non-slip matting before installing dividers. This prevents items from sliding around.
- Paint or seal your wooden dividers for a more finished look. This also makes them easier to clean.
- Think about specific needs. A deeper section for ladles, a shallow one for corn holders.
3. DIY Wall-Mounted Herb Garden
Visual guide about 6 Diy Kitchen Decor Ideas Clutter Free
Image source: homebnc.com
Fresh herbs elevate any dish. They also add a lovely touch of green to your kitchen decor. However, pots on the windowsill can quickly become cluttered. A DIY wall-mounted herb garden is a brilliant solution. It keeps your herbs within reach, beautiful, and completely clutter-free.
Materials Needed:
- Small terracotta pots or tin cans (6-8 pots recommended)
- Small wooden plank or shelf (long enough to hold all pots)
- Potting soil
- Herb seeds or small herb plants
- Screws and wall anchors
- Drill
- Measuring tape and pencil
- Hose clamps or small plant hangers (if using pots)
- Paint or stain (optional)
Step-by-Step Instructions:
- Prepare Your Pots: Clean your pots or cans. If using tin cans, ensure there are drainage holes at the bottom. You can use a nail and hammer to create them. Paint or decorate them if desired. Let them dry completely.
- Prepare the Wooden Plank: If you’re using a single wooden plank as a shelf, sand it smooth. Paint or stain it to match your kitchen decor. Allow it to dry.
- Plant Your Herbs: Fill your pots with potting soil. Plant your herb seeds or transplant your small herb plants. Water them lightly.
- Mount the Plank/Shelf: Find a sunny spot on your kitchen wall, ideally near a window. Use a level to ensure the plank is straight. Mark your drilling points. Drill pilot holes. Insert wall anchors if needed. Screw the plank firmly to the wall.
- Secure the Pots:
- For Hose Clamps: Wrap a hose clamp around each pot. Secure the clamp to the wooden plank or directly to the wall using small screws. This creates a floating look.
- For Shelf with Holes: If your plank is designed with holes, simply place the pots into the holes. This might require a slightly more advanced woodworking step (cutting holes into the plank before mounting).
- For Display on a Shelf: Simply place the pots on your newly mounted shelf. Add small decorative labels for each herb.
- Maintain Your Garden: Water your herbs regularly. Provide enough light. Enjoy fresh herbs and beautiful DIY kitchen decor!
Tips for Success/Customization:
- Choose herbs that thrive indoors and in similar conditions, like basil, mint, chives, and parsley.
- For a rustic look, use reclaimed wood for your plank.
- Label your herbs with cute DIY plant markers. Use popsicle sticks or small chalkboards.
- Ensure adequate drainage for your pots to prevent root rot.
4. DIY Kitchen Command Center
Visual guide about 6 Diy Kitchen Decor Ideas Clutter Free
Image source: homebnc.com
Paper clutter is a silent killer of a tidy kitchen. Bills, school notices, shopping lists, and appointment cards can quickly pile up. A DIY kitchen command center is a brilliant way to gather all this information in one organized spot. It keeps your countertops clear and your family on schedule. This is a highly functional piece of DIY kitchen decor.
Materials Needed:
- Large framed chalkboard or whiteboard (or a piece of plywood painted with chalkboard/whiteboard paint)
- Small wall-mounted file organizer or mail sorter
- Corkboard squares or a small framed corkboard
- Small hooks or clips
- Chalk or dry-erase markers
- Pushpins
- Drill, screws, and wall anchors
- Level
Step-by-Step Instructions:
- Choose Your Spot: Select a prominent but out-of-the-way wall in your kitchen. This could be near the back door, by the fridge, or on an unused wall section.
- Mount the Main Board: Start with your largest item, the chalkboard or whiteboard. Use a level to hang it straight. Mark drilling points, drill pilot holes, and secure it with screws and wall anchors.
- Add a File Organizer: Below or beside your main board, install a small wall-mounted file organizer. This is perfect for incoming mail, permission slips, or coupons. Mark drilling points, drill, and secure.
- Integrate a Corkboard: Place corkboard squares or a framed corkboard nearby. This is for important notes, photos, or reminders you want to pin up.
- Attach Hooks and Clips: Add small hooks for keys, reusable shopping bags, or kitchen towels. Use clips for important documents that need to stay flat.
- Arrange Your Supplies: Place a cup of chalk or a magnetic dry-erase marker holder on your command center. Keep pushpins handy.
- Start Organizing! Begin using your new command center immediately. Write down your grocery list, meal plan, or family schedule. Pin up important papers. Enjoy a new level of kitchen organization and a clutter-free space.
Tips for Success/Customization:
- Match the frame of your chalkboard/whiteboard to your existing kitchen decor for a cohesive look.
- Use magnetic paint under your chalkboard paint for extra versatility. This allows you to use magnets too.
- Color-code your dry-erase markers for different family members or types of tasks.
- Add a small wall clock to your command center for ultimate efficiency.
5. DIY Appliance Garages or Dedicated Stations
Small appliances like toasters, blenders, and coffee makers are kitchen necessities. But they can quickly create visual clutter on your countertops. A DIY appliance garage or a dedicated, hidden station is a brilliant solution. It keeps these items accessible when needed and neatly tucked away when not. This is a clever way to keep your kitchen looking clutter-free.
Materials Needed:
- Cabinet-grade plywood or MDF (medium-density fiberboard)
- Wood glue, screws, and brad nails
- Saw (circular, jigsaw, or hand saw)
- Drill
- Measuring tape, ruler, and pencil
- Sandpaper
- Paint or stain (to match existing cabinets)
- Optional: small cabinet hinges, magnetic catch (for a door)
Step-by-Step Instructions:
- Plan Your Appliance Garage: Identify the appliance you want to hide. Measure its height, width, and depth. Add a few inches to each dimension for breathing room and easy access. Decide where it will go. This might be a corner, a section of unused counter, or a dedicated cabinet space.
- Design Your Enclosure: Sketch out your design. Will it be a simple three-sided box open in the front? Or will it have a small door that lifts or slides? Consider how power cords will be managed.
- Measure and Cut Wood: Based on your design, measure and cut the plywood or MDF pieces. You will likely need pieces for the bottom, two sides, and a top. If adding a door, cut that piece too.
- Assemble the Box: Apply wood glue to the edges. Join the bottom, sides, and top pieces. Use screws or brad nails to secure them firmly. Ensure it’s square and sturdy.
- Sand and Finish: Sand all surfaces smooth. Fill any screw holes with wood filler. Paint or stain the enclosure to match your existing kitchen cabinets or decor. Let it dry completely.
- Install a Door (Optional): If you’re adding a door, attach hinges to the door and the frame. Add a magnetic catch to keep it closed.
- Create Cord Management: Drill a small hole in the back or side of the enclosure. This allows appliance cords to pass through neatly to an outlet.
- Place and Use: Position your new appliance garage. Place your appliance inside. Enjoy a much cleaner and clutter-free countertop!
Tips for Success/Customization:
- For simpler execution, consider a rolling cart for appliances. You can tuck it into a pantry or corner when not in use.
- If you’re skilled, integrate a pull-out shelf inside the garage for easier access to heavier appliances.
- Ensure proper ventilation, especially for appliances that generate heat.
- Use a power strip inside the garage if you have multiple appliances. Always unplug when not in use for safety.
6. DIY Stylish & Uniform Pantry Storage Jars
Open shelving is beautiful, but it can quickly look messy if your pantry items are in their original mismatched packaging. A simple yet impactful DIY kitchen decor idea is to transfer staples into uniform, decorative storage jars. This instantly creates a cohesive, high-end look. It also makes your pantry items easy to find. This project makes your kitchen look much more clutter-free.
Materials Needed:
- Assortment of clear glass jars or canisters with airtight lids (various sizes for different staples)
- Vinyl labels, chalkboard labels, or a permanent marker
- Contents for your jars (flour, sugar, pasta, rice, beans, snacks, etc.)
- Scoops or measuring cups (optional, for aesthetics)
Step-by-Step Instructions:
- Gather Your Jars: Decide what items you want to store. Purchase or collect enough clear jars or canisters. Look for jars with airtight seals to keep food fresh. Choose a uniform style for a truly cohesive look.
- Clean and Dry Jars: Wash all jars and lids thoroughly. Ensure they are completely dry before filling. Moisture can spoil food.
- Transfer Contents: Carefully pour your dry pantry staples into the respective jars. Use a funnel if needed to prevent spills. Fill them to a practical level.
- Label Your Jars: This is crucial for organization and a clutter-free kitchen.
- Vinyl Labels: Apply pre-cut vinyl labels for a sleek, professional look.
- Chalkboard Labels: Stick on chalkboard labels and write with a chalk marker. This allows for easy changes.
- Permanent Marker: For a simple, minimalist look, write directly on the glass with a permanent glass marker.
Ensure labels are legible and clearly state the contents. Add expiration dates on the bottom if desired.
- Arrange Your Display: Place your filled and labeled jars on open shelving, countertops, or inside your pantry. Arrange them by height, color, or frequency of use. Group similar items together.
- Add Scoops (Optional): For flour, sugar, or coffee, consider adding a small scoop directly into the jar. This is convenient and adds to the aesthetic.
Tips for Success/Customization:
- Choose jars that are stackable if you have limited vertical space.
- Use different jar shapes for visual interest, but stick to the same material (e.g., all glass).
- For items like spices, use smaller, uniform jars. Arrange them on a spice rack or tiered shelf.
- Consider adding a small silica gel packet inside jars of items prone to moisture, like brown sugar.
- Rotate stock: When refilling, use older contents first to ensure freshness.
Maintaining Your Clutter-Free Kitchen & Customization Tips
Creating a clutter-free kitchen with DIY decor is a fantastic start. But maintaining it requires ongoing effort. Here are some tips to keep your kitchen looking its best:
- “One In, One Out” Rule: When you buy a new kitchen gadget or decor item, consider if you can get rid of an old one. This prevents accumulation.
- Daily Tidy-Up: Spend 5-10 minutes each evening putting things back in their place. This small habit prevents major messes.
- Designate a “Landing Strip”: For items that come into the kitchen but don’t belong, like mail or keys, create a small, dedicated spot. This could be part of your command center.
- Seasonal Declutter: Twice a year, do a deeper declutter. Go through drawers, cabinets, and open shelves. Remove anything unused, broken, or expired.
- Regular Cleaning: Keep your DIY decor elements clean. Wipe down your pegboard, dust your shelves, and clean your storage jars. This helps them look fresh and inviting.
- Flexibility is Key: Your kitchen needs change. Don’t be afraid to adjust your DIY decor solutions. Move a pegboard section, or reconfigure a drawer organizer if it’s not working optimally.
- Involve the Family: Teach everyone in the household where things belong. Encourage them to put items back after use. A clutter-free kitchen is a team effort.
Conclusion
Congratulations! You’ve just explored 6 amazing DIY kitchen decor ideas designed to create a beautiful, functional, and wonderfully clutter-free kitchen. From leveraging vertical space with a pegboard to taming drawer chaos with custom organizers, each project offers a practical path to a more serene kitchen environment.
Remember, a clutter-free kitchen isn’t just about aesthetics. It’s about creating a more efficient, enjoyable, and peaceful space for cooking and living. These DIY projects are accessible, affordable, and offer a great sense of accomplishment.
Start with one idea that excites you most. Take it one step at a time. Soon, you’ll be enjoying the benefits of a well-organized and stylish kitchen that truly reflects your personal touch. Happy DIY-ing!