Transforming small rooms doesn’t require a big budget! Discover amazing DIY paper decor hacks that add style, personality, and visual space. These easy, affordable ideas are perfect for beginners looking to refresh their living areas.
Feeling like your small room is a bit… well, small? It’s a common challenge, and honestly, it can feel a little frustrating when you want your space to feel bigger and more stylish. You might think you need expensive furniture or a complete renovation, but what if I told you some of the most impactful decor can be made from something as simple as paper?
Get ready to unleash your inner creative! We’re diving into a world of paper crafts that can completely change the look and feel of your room. These aren’t complicated projects; they’re fun, budget-friendly ways to add pops of color, texture, and visual interest.
Let’s turn those blank walls and forgotten corners into something truly special. We’ll explore easy techniques and clever ideas that will make your small room feel like a spacious, designer-decorated haven. Ready to get crafting?
Frequently Asked Questions (FAQ)
What are the easiest DIY paper decor ideas for a small room?
Some of the simplest include paper garlands, DIY paper flowers, folded paper wall art, and decorative paper lanterns. These require minimal tools and can be made quickly.
Can paper decorations actually make a small room look bigger?
Yes, strategically placed paper decor can create the illusion of space. For example, tall paper elements can draw the eye upward, and reflective or light-colored paper can bounce light around the room.
What kind of paper is best for DIY room decor?
It depends on the project! Cardstock is great for sturdy structures like 3D wall art. Scrapbook paper offers beautiful patterns. Regular printer paper is versatile for folding and cutting. Even old magazines or newspapers can be used for unique textures.
How do I attach paper decorations to walls without damaging them?
Use temporary adhesive strips like Command strips, painter’s tape, or double-sided tape designed for delicate surfaces. For lighter items, a few dots of removable craft glue can also work well.
Are paper decorations safe for small spaces?
Generally, yes. However, always keep paper decorations away from direct heat sources like lamps, candles, or heaters to prevent fire hazards. Ensure they are securely attached so they don’t fall.
Where can I find inspiration for paper DIY projects?
Websites like Pinterest and Instagram are fantastic visual resources. Blogs dedicated to crafts and home decor, as well as YouTube tutorials, offer step-by-step guides for countless paper projects.
What tools do I need for basic paper decor projects?
Most projects require just a few basics: scissors, a ruler, a pencil, glue (school glue, hot glue, or glue sticks), and sometimes a craft knife or cutting mat for more intricate designs.
Unleash Your Inner Decorator: The Magic of Paper Hacks for Small Spaces
Transforming a small room into a stylish sanctuary doesn’t need a huge budget or a degree in interior design. If you’re looking for simple, affordable, and incredibly effective ways to elevate your space, you’ve come to the right place! We’re diving into the wonderful world of DIY paper decor.
Small rooms often come with unique challenges, like feeling cramped or lacking personality. But with a little creativity and some clever paper hacks, you can make your room feel larger, brighter, and more inviting. Think beyond just hanging pictures; we’re talking about creating art, adding dimension, and bringing in pops of color that make a big impact.
This guide is packed with beginner-friendly ideas that will have you looking at paper in a whole new light. We’ll cover everything from quick wall accents to more elaborate statement pieces, all designed to be easy to make and budget-friendly. Get ready to discover how paper can be your secret weapon for small-space decorating!
Why Paper is Your Small Room’s Best Friend
Paper is an incredibly versatile material for decorating, especially when you’re working with limited space and a tight budget. Its accessibility and affordability make it a dream for DIY enthusiasts. You can find paper in countless colors, patterns, and textures, allowing for endless creative possibilities.
One of the biggest advantages of paper decor in small rooms is its ability to create visual interest without adding bulk. Unlike heavy furniture or elaborate wall hangings, paper elements are lightweight and can be arranged in ways that enhance the perception of space. They can add color, texture, and a handmade charm that makes a room feel unique and personal.
Furthermore, paper is forgiving. If you make a mistake, it’s usually easy to fix or start over without a significant financial loss. This low-stakes environment is perfect for beginners who want to experiment and build their decorating confidence. For more small-space inspiration, check out our guide on cozy small kitchen ideas that maximize every inch with style.
1. Statement Paper Wall Art: Big Impact, Little Cost
Walls in small rooms often feel bare. Filling them with art can make a huge difference, but expensive pieces can eat into your budget. Paper wall art is the perfect solution, offering stunning visual appeal without the hefty price tag.
Think beyond flat prints. We’re talking about creating dimensional pieces that add texture and catch the light, making your walls a focal point. These projects are surprisingly simple and can be customized to match any color scheme or style.
Geometric Paper Art
Geometric designs are modern, chic, and incredibly effective in small spaces. They create clean lines that can make a room feel more organized and expansive.
Materials You’ll Need:
- Cardstock or heavy-weight paper in various colors
- Scissors or a craft knife and cutting mat
- Ruler
- Pencil
- Glue (glue stick, craft glue, or double-sided tape)
- A large sheet of paper or poster board as a backing (optional)
- Temporary adhesive strips (like Command strips) for hanging
How to Create Geometric Paper Art:
- Plan Your Design: Decide on a pattern. You can create simple squares, triangles, hexagons, or more complex interlocking shapes. Sketching your design on paper first can be helpful.
- Cut Your Shapes: Using your ruler and pencil, mark out your desired shapes on the colored cardstock. Carefully cut them out with scissors or a craft knife. For a consistent look, cut a template first.
- Arrange and Glue: Start arranging your shapes on your backing board or directly onto your wall (if you’re feeling brave and have a good removal plan!). Overlap some shapes for a layered effect, or keep them separate for a cleaner look. Once you’re happy with the arrangement, begin gluing them down.
- Consider Depth: For a 3D effect, you can cut small strips of cardstock or use foam dots to mount some shapes slightly off the backing, creating shadows and depth.
- Hang It Up: If you used a backing board, attach temporary adhesive strips to the back of the board. If you glued directly to the wall, you’ll need to attach strips to the back of individual pieces or create a larger cohesive design that can be hung as one unit.
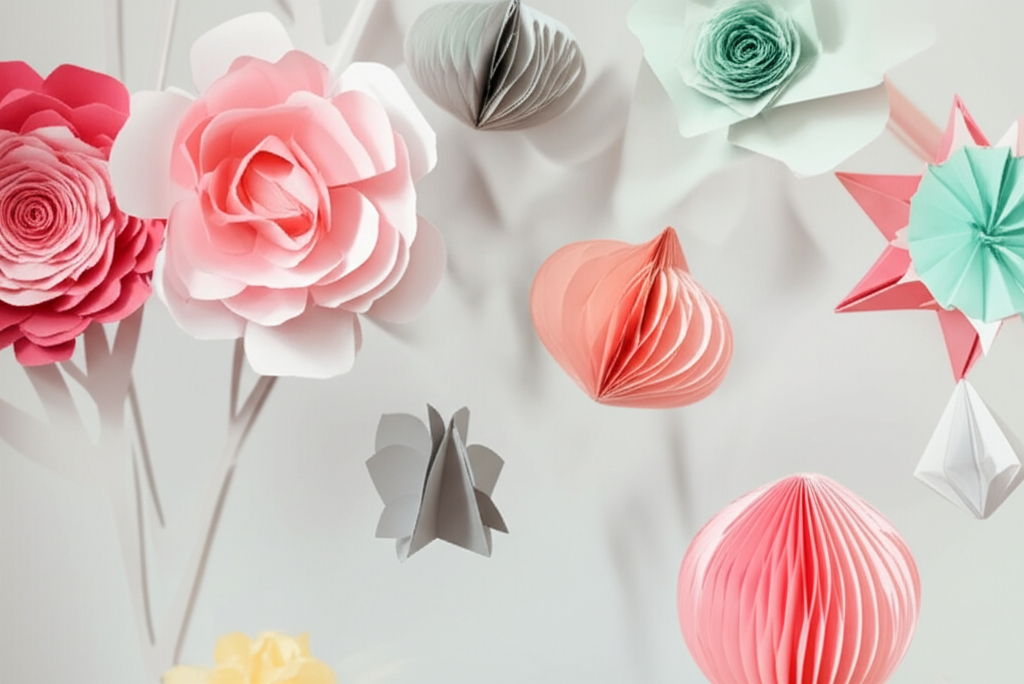
Folded Paper Sculptures & Wall Hangings
Creating beautiful 3D forms from flat paper is a magical process. Folded paper art adds incredible texture and visual interest, drawing the eye and making a statement without overwhelming the space.
Materials You’ll Need:
- Paper of your choice (origami paper, cardstock, even patterned scrapbook paper)
- Scissors
- Glue or tape
- String or twine (for hanging)
- A needle (optional, for threading)
How to Create Folded Paper Sculptures:
- Choose Your Fold: There are many folding techniques. Accordion folds create fans and geometric shapes. Simple folds can create modular units that can be glued together to form spheres, stars, or other 3D objects. Search for “easy paper folding techniques” online for inspiration.
- Create Modular Units (Optional): For larger sculptures like paper balls or stars, you’ll often need to create multiple identical folded units. For example, to make a paper ball, you might fold 12-20 identical kite-shaped units and then glue their edges together to form a sphere.
- Assemble: Once your units are folded, use glue or tape to connect them. For wall hangings, you can fold paper into various shapes (like leaves or geometric patterns) and string them together to create a garland.
- Add Hanging Mechanism: If creating a hanging sculpture, attach a loop of string or twine to the top. For modular spheres, you can often thread string through a few of the central folds.
- Hang: Use temporary hooks or adhesive strips to hang your finished piece. Taller folded elements can help draw the eye upwards, making the room feel taller.
2. Enchanting Paper Lighting: Soft Ambiance, Big Style
Lighting is crucial in any room, especially small ones. It can dramatically affect the mood and perceived size. Paper lanterns and DIY lampshades are fantastic for creating soft, diffused light that makes a space feel cozy and inviting, while also adding a decorative element.
These projects are relatively simple and can transform a basic light fixture into a charming focal point. Remember to always prioritize safety when working with light fixtures and paper.
DIY Paper Lanterns
Paper lanterns are a classic for a reason. They are beautiful, affordable, and can be customized endlessly. You can buy plain paper lanterns and decorate them, or create them from scratch.
Materials You’ll Need:
- Plain paper lanterns (available at craft stores)
- Tissue paper, scrapbook paper, or colored paper
- Scissors
- Glue stick or Mod Podge
- Optional: LED string lights or a battery-operated light kit for the lantern
How to Decorate Paper Lanterns:
- Prepare Your Lantern: Gently expand your paper lantern according to its instructions.
- Cut Your Decorations: Cut shapes from your chosen paper. Think circles, stars, hearts, or even strips. For a textured look, you can cut fringe or small squares.
- Apply Glue: Using a glue stick or Mod Podge, apply a thin layer of adhesive to the lantern where you want to place your paper decorations.
- Attach Decorations: Carefully press your cut paper shapes onto the glued areas. Overlap them for a fuller look or arrange them in a pattern.
- Let Dry: Allow the glue to dry completely.
- Add Light: Insert your LED string lights or battery-operated light kit inside the lantern. Avoid using incandescent bulbs as they can get too hot.
- Hang: Hang your beautiful, customized lantern using its provided hook.
Paper Lampshade Makeover
Give an old, plain lampshade a new lease on life with paper. This is a quick way to add personality to a corner of your room.
Materials You’ll Need:
- A plain lampshade
- Paper (e.g., maps, sheet music, book pages, patterned paper)
- Scissors or a craft knife
- Glue stick or Mod Podge
- Optional: Ribbon or trim for the edges
How to Makeover a Lampshade:
- Measure and Cut: Measure the height and circumference of your lampshade. Cut strips of paper to these dimensions. If you’re using a pattern like maps or sheet music, you might want to cut out specific sections or arrange them creatively.
- Apply Glue: Working in small sections, apply an even layer of glue stick or Mod Podge to the lampshade.
- Attach Paper: Carefully apply the paper strips to the glued area, smoothing out any bubbles or wrinkles. Overlap the strips slightly for a seamless look.
- Trim Edges: Once the entire lampshade is covered and the glue is dry, trim any excess paper from the top and bottom edges with scissors or a craft knife.
- Add Trim (Optional): For a polished finish, glue a ribbon or decorative trim around the top and bottom edges of the lampshade.
- Place on Lamp: Put your newly decorated lampshade on your lamp base.
3. Whimsical Paper Plants & Vines: Greenery Without the Fuss
Plants can bring life to a room, but small spaces might not have enough natural light or room for pots. Paper plants and vines offer a beautiful, maintenance-free alternative that adds color and a touch of nature.
These can be used to fill vertical space, soften corners, or add a pop of color to shelves. They are surprisingly realistic and can be made in any size or color you desire.
DIY Paper Leaves
Creating realistic or stylized paper leaves is a fun way to add botanical charm. You can arrange them in vases, attach them to walls, or create a hanging mobile.
Materials You’ll Need:
- Green paper (various shades), or colored paper for stylized leaves
- Scissors
- A leaf template (easily found online and printed)
- Craft wire or thin string (for stems, optional)
- Glue or tape
- A vase or container (for arrangements)
How to Make Paper Leaves:
- Find or Draw a Template: Search online for “paper leaf templates” and print out your favorite shapes (e.g., monstera, eucalyptus, maple). You can also draw your own.
- Cut Out Leaves: Trace the template onto your paper and carefully cut out the leaf shapes. For a more realistic look, cut multiple leaves in slightly different sizes and shades of green.
- Add Detail (Optional): Use a pen or marker to draw veins on the leaves. For a 3D effect, gently score a line down the center and fold the leaf slightly.
- Attach Stems (Optional): If you want to create stems, cut thin strips of green paper or use craft wire. Glue or tape the stem to the back of the leaf.
- Arrange: Place your paper leaves in a vase, attach them to a wall with temporary adhesive, or create a garland by stringing them together.
Paper Vines for Vertical Decor
Vines are excellent for small spaces as they utilize vertical real estate, drawing the eye upward and adding a lush feel without taking up floor space.
Materials You’ll Need:
- Green paper (construction paper, cardstock, or patterned paper)
- Scissors
- Glue or tape
- String or twine
- Command hooks or temporary wall adhesive
How to Make Paper Vines:
- Cut Leaf Shapes: Cut out numerous small leaf shapes from your green paper. Varying sizes can make it look more natural.
- Create Vine Base: Cut long, thin strips of brown or green paper to act as the base of your vine, or use twine/string.
- Attach Leaves: Glue or tape the leaves along the length of your vine base or string, spacing them out as desired. You can attach them flat or give them a slight bend for a more dynamic look.
- Add Tendrils (Optional): Cut thin strips of paper and curl them around a pencil to create tendrils that can be attached to the vine.
- Hang: Use Command hooks or temporary adhesive to hang your paper vines along walls, doorways, or shelves. Let them trail down for a natural effect.
4. Stylish Paper Storage & Organization
Clutter is the enemy of small spaces. Staying organized is key, and thankfully, paper can help you create attractive storage solutions that don’t look like eyesores.
From decorative boxes to magazine holders, paper can be transformed into functional pieces that also add to your room’s aesthetic. These DIYs help keep your essentials tidy while looking good.
DIY Decorative Storage Boxes
Store small items like stationery, craft supplies, or accessories in beautifully decorated boxes made from sturdy paper or cardboard.
Materials You’ll Need:
- Sturdy cardboard or thick cardstock
- Decorative paper (scrapbook paper, wrapping paper)
- Scissors or craft knife
- Ruler
- Glue stick or Mod Podge
- Optional: Ribbon, twine, or other embellishments
How to Make Decorative Storage Boxes:
- Create the Box: You can either upcycle existing small cardboard boxes (like from tea or shoes) or create your own from scratch using a template. For scratch-built boxes, cut out the base and four sides from sturdy cardboard. Score and fold for clean edges.
- Cover with Paper: Measure and cut your decorative paper to cover the outside and inside of the box. Apply glue evenly and smooth the paper onto the cardboard, trimming any excess.
- Assemble: If you created a box from scratch, carefully glue the sides to the base and to each other.
- Add Embellishments: Glue on ribbon for handles, or tie twine around the box for a decorative touch.
- Use: Place your finished boxes on shelves, desks, or in closets to store your belongings neatly.
Paper Magazine Holders
Keep your favorite magazines, notebooks, or even mail organized and upright with simple DIY magazine holders.
Materials You’ll Need:
- Sturdy cardstock or poster board
- Decorative paper or fabric scraps
- Scissors or craft knife
- Ruler
- Glue stick or strong craft glue
- Optional: Binder clips for temporary holds while drying
How to Make Magazine Holders:
- Cut Your Base: Cut a large rectangular piece of cardstock for the back and base of your holder. A common size is about 12 inches tall by 8 inches wide, but adjust as needed.
- Cut the Front Panel: Cut a second piece that will be the front. This piece should be the same width but shorter in height (e.g., 8 inches tall). You can also cut a diagonal line from one side to the other on the top edge of this front piece to create an angled opening.
- Create Side Panels: Cut two side panels. These should match the height of your back panel on one side and taper down to the height of your front panel on the other side. The width of the side panels will determine the depth of your holder.
- Score and Fold: Score lines where panels will meet to ensure clean folds.
- Assemble: Glue the side panels to the edges of the back panel. Then, attach the front panel to the front edges of the side panels. Use binder clips to hold them in place while the glue dries.
- Decorate: Once assembled and dry, cover the holder with decorative paper, fabric, or paint.
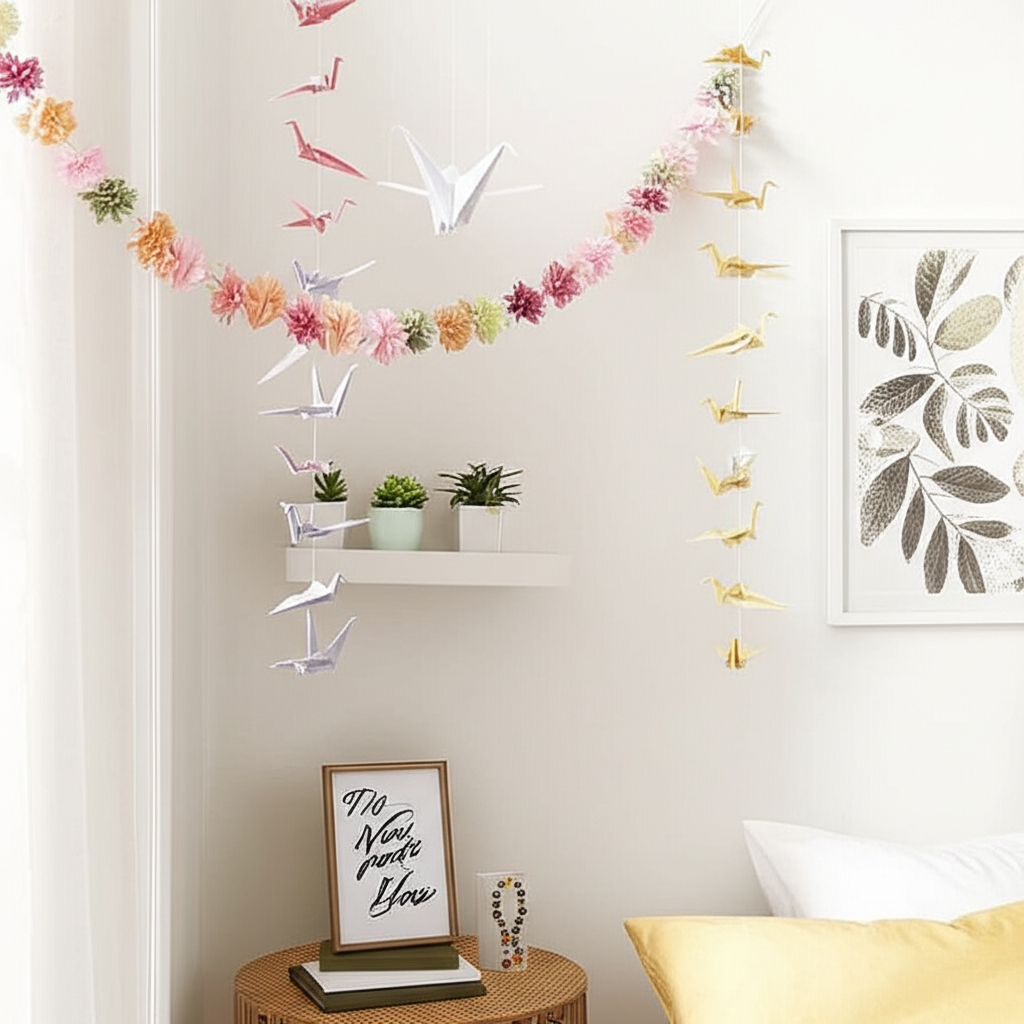
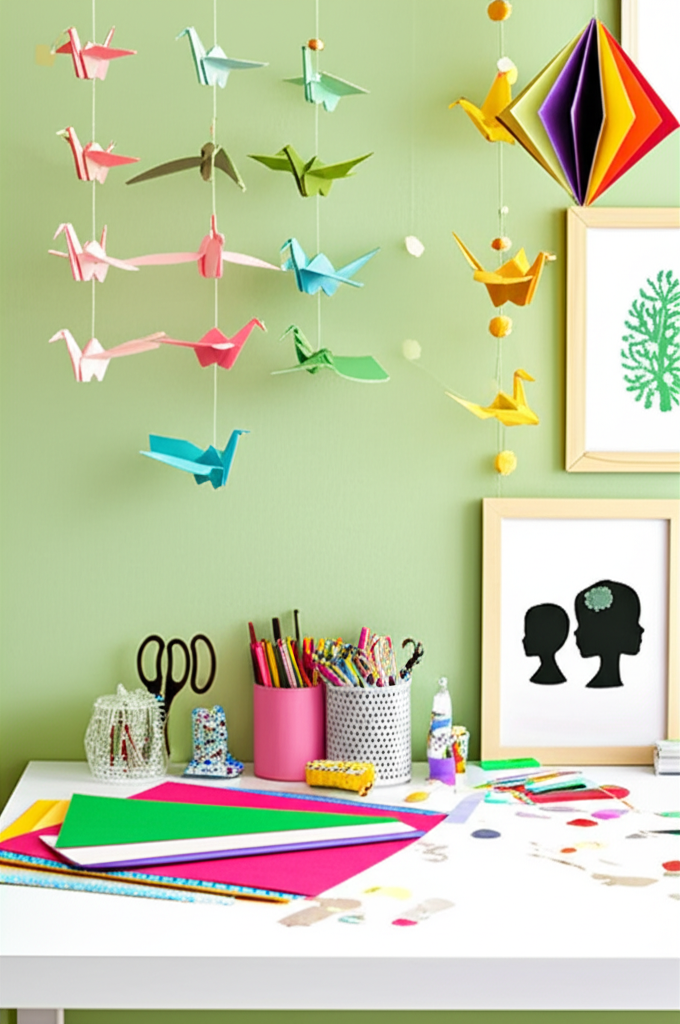
5. Festive Paper Garlands & Bunting: Instant Cheer
Garlands and bunting are fantastic for adding a festive touch and a splash of color to any room. They are incredibly easy to make and can be customized for any season or occasion.
In a small room, a well-placed garland can act as a focal point, drawing the eye and adding visual interest without taking up valuable surface space. They are perfect for decorating walls, shelves, windows, or even furniture.
Simple Paper Shape Garland
This is one of the easiest paper crafts, perfect for beginners and kids alike.
Materials You’ll Need:
- Colored paper, cardstock, or scrapbook paper
- Scissors or a hole punch
- String, twine, or ribbon
- Glue or tape
- A needle (optional, for threading through holes)
How to Make a Paper Shape Garland:
- Cut Shapes: Cut out numerous shapes from your paper. Think circles, stars, triangles, hearts, or even simple squares. You can use a template or freehand them.
- Prepare for Hanging:
- Hole Punch Method: Punch two holes at the top of each shape.
- Glue/Tape Method: You can also simply glue or tape each shape directly onto the string, folding the string over the back of the shape.
- String Them Together: Thread your string through the holes, or glue/tape shapes onto the string. Space them evenly or randomly, depending on your desired look.
- Hang: Use small nails, tacks, or temporary adhesive hooks to hang your garland.
Triangle Bunting
Bunting adds a playful and celebratory feel to a room.
Materials You’ll Need:
- Fabric scraps or sturdy paper (cardstock works well)
- Scissors
- Ribbon or bias tape
- Glue or sewing machine (optional, for a more durable finish)
- Iron (if using fabric)
How to Make Triangle Bunting:
- Cut Triangles: Cut out multiple triangles from your paper or fabric. A common size is about 4-6 inches on each side. Ensure they are all the same size for a uniform look.
- Prepare Ribbon: Cut a length of ribbon or bias tape long enough for your desired bunting length, plus extra for tying.
- Attach Triangles:
- Paper Method: Lay the ribbon flat. Fold over the top edge of each triangle to create a small pocket, and then glue or tape the folded edge onto the ribbon, spacing them evenly.
- Fabric Method: Lay the ribbon flat. Place the top edge of each triangle onto the ribbon, fold the ribbon over the top edge of the triangle, and secure with fabric glue or by sewing. Ensure the triangles are facing the same direction.
- Hang: Tie the ends of the ribbon to hang your bunting.
Pro Tips for Paper Decor in Small Rooms
Using paper for decor is fantastic, but a few smart strategies can make your small space look even better and feel more spacious.
- Think Vertically: Use paper decor that draws the eye upward. Tall, slender paper sculptures, wall hangings that extend towards the ceiling, or even cascading paper vines can make your room feel taller.
- Light Colors and Reflective Surfaces: White, pastels, or papers with a slight sheen can reflect light, making the room feel brighter and larger.
- Strategic Placement: Don’t overcrowd your walls. Focus on creating one or two impactful paper art pieces rather than scattering small items everywhere. A large statement piece can be more effective than many small ones.
- Texture is Key: Layering different types of paper, using folding techniques, or adding 3D elements can create depth and visual interest that makes your decor stand out.
- Keep it Tidy: Since small rooms can feel cluttered easily, ensure your paper creations are neat and well-executed. A well-made DIY looks much more sophisticated than a rushed one.
- Consider Scale: While you want impact, avoid oversized paper elements that might overwhelm a tiny room. Find a balance that feels proportionate to your space.
- Safety First: Always keep paper decorations away from heat sources like lamps, heaters, or open flames. Ensure they are securely attached to prevent them from falling. For more information on fire safety in the home, consult resources like the National Fire Protection Association (NFPA).
Your Small Space, Reimagined!
See? Decorating a small room can be an incredibly fun and rewarding process, especially when you harness the power of paper! You’ve learned how to create stunning wall art, add ambient lighting, bring in whimsical greenery, organize your space stylishly, and add festive touches – all with simple paper hacks.
These DIY ideas prove that you don’t need a lot of money or complicated skills to make your small room feel like a magazine spread. The beauty of paper is its affordability and endless versatility, allowing you to experiment and personalize your space to your heart’s content.
So, gather your supplies, pick a project that sparks your creativity, and get ready to transform your room. Embrace the process, have fun with it, and enjoy the amazing results. Your beautifully decorated, functional, and stylish small space awaits! For even more inspiration, explore our collection of kitchen decor themes that prove small spaces can pack a big design punch.