Transform your cluttered kitchen storage with simple DIY vertical dividers that keep baking sheets and trays neatly separated. These affordable and easy-to-make organizers save space, prevent stacking damage, and make finding the right baking tools effortless. With just a few materials like cardboard, wood, or recycled items, you can create custom dividers tailored to your cabinet size, enhancing both functionality and aesthetics. Whether you’re an avid baker or just looking to tidy up, this DIY solution offers a practical and satisfying project to optimize your kitchen storage.
For quick organization, craft vertical dividers using inexpensive materials like cardboard or wooden planks, secured with glue or screws. Measure your trays, cut the dividers to fit, and arrange them inside your cabinet or drawer. This simple hack keeps your baking sheets and trays separated, easily accessible, and protected from damage, all while adding a personalized touch to your kitchen setup.
If you’re tired of the chaos in your kitchen cabinet, creating DIY vertical dividers is a game-changer. Not only do they help you organize your baking sheets and trays efficiently, but they also make your space more visually appealing. Start by measuring your trays and selecting your materials, then follow straightforward steps to assemble your custom dividers. This project is perfect for anyone looking for an easy, cost-effective way to maximize storage and keep everything in order.

DIY Vertical Dividers for Baking Sheets and Trays
Understanding the Need for Vertical Dividers
Baking sheets and trays often need organization to improve baking efficiency and prevent items from shifting. Vertical dividers act as simple barriers, keeping cookies, pastries, or vegetables separated and neatly arranged. Creating your own DIY vertical dividers is an easy way to customize your kitchen storage solutions without spending a lot of money.
Materials Needed for DIY Vertical Dividers
Having the right materials is key to building sturdy, effective dividers. You typically need:
- Wooden strips or plywood sheets
- Measuring tape
- Saw (hand saw or power saw)
- Sandpaper
- Glue or nails
- Clamps to hold pieces together
- Non-toxic paint or sealant (optional)
Make sure all materials are food-safe if they come into direct contact with trays or baked goods.
Step-by-Step Guide to Building Vertical Dividers
Building your own vertical dividers involves several simple steps. Follow this detailed guide:
- Measure the dimensions of your baking trays carefully. Record their length, width, and height.
- Decide how many dividers you want and space them evenly.
- Cut wooden strips to match the height of your trays for upright supports.
- Cut horizontal pieces that will connect the vertical supports, based on the width of your trays.
- Sand all edges to remove splinters and ensure safety during handling.
- Assemble the vertical supports and horizontal pieces using glue or nails, creating a grid pattern.
- Clamp the structure while the glue dries for maximum strength.
- Optionally, paint or seal the dividers with non-toxic, heat-safe materials for a finished look and added durability.
Tips for a Durable and Custom Fit
Your DIY dividers will work best if they fit snugly within your trays. Here are some tips:
- Use adjustable or removable supports to accommodate different tray sizes.
- Opt for lightweight yet sturdy materials like plywood or thin hardwood for easy handling.
- Ensure the width of each divider allows for easy sliding and removal.
- If your trays have ridges or unusual shapes, customize the divider design accordingly.
Additionally, sealing the edges with food-safe sealant prevents splinters and makes cleaning easier.
Alternative Materials for DIY Dividers
If wood isn’t your preference, consider other options:
Plastic Sheets
These are lightweight and easy to cut; ensure they are food-safe and dishwasher-safe for easy cleaning.
Cardboard
For temporary solutions, thick cardboard can do the job; however, it isn’t durable or moisture-resistant.
Metal Wire or Mesh
Provides a sturdy, washable option; bend into custom shapes using pliers.
Maintenance and Cleaning of DIY Dividers
Proper care extends the life of your dividers. Regularly wipe down with a damp cloth to remove grease or crumbs. If made of wood, occasionally apply food-safe sealant for longevity. For plastic or metal options, dishwasher cleaning might be possible, depending on material.
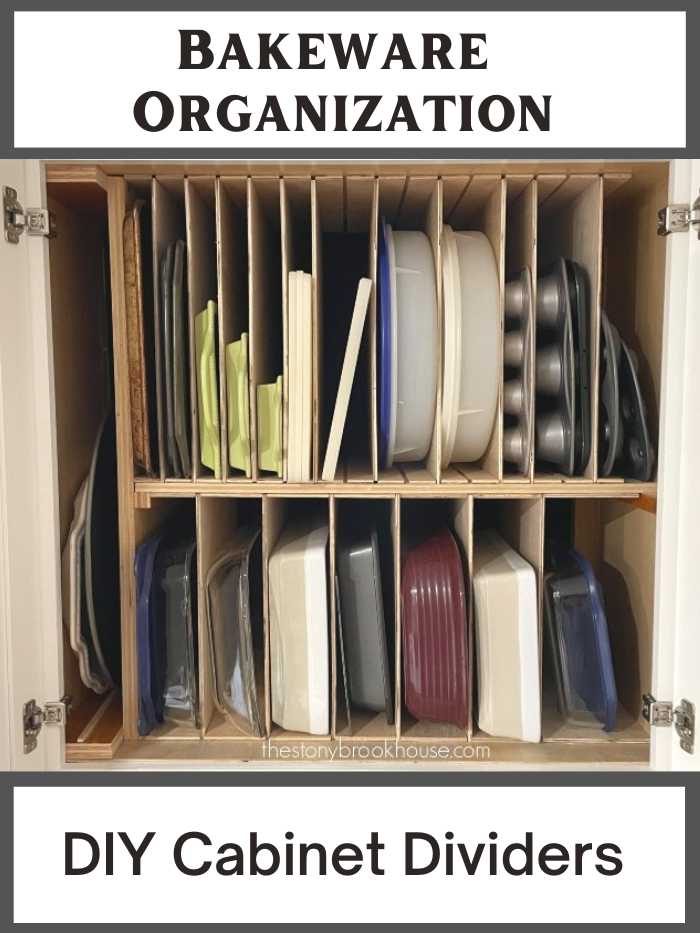
Using Vertical Dividers to Organize Your Oven and Storage Cabinets
Besides trays, vertical dividers can be placed in cabinets or drawers to organize baking tools and accessories. This method helps keep baking sheets, pans, and utensils neat, accessible, and easy to grab.
Creative Customization Ideas
Personalize your dividers with:
- Colorful paint for a cheerful look
- Decorative patterns using stencils
- Labels to identify different types of baked goods or trays
Adding these touches makes your organization system both functional and charming.
Benefits of Making Your Own Vertical Dividers
DIY dividers offer many advantages:
- Cost-effective solution compared to store-bought options
- Customizable to fit specific tray sizes or kitchen needs
- Enjoyment of a hands-on project that boosts creativity
- Ability to select eco-friendly, non-toxic materials for safety and sustainability
These benefits turn an easy project into a smart investment for your kitchen.
Common Mistakes to Avoid
While creating your DIY vertical dividers, watch out for:
- Measuring inaccurately, leading to ill-fitting dividers
- Using materials that are not food-safe or heat-resistant
- Over-tightening nails or screws, which can crack the wood
- Neglecting to sand edges, risking splinters or damage to trays
Avoiding these pitfalls ensures your project stays durable and safe.
Final Tips for Successful DIY Vertical Dividers
Take your time when measuring and cutting. Double-check dimensions before assembly. Use clamps generously to hold pieces firmly during gluing. And most importantly, have fun customizing your storage system!
Building DIY vertical dividers is a practical way to keep your baking sheets and trays organized. With simple tools and materials, you can craft a storage solution tailored specifically to your kitchen needs. The process is rewarding, cost-effective, and creates a cleaner baking environment that makes preparing and storing baked goods easier than ever.
Frequently Asked Questions
What materials are best suited for building DIY vertical dividers for baking sheets and trays?
Opt for sturdy materials like plywood, acrylic sheets, or metal strips to ensure durability and stability. Plywood is easy to cut and assemble, while acrylic offers a sleek look. Metal strips provide strength but require precise cutting tools. Choose materials based on your skill level and the weight of the trays you plan to store.
How can I ensure the dividers fit different sizes of baking sheets and trays?
Design adjustable or flexible dividers by using materials like slotted holes or retractable mechanisms. Measure the typical sizes of your trays and include some extra space for flexibility. Consider using modular components that can be reconfigured as needed, allowing your storage system to adapt to various tray dimensions.
What tools do I need to construct vertical dividers at home?
You will need basic tools such as a saw (hand saw or power saw), drill, measuring tape, and screws or adhesives suitable for your chosen material. Sandpaper can help smooth rough edges, and clamps will keep pieces secure during assembly. Having a level ensures your dividers stay upright and properly aligned.
Are there any tips for making the DIY vertical dividers more stable and long-lasting?
Secure the dividers firmly to the base or shelving unit using strong fasteners or brackets. Reinforce joints with additional screws or brackets, especially if you plan to store heavy trays. Applying a sealant or protective coating can help prevent wear and tear over time, extending the lifespan of your DIY storage solution.
Can I customize the height and spacing of the dividers easily?
Yes, by designing your dividers with adjustable components or modular segments, you can easily modify their height and spacing. Using slotted holes or removable panels allows you to reconfigure the setup based on your needs without rebuilding the entire system. This flexibility helps keep your storage organized as your collection of trays changes.
Final Thoughts
DIY vertical dividers for baking sheets and trays offer an affordable and customizable solution for organizing your kitchen. These dividers make it easy to separate different baked goods, saving space and preventing damage. Using simple materials, you can create sturdy, effective partitions tailored to your needs. With a little effort, you achieve a neat, functional setup that enhances your baking experience.