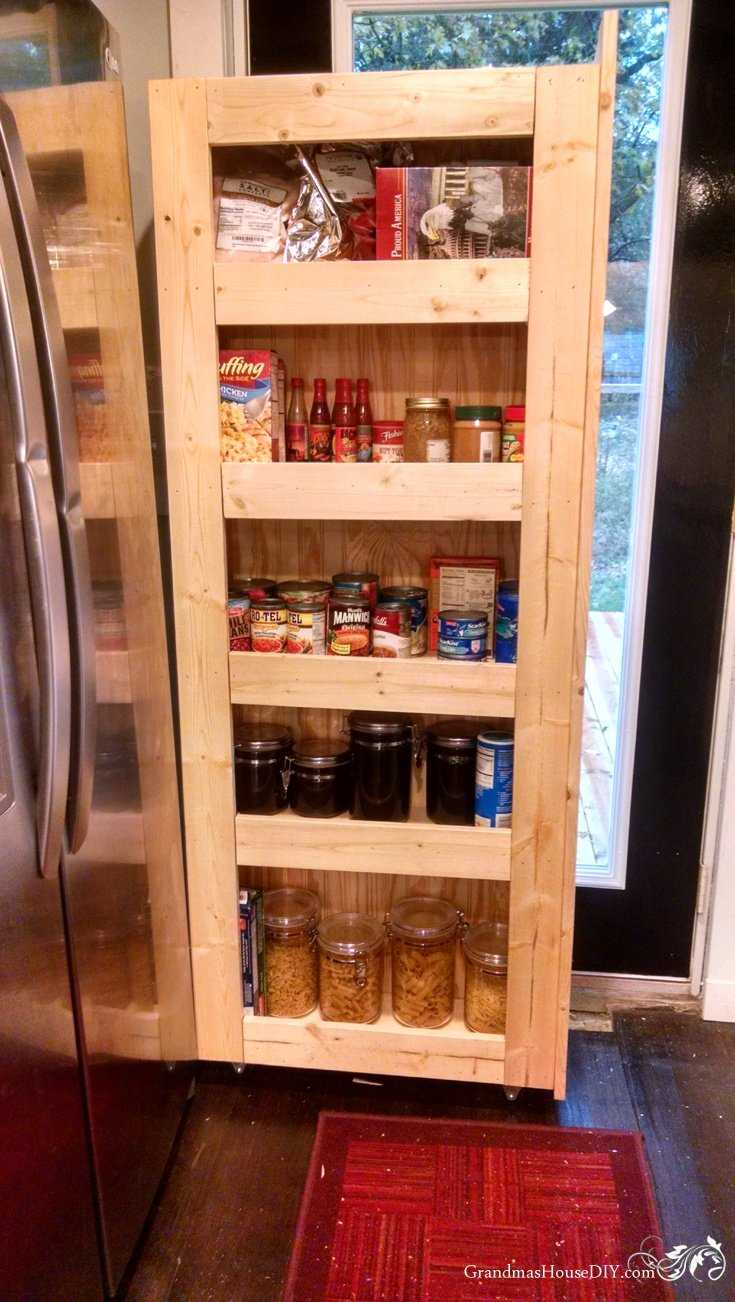
To make a rolling pantry cart, start by gathering sturdy materials like wood or metal, and choose a size that fits your space and storage needs. Assemble the frame, install shelves for easy access, and add wheels for mobility. Finish with a protective coat of paint or sealant to ensure longevity and style.
Creating a rolling pantry cart is a fantastic way to organize your kitchen and maximize space. It’s not only functional but also customizable to fit your aesthetic. In just a few straightforward steps, you can build a sturdy, stylish cart that moves easily and keeps your essentials within reach. This project is perfect for DIY enthusiasts looking to enhance their kitchen organization without spending a fortune. Whether you prefer a rustic look with reclaimed wood or a sleek modern vibe with metal accents, a rolling pantry cart can be tailored to match your decor while providing practical storage solutions. Let’s dive into how you can craft your own functional and stylish rolling pantry cart.

How to Make a Rolling Pantry Cart
Gathering Materials and Tools
Before starting your project, collect all the necessary materials. You will need wooden boards, wheels, screws, a drill, a saw, and paint or stain if you want to add color. Having everything ready will make the building process smoother and faster.
Identify the best type of wood for your cart. Popular options include plywood, pine, or cedar because they are lightweight yet sturdy. Select wheels that can support the weight of your pantry items while allowing easy movement.
Prepare your workspace. Clear a large area where you will cut and assemble the cart. Keep tools organized and within reach to improve efficiency during construction.
Designing Your Rolling Pantry Cart
Start by sketching a simple plan of your cart. Decide on the height, width, and depth based on your storage needs and available space. Consider adding multiple shelves for better organization.
Think about the number of wheels needed. Typically, two wheels are mounted at the back and two at the front, allowing for easy steering. Choose wheels with a lock feature to keep the cart steady when needed.
Incorporate details such as handles or grips for easier movement. Decide whether to include drawers, baskets, or hooks for additional storage options.
Measuring and Cutting the Wood
Measure your wood pieces carefully, following your design plans. Use a tape measure and mark cutting lines clearly with a pencil.
Cut the wooden boards using a saw, ensuring straight and clean edges. Safety tip: Always wear protective gear, such as goggles and gloves, during cutting.
For shelves, cut multiple pieces as needed. Also, cut side panels and the base of your cart, making sure dimensions match your overall design.
Assembling the Frame
Begin by attaching the side panels to the base using screws. Drill pilot holes first to prevent wood from splitting.
Connect the shelves to the side panels at your desired heights. Use brackets or additional supports for added stability.
Ensure all parts are aligned properly before tightening screws fully. Use a level to verify that your frame is even and sturdy.
Attaching the Wheels
Choose the best mounting locations for your wheels—typically at each corner of the base. Mark drill points precisely.
Attach the wheels securely, following manufacturer instructions. Use appropriate screws or bolts, and tighten them firmly to prevent wobbling.
For wheels with a lock feature, test the locking mechanism to confirm it functions correctly before moving on.
Adding Finishing Touches
Sand the entire cart to smooth rough edges and surfaces. This step makes it safer and gives your cart a polished appearance.
Apply paint, stain, or sealant to protect the wood and customize the look. Consider choosing bright colors for a cheerful touch or neutral tones for a sleek style.
Add accessories like baskets, hooks, or labels to help organize your pantry items better.
Implementing Storage Solutions
Use baskets or small containers on shelves for dry goods, spices, or snacks. Label each container for easy identification.
Hang hooks on the sides for utensils, bags, or cleaning supplies. Incorporate additional shelves if space allows, to maximize storage capacity.
Arrange your pantry items thoughtfully to keep frequently used items within reach and heavier items on lower shelves for safety.
Maintaining Your Rolling Pantry Cart
Regularly check the wheels for debris or damage. Lubricate the wheels periodically to ensure smooth movement.
Clean the wood surfaces with a damp cloth to prevent dust buildup. Reapply protective finishes if the surface becomes worn or stained.
Adjust the shelves or accessories as your storage needs change. Proper maintenance extends the lifespan of your cart and keeps it functional.
Tips for Customizing Your Cart
Personalize your cart by painting it in your favorite colors or adding decorative details like stencils or decals.
Create a unique storage layout by adding dividers or adjustable shelves, allowing flexibility for different sized items.
Use removable baskets or containers for easy cleaning and reorganization.
Incorporate a handle or grip that matches your style while making the cart easier to pull or push.
Additional Ideas for a Perfect Rolling Pantry Cart
Integrate a small cutting board on the top for quick meal prep.
Add a paper towel holder or spice rack for convenience.
Design the cart with foldable or collapsible parts to save space when not in use.
Think about using eco-friendly or recycled materials to make your project more sustainable.
Select wheels with high load capacity if you plan to store heavy items like canned goods or bulk supplies.
Building your own rolling pantry cart offers a practical and fun way to customize storage space in your home. By choosing the right materials, planning carefully, and assembling with attention to detail, you can create a durable and stylish addition to your kitchen. Regular maintenance and thoughtful organization ensure it remains a useful asset for years to come. Whether you use it for snacks, spices, or cleaning supplies, your handmade cart will help keep your pantry neat and accessible.
Even if you're renting this DIY pull out kitchen storage cabinet will help you organize your kitchen
Frequently Asked Questions
What materials are best suited for building a durable rolling pantry cart?
Choose sturdy materials like hardwoods such as oak or maple for the frame and shelves to ensure longevity. Use metal casters with locking mechanisms for stability and ease of movement. Avoid cheap plastics or flimsy wood that may weaken over time or under weight.
How can I ensure my rolling pantry cart has enough storage space for various items?
Plan your design with adjustable shelves to accommodate different heights of pantry items. Incorporate drawers or baskets for smaller items and leave enough clearance between shelves for larger packages. Measuring your storage needs before construction helps create a functional layout.
What tools are necessary to assemble a rolling pantry cart at home?
Gather basic tools such as a saw, drill, screwdriver, measuring tape, and level. Using clamps and sandpaper can help with precise assembly and finishing. Having these tools on hand makes the process smoother and more accurate.
How can I add wheels securely to support heavy loads on my cart?
Attach heavy-duty casters to the base using appropriate screws or bolts designed for the casters. Reinforce the mounting points with additional wood blocks if needed. Ensure the wheels are rated for the weight you plan to carry for safety and durability.
What finishing techniques will help protect my DIY pantry cart from moisture and wear?
Apply a coat of primer followed by a durable sealant or waterproof paint to safeguard the wood. Consider adding a clear polyurethane finish for extra protection against spills and scratches. Regular maintenance, such as cleaning and resealing, extends the life of your cart.
Final Thoughts
Pour faire un rolling pantry cart, commence par choisir des matériaux légers mais solides comme le bois ou le métal. Assemblez les étagères selon la taille souhaitée et fixez-les solidement. Ajoutez des roues robustes pour faciliter la mobilité, en veillant à ce qu’elles soient pivotantes pour plus de facilité.
Pour finir, rangez vos articles et personnalisez votre panier roulant avec des paniers ou des organisateurs. Conclure avec comment faire un rolling pantry cart est simple : suivez ces étapes pour créer une solution pratique qui libère de l’espace et facilite l’accès à vos produits.