Struggling with a tiny, cluttered kitchen pantry? This guide offers a complete roadmap to transforming even the smallest space into an organized, highly functional storage area. Discover how to declutter ruthlessly, maximize vertical space, and implement smart storage solutions that keep your pantry neat, accessible, and stress-free. Say goodbye to food waste and hello to a harmonious kitchen!
How to Organize Kitchen Pantry in Small Space
Hello there, fellow home chef! Do you dream of a perfectly organized kitchen pantry where every ingredient has its place, and finding what you need is a breeze? But then you look at your small pantry space and sigh, wondering if it’s even possible? We understand! A small pantry can feel like a constant battle against clutter, expired goods, and items getting lost in the abyss. It can lead to food waste, frustration, and a general sense of disarray in your kitchen.
But here’s the good news: organizing a kitchen pantry, even a tiny one, is absolutely achievable. With the right strategies and a bit of dedication, you can transform your cramped cupboard into a highly functional, efficient, and even beautiful storage area. This comprehensive guide is designed to walk you through every step of the process, from the initial purge to maintaining your perfectly organized small kitchen pantry. You’ll learn practical tips, smart storage solutions, and how to make the most of every single inch. Let’s turn that pantry frustration into pantry perfection!
Key Takeaways
- Start with a Full Purge: Before buying any organizers, empty your entire pantry. Check expiration dates, discard expired items, and donate what you won’t use. This ruthless decluttering is the most crucial first step.
- Utilize Vertical Space Smartly: Small pantries often have unused vertical potential. Implement shelf risers, stackable containers, and over-the-door organizers to create extra storage levels and make the most of every inch.
- Categorize and Zone Your Items: Group similar items together (e.g., baking supplies, snacks, breakfast items). Assign specific zones within your pantry for these categories to ensure everything has a “home” and is easy to find.
- Choose the Right Storage Solutions: Invest in containers that fit your space and items perfectly. Clear bins, airtight jars, drawer dividers, and lazy Susans are excellent for maintaining visibility and order in a small kitchen pantry.
- Label Everything Clearly: Once items are in containers and zones, label them. This not only helps you and your family find things quickly but also ensures items are returned to their correct spot, preventing clutter build-up.
- Prioritize Accessibility: Place frequently used items at eye level or in easily reachable spots. Less used items can go higher or lower, making your daily cooking routine more efficient and less frustrating.
- Implement a Maintenance Routine: Organization isn’t a one-time event. Schedule quick weekly tidies and a deeper monthly or quarterly check-up to keep your small kitchen pantry consistently organized and functional.
Step 1: Embrace the Purge – Empty and Declutter Everything
This is where the magic begins, and it’s perhaps the most crucial step for organizing any small space. You cannot truly organize what you haven’t seen.
H3: Remove Every Single Item
Yes, really. Take everything out of your kitchen pantry. Every box, every can, every jar, every bag. Lay them out on your kitchen counter, dining table, or even the floor. This might seem like a daunting task, but it gives you a full inventory of what you actually have. Plus, seeing the empty pantry space is incredibly motivating.
H3: Be Ruthless with Decluttering
Now comes the tough but rewarding part. Go through each item with a critical eye.
- Check Expiration Dates: This is non-negotiable. Discard anything that’s expired or past its prime. Don’t risk it!
- Assess Usage: Ask yourself: “When did I last use this? Will I use this again?” If an item has been sitting untouched for months (or years!) and doesn’t spark joy or serve a practical purpose, it might be time to let it go.
- Consolidate Duplicates: Do you have three half-empty bags of pasta? Consolidate them into one airtight container. The same goes for spices, flours, and other staples.
- Create “Keep,” “Discard,” and “Donate” Piles:
- Keep: Items you regularly use and are in good condition.
- Discard: Expired, spoiled, or truly unusable items.
- Donate: Unopened, non-expired items you know you won’t use but are perfectly good for others. Think food banks or local shelters.
This step is vital for a small kitchen pantry because every inch counts. You can’t afford to store things you don’t need or use.
Step 2: Clean Your Pantry Space Thoroughly
With your pantry completely empty, now’s the perfect time for a deep clean. This simple step makes a huge difference and ensures you’re starting with a fresh, hygienic slate.
H3: Wipe Down Every Surface
Using an all-purpose cleaner or a simple solution of vinegar and water, wipe down all shelves, walls, and the floor of your pantry. Pay attention to sticky spots or crumbs. Don’t forget the inside of the pantry door if you have one!
H3: Address Any Odors or Pests
If you notice any lingering odors, place an open box of baking soda in the pantry for a few days to absorb them. If you suspect any pests (unlikely after a full purge, but good to check), address them immediately before restocking. This is an important step in maintaining a healthy food storage area.
Step 3: Categorize Your Food Items
Before you even think about putting things back, group your “keep” items into logical categories. This is fundamental for an organized kitchen pantry, especially in a small space.
H3: Brainstorm Logical Categories
Think about how you use your pantry items. Common categories include:
- Baking Supplies: Flours, sugars, baking powder/soda, chocolate chips, sprinkles.
- Breakfast Items: Cereal, oatmeal, granola, pancake mix.
- Snacks: Granola bars, crackers, chips, dried fruit.
- Pasta & Grains: Various pastas, rice, quinoa, couscous.
- Canned Goods: Soups, vegetables, beans, tuna.
- Sauces & Condiments: Ketchup, mustard, soy sauce, oils, vinegars (consider fridge for some).
- Spices & Seasonings: (If not kept in a separate spice rack).
- Jars & Spreads: Jams, peanut butter, honey.
- Beverages: Teas, coffee, juice boxes (if stored in pantry).
- Meal Kits/Quick Meals: Mac and cheese, instant noodles.
- “Backup” or Bulk Items: Large bags of rice, extra pasta.
H3: Create Temporary Zones
Once categorized, keep these groups separate on your counter. This visualization will help you understand the volume of each category and plan where they might go in your pantry. This “zoning” strategy is key for efficient organization in a small kitchen pantry.
Step 4: Measure and Plan Your Storage Solutions
This step is crucial for small spaces. Don’t just buy organizers randomly!
H3: Measure Your Pantry Dimensions
Grab a tape measure and note down the width, depth, and height of each shelf. Also, measure the distance between shelves. Don’t forget the inside of the pantry door if you plan to use it for storage. This information will prevent you from buying items that don’t fit.
H3: Consider Your Items and Habits
Think about your categories from Step 3.
- Which items do you use most frequently? These should be easily accessible.
- Which items are heavy or bulky? These should go on lower, sturdier shelves.
- Do you have awkward spaces or deep shelves? Think about pull-out drawers or lazy Susans.
- What specific containers do you need for specific items (e.g., airtight for flour, clear for snacks)?
Sketching out a rough plan can be incredibly helpful here. Visualize where each category will live within your small kitchen pantry.
Step 5: Choose the Right Storage Containers
The right tools make all the difference. For a small kitchen pantry, smart container choices are paramount.
H3: Prioritize Uniformity and Stackability
Aim for containers that are uniform in color or style to create a cohesive, less cluttered look. More importantly, choose containers that are stackable to maximize vertical space.
H3: Explore Different Container Types
- Clear, Airtight Containers: Essential for dry goods like flour, sugar, pasta, rice, and cereals. They protect food from pests and moisture, extend shelf life, and allow you to see contents at a glance. Square or rectangular shapes maximize space better than round ones.
- Baskets & Bins: Great for grouping snacks, small packets, or oddly shaped items. Opaque baskets can hide clutter, while clear bins offer visibility. Measure your shelves to ensure they fit.
- Shelf Risers/Expanders: These are lifesavers for adding an extra “shelf” within an existing shelf, creating more vertical storage for cans, jars, or plates.
- Lazy Susans (Turntables): Perfect for corner spaces or deep shelves. Use them for oils, vinegars, spices, or small jars to make everything accessible with a spin.
- Over-the-Door Organizers: If you have a pantry door, this is prime real estate! Use it for spices, small snacks, foil/wrap boxes, or even extra bottles.
- Drawer Dividers: If you have pantry drawers, dividers keep small packets and utensils neat.
- Can Organizers: Tiered can organizers or dispensers help store cans efficiently and allow for easy rotation (first-in, first-out).
Remember the measurements you took! This prevents impulse buys that won’t fit your small kitchen pantry.
Step 6: Maximize Vertical Space
This is where small pantry organization truly shines. Vertical space is often underutilized.
H3: Use Shelf Risers and Stackable Bins
As mentioned, shelf risers effectively double the capacity of a single shelf. Stackable containers for dry goods also achieve this. Think about how you can go “up” rather than just “across.”
H3: Leverage the Back of the Door
An over-the-door organizer with multiple pockets or shelves can add significant storage for smaller, lighter items. It’s perfect for spices, small condiments, or snack packets that would otherwise take up valuable shelf space.
H3: Adjust Shelves if Possible
If your pantry has adjustable shelves, take advantage of it! Play around with different heights to accommodate taller items (like cereal boxes or large oil bottles) while still leaving enough room for shorter items on other shelves. This customization is key to making a small kitchen pantry work for you.
Step 7: Implement a Smart Layout and Accessibility
Now it’s time to put everything back, strategically.
H3: Place Frequently Used Items at Eye Level
Think about your daily routine. Cereals, snacks, baking staples, and other frequently accessed items should be on the shelves that are easiest to reach – typically between your waist and shoulder height.
H3: Store Heavy Items on Lower Shelves
Large bags of flour or sugar, bulk items, heavy canned goods, or bottles of beverages should be placed on the lowest shelves. This prevents accidents and makes them easier to retrieve.
H3: Less Used Items Go Higher or Lower
Special occasion items, backup supplies, or bulk purchases can be stored on the highest or lowest shelves. Just make sure they are still accessible with a step stool if needed.
H3: Group by Category (Zoning in Action)
Place all your baking supplies together in one zone. All your snacks in another. This keeps your small kitchen pantry tidy and makes meal prep faster. When items have a clear “home,” it’s easier to put them away and find them later.
H3: Consider the “First In, First Out” (FIFO) Rule
When restocking, place newer items behind older ones. This helps ensure you use older products first, reducing food waste – an especially important consideration when space is limited.
Step 8: Label Everything Clearly
Don’t skip this step! Labels are the unsung heroes of pantry organization.
H3: Label Containers and Shelves
Label your airtight containers with the contents (e.g., “All-Purpose Flour,” “Brown Sugar,” “Lentils”). You can also add the expiration date with a dry-erase marker for quick reference.
Consider labeling the shelves or sections too (e.g., “Baking,” “Snacks,” “Cans”). This helps everyone in the household know where things belong, making maintenance much easier.
H3: Choose Your Labeling Method
- Label Maker: Professional and clear.
- Chalkboard Labels & Chalk Pen: Trendy and easily changeable.
- Vinyl Labels: Stylish and durable.
- Handwritten Labels: Simple and personal, using sticky labels or masking tape.
Labels remove guesswork and ensure items are returned to their designated spots, which is vital for maintaining order in a small kitchen pantry.
Step 9: Restock and Refine Your System
With everything in its place, take a step back and admire your handiwork!
H3: Perform a Final Review
Stand in front of your organized kitchen pantry. Does it feel intuitive? Can you easily access what you need? Is there anything that could be adjusted for better flow? Maybe a basket needs to be moved, or two categories swapped. Don’t be afraid to tweak your system.
H3: Observe Workflow
Over the next few days and weeks, pay attention to how you and your family interact with the pantry. Are certain items still hard to reach? Do things get messy quickly in one particular area? This feedback helps you refine your initial organization plan.
Step 10: Maintain Your Organized Pantry
Organization isn’t a one-time event; it’s an ongoing process. Especially for a small kitchen pantry, consistent maintenance prevents clutter from creeping back in.
H3: Implement a Quick Weekly Tidy
Spend 5-10 minutes each week doing a quick “reset.”
- Put items back in their designated spots.
- Wipe up any small spills immediately.
- Quickly check for items that are running low.
H3: Schedule Deeper Check-ups
Every month or quarter, do a mini-purge.
- Check expiration dates again.
- Wipe down shelves.
- Re-evaluate if any categories or storage solutions need adjusting as your needs change.
H3: Practice the “One In, One Out” Rule (Where Applicable)
When you buy a new container of something, try to use up the old one first. For items like spices, avoid buying a new one if you still have a nearly full old one. This prevents accumulation in your small kitchen pantry.
H3: Train Your Family
Communicate your new system to everyone who uses the pantry. Show them where things belong and explain the benefits of keeping it organized. Consistency from everyone is key to long-term success.
Troubleshooting Common Small Pantry Problems
Even with the best intentions, you might run into a few snags. Here’s how to tackle them:
H3: “It Still Feels Too Cluttered!”
If your organized kitchen pantry still feels packed, it’s a sign you might have too many items for your space. Go back to Step 1 and be even more ruthless with decluttering. Consider if you’re buying too much in bulk for your small space, or if some items could be stored elsewhere (e.g., rarely used small appliances in a basement, extra paper goods in a laundry room).

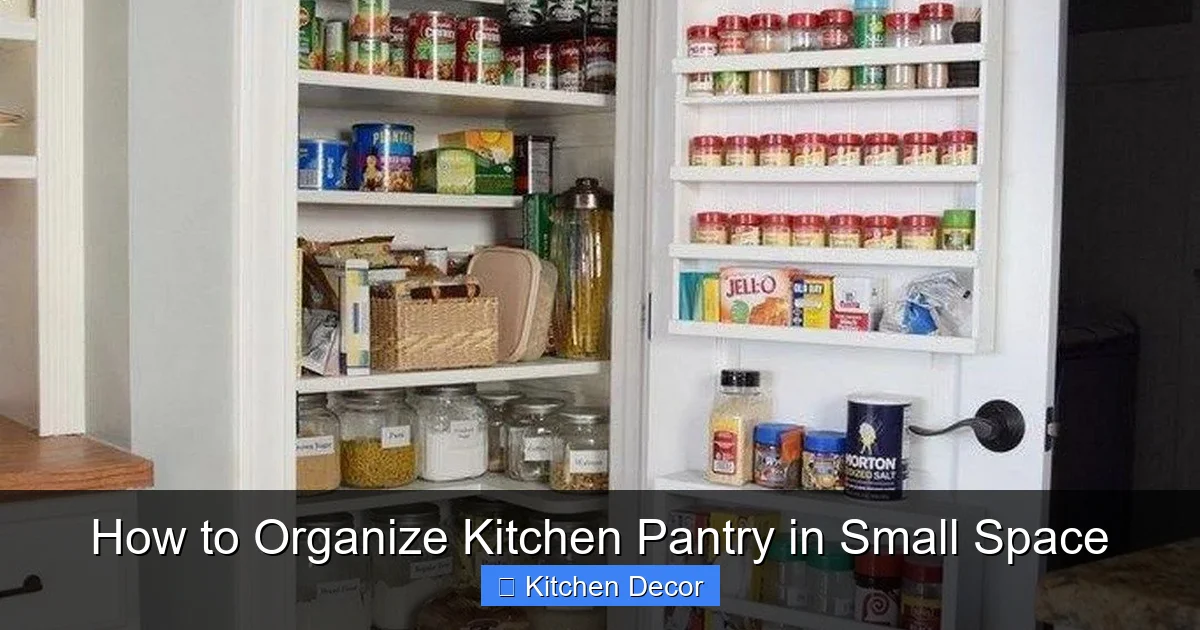
Visual guide about How to Organize Kitchen Pantry in Small Space
Image source: casa.abril.com.br

Visual guide about How to Organize Kitchen Pantry in Small Space
Image source: i.pinimg.com

Visual guide about How to Organize Kitchen Pantry in Small Space
Image source: daintydressdiaries.com
H3: “I Can’t Find Anything Even With Labels!”
This usually means your categories aren’t logical, or your storage solutions are obscuring things. Are clear containers being used effectively? Are your labels clear enough? Perhaps your zones aren’t intuitive. Re-evaluate your categories and accessibility. Maybe move frequently used items to an even more prominent spot.
H3: “My Pantry Doesn’t Stay Organized for Long.”
This is a common issue! It typically points to a lack of consistent maintenance or unclear “homes” for items. Review Step 10 – ensure you’re doing regular tidies. Also, check if your family understands the system. Sometimes, simplifying categories or using more “foolproof” containers (like opaque bins for visually busy items) can help.
H3: “I Have Really Deep Shelves, Things Get Lost in the Back.”
Deep shelves are tricky for a small kitchen pantry. Solutions include: lazy Susans for corners or the very back of shelves; pull-out drawers or bins that you can slide forward; or dedicating the back to infrequently used items that you don’t mind retrieving occasionally.
Conclusion
Organizing a kitchen pantry in a small space might seem like a monumental task, but by following these steps, you can create a system that truly works for you and your family. From the initial purge to selecting the perfect containers and maintaining your sparkling new setup, every action builds towards a more efficient, less stressful kitchen. Imagine easily finding that elusive spice, knowing exactly what groceries you need, and reducing food waste. This isn’t just about tidiness; it’s about simplifying your daily life and making your kitchen a happier, more functional place. So, take a deep breath, roll up your sleeves, and get ready to transform your small kitchen pantry into a masterpiece of organization! You’ve got this.