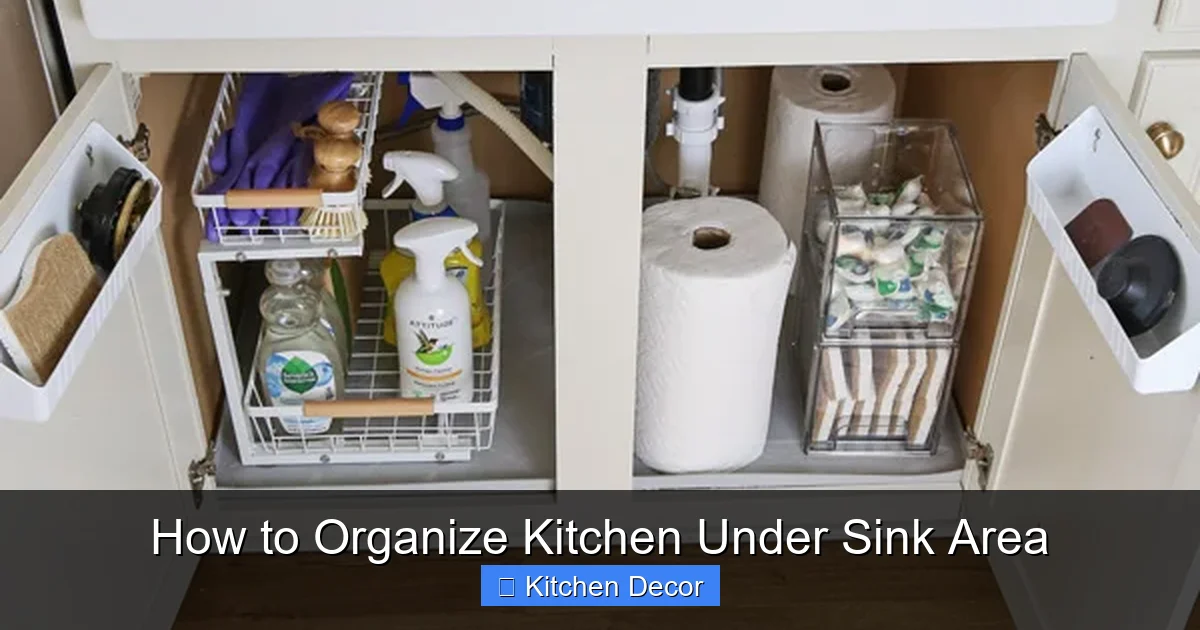
Is your kitchen under-sink cabinet a black hole of cleaning supplies and random items? This comprehensive guide will show you how to organize kitchen under sink area effectively, turning chaos into calm. You’ll learn the crucial steps of purging, cleaning, planning, and implementing smart storage solutions, ensuring every item has a designated home and is easily accessible. Say goodbye to clutter and hello to an efficient, well-maintained space!
How to Organize Kitchen Under Sink Area
The kitchen under-sink area. For many of us, it’s a chaotic abyss, a black hole where cleaning supplies, plastic bags, and half-used bottles go to disappear. It’s often the dumping ground for anything that doesn’t quite fit elsewhere, leading to a frustrating mess when you’re trying to find that specific sponge or bottle of cleaner. But it doesn’t have to be this way! Imagine opening that cabinet door to a neatly arranged, functional space where everything has a home and is easy to find. Sounds like a dream, right?
Well, wake up, because that dream is about to become a reality! Organizing your kitchen under-sink area is not only achievable but can significantly improve the efficiency and tidiness of your entire kitchen. A well-organized under-sink cabinet makes daily chores simpler, reduces stress, and even helps prolong the life of your cabinet by preventing spills and moisture damage. This comprehensive guide will walk you through every step, from clearing out the clutter to implementing clever storage solutions, ensuring your under-sink space remains tidy and functional.
By the end of this guide, you’ll have a clear understanding of how to transform your under-sink cabinet from a disaster zone into a model of organized efficiency. Let’s get started on creating a kitchen under-sink area that you’ll actually love to open!
Key Takeaways
- Start with a Full Emptying and Purge: The first and most critical step is to remove everything from under the sink. This allows you to see the true space, declutter expired, unused, or unnecessary items ruthlessly, and prevent simply reorganizing clutter.
- Deep Clean and Protect the Space: Once empty, thoroughly clean and sanitize the area. Consider adding a waterproof liner to protect the cabinet base from future spills and leaks, which is essential for maintaining hygiene and preventing damage.
- Measure and Plan Thoughtfully: Before buying any organizers, measure the exact dimensions of your cabinet, noting any pipes or disposal units. This prevents purchasing ill-fitting items and helps you plan a layout that maximizes every inch of available space.
- Implement Zone-Based Storage: Group similar items together (e.g., dish soap, sponges, dishwasher pods). Designate specific “zones” for these categories, making it easier to find what you need and return items to their proper place.
- Utilize Vertical and Door Space: The under-sink area often has untapped vertical height and cabinet door space. Incorporate stackable shelves, tiered organizers, tension rods, and over-the-door caddies to maximize storage without obstructing pipes.
- Prioritize Accessibility for Frequently Used Items: Place items you use daily or weekly at the front and within easy reach. Less frequently used items can be stored further back or in less accessible spots, ensuring efficiency in your daily routines.
- Maintain with Regular Checks: Organization isn’t a one-time task. Schedule quick tidy-ups and an annual deep dive to keep your under-sink area functional and prevent clutter from creeping back in.
Step 1: Empty Everything Out
You can’t truly organize kitchen under sink area effectively without starting with a blank slate. This initial step is crucial for gaining a full understanding of the space you’re working with and what truly resides within it. Resist the urge to just push things around; a complete clear-out is the only way to achieve lasting organization.
Prepare Your Workspace
Before you begin, gather a few essentials. You’ll need a large trash bag for items to discard, a laundry basket or box for items to relocate, and a cleaning caddy with basic cleaning supplies (sprays, sponges, rags). Lay down an old towel or newspaper on your kitchen floor or counter to protect it from any dirty items or spills as you remove them from the cabinet.
Remove Every Single Item
Now, open those cabinet doors and start pulling everything out. Yes, everything! Don’t worry about sorting just yet; simply place all items onto your prepared surface. As you remove things, take note of what you have. You might be surprised by how many duplicates or long-forgotten items have accumulated over time. This initial removal gives you a realistic inventory and allows you to physically see the entire space, including any hidden pipes or structural elements that will influence your future organization plan.
Step 2: Declutter and Purge Ruthlessly
Once everything is out, the real work of decluttering begins. This is where you make critical decisions about what stays, what goes, and what needs a new home. Be honest with yourself and aim to keep only what is truly useful and frequently used in this specific location.
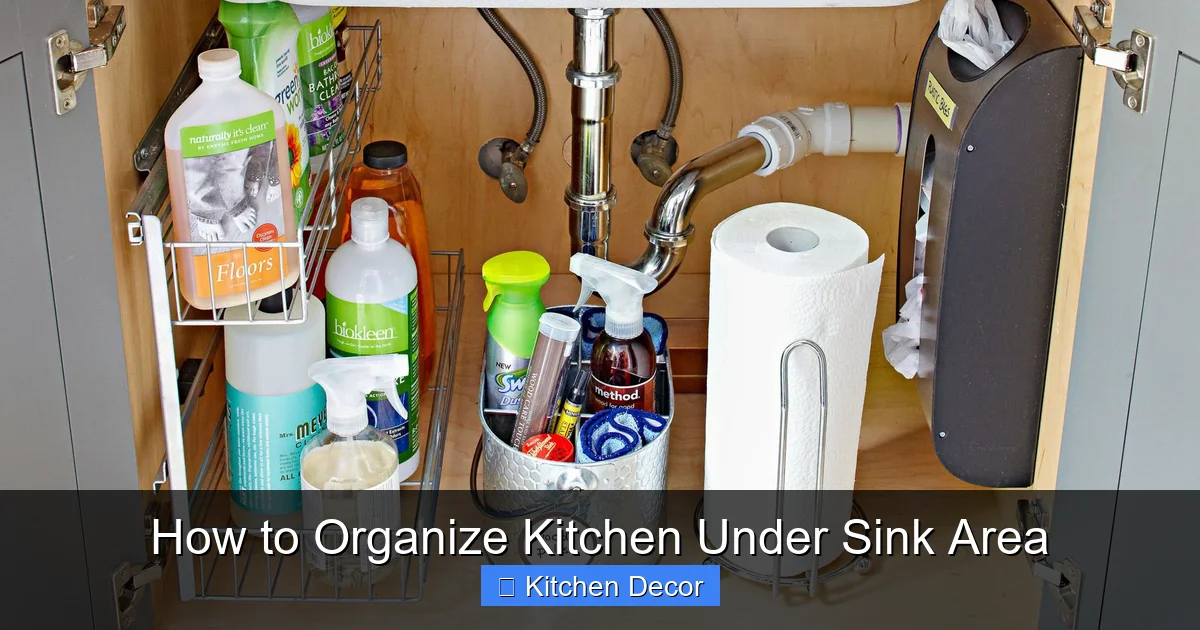
Visual guide about How to Organize Kitchen Under Sink Area
Image source: bhg.com
Categorize Your Items
As you look at the pile of items on your floor, begin to sort them into broad categories. Common categories might include:
- Cleaning supplies (dish soap, surface cleaners, window cleaner)
- Dishwasher supplies (pods, rinse aid)
- Sponges, brushes, rags
- Trash bags/recycling bags
- Plastic bags (grocery bags)
- Random tools or small appliances
- Pest control products
- Gardening supplies (if stored inside)
The “Keep, Toss, Relocate” System
For each item, apply this simple three-category system:
- Keep: These are items you use regularly and logically belong under the kitchen sink. Think dish soap, dishwasher pods, scrubbing brushes.
- Toss: This category includes anything expired, empty, broken, or items you haven’t used in over a year and realistically won’t use again. Don’t forget to properly dispose of chemicals or hazardous materials according to local guidelines.
- Relocate: Many items end up under the sink because they don’t have another home. Tools might belong in a utility drawer, extra pantry items in the pantry, or spare lightbulbs in a utility closet. Be firm and find a more appropriate home for these items.
Check Expiration Dates
Take a moment to check the expiration dates on all cleaning products. While many don’t spoil in the same way food does, their efficacy can diminish over time. Get rid of anything past its prime.
Be Honest About Usage
Ask yourself: “When was the last time I used this?” If the answer is “I don’t remember” or “never,” it’s probably a candidate for the ‘toss’ or ‘relocate’ pile. Keeping only what you truly need and use frequently is key to maintaining an organized kitchen under sink area.
Step 3: Deep Clean and Sanitize
With an empty cabinet, this is the perfect opportunity to give your under-sink area a thorough cleaning. This step is often overlooked but is vital for hygiene and creating a fresh start for your new organizational system.

Visual guide about How to Organize Kitchen Under Sink Area
Image source: bhg.com
Wipe Down Surfaces
Using an all-purpose cleaner and a clean cloth or sponge, wipe down the entire interior of the cabinet. Pay special attention to the bottom, sides, and even the inside of the doors. You’ll likely find dust, grime, and perhaps some sticky residue from past spills.
Tackle Stains and Spills
If you encounter stubborn stains or dried spills, you might need a stronger cleaner or a bit more elbow grease. For tough grime, a magic eraser can work wonders. Be sure to scrub away any lingering marks to reveal a clean, fresh surface. Rinse your cloth frequently to avoid spreading dirt.
Address Odors
Under-sink cabinets can sometimes develop musty or unpleasant odors, especially if there have been leaks or spills. After cleaning, if an odor persists, try placing an open box of baking soda, a bowl of white vinegar, or activated charcoal in the cabinet for a few days to absorb the smells. Ensure the area is completely dry before moving on.
Consider a Protective Liner
To prevent future damage from spills or potential leaks, installing a cabinet liner is a smart investment. You can find waterproof, non-slip liners specifically designed for under-sink cabinets. These are easy to cut to size and provide an extra layer of protection, making future clean-ups much simpler. This simple addition can save you from potential headaches and costly repairs down the line, an important step to truly organize kitchen under sink area for the long term.
Step 4: Assess Your Space and Measure
Before you even think about buying storage solutions, you need to understand the dimensions and unique challenges of your specific under-sink area. Every cabinet is different, especially when it comes to plumbing.

Visual guide about How to Organize Kitchen Under Sink Area
Image source: justagirlandherblog.com
Note Obstacles (Pipes, Disposal)
Closely examine the interior of your cabinet. The most common obstacles are the drain pipes, water lines, and often a garbage disposal unit. These elements dictate where you can place shelves, drawers, and bins. Notice how much clearance you have around them. Are they centered, or do they hug one side? This information is critical for selecting compatible organizers.
Measure Dimensions
Grab a tape measure and carefully measure the width, depth, and height of your cabinet. Don’t forget to measure the height from the cabinet floor to the lowest part of any pipes or the bottom of the disposal unit. These measurements will guide your purchasing decisions, ensuring that any organizers you buy will fit without obstruction. Write these measurements down and keep them handy when shopping.
Think Vertically and Horizontally
As you measure, start envisioning how you can maximize both horizontal and vertical space. The area around and above the pipes is often underutilized. Consider how pull-out drawers might navigate around pipes, or how stackable shelves could create new storage levels. This thoughtful assessment prevents wasted space and ensures you make the most of your cabinet’s potential when you organize kitchen under sink area.
Step 5: Plan Your Zones and Storage Solutions
With a clean, empty, and measured space, it’s time to devise your organizational strategy. This involves grouping similar items and selecting the right tools to keep them contained and accessible.
Group Similar Items
Look at your ‘keep’ pile from Step 2. Start grouping items that make sense together. For example:
- Dishwashing Zone: Dish soap, sponges, scrub brushes, dishwasher pods.
- Surface Cleaning Zone: All-purpose cleaner, glass cleaner, microfiber cloths.
- Bag Storage Zone: Trash bags, recycling bags, grocery bags.
- Specialty Zone: Furniture polish, pest control, small kitchen tools not used daily.
This logical grouping is the foundation of an efficient system.
Designate Specific Zones
Now, mentally assign these groups to specific areas within your under-sink cabinet. Frequently used items (like dish soap) should be at the front and easily accessible. Less frequently used items can go towards the back or on higher shelves if you’re using vertical organizers. Consider the flow of your kitchen tasks; if you often grab the dish soap while standing at the sink, that’s where it should live.
Research Smart Storage Products
This is where your measurements from Step 4 become invaluable. There’s a vast array of under-sink organizers available, designed to tackle various challenges. Here are some popular and effective options:
- Pull-Out Sliding Drawers/Baskets: These are game-changers for accessing items at the back of the cabinet without having to get on your hands and knees. Look for U-shaped designs that fit around plumbing. They make it incredibly easy to organize kitchen under sink area efficiently.
- Stackable Shelves or Risers: Create vertical storage, effectively doubling or tripling your shelf space. These are great for smaller items or creating different levels for different product heights.
- Small Bins and Totes: Perfect for corralling smaller items like sponges, scrub brushes, or rubber gloves. Clear bins allow you to see contents at a glance.
- Lazy Susans (Turntables): Excellent for corner cabinets or for bottles and sprays. A quick spin brings everything within reach.
- Over-the-Door Organizers: Maximize vertical space by utilizing the inside of your cabinet doors. These are ideal for holding cleaning cloths, sponges, or even thin bottles.
- Tension Rods: A simple tension rod can be placed across the cabinet to hang spray bottles by their nozzles, freeing up shelf space below.
- Magazine Holders: Surprisingly effective for storing rolls of trash bags or foil/plastic wrap boxes vertically.
Don’t just buy the first thing you see. Read reviews, compare sizes, and choose products that genuinely fit your space and your specific needs to organize kitchen under sink area perfectly.
Step 6: Implement Your Organization System
Now comes the satisfying part: putting everything back into its designated place using your new storage solutions. This is where your planning comes to life!
Start with Larger Items
Begin by placing your largest organizers, such as pull-out drawers or stackable shelves, into the cabinet. Ensure they fit around pipes and that doors can close properly. If you have a protective liner, make sure it’s in place first. Once the framework is set, it becomes easier to fill in the smaller pieces.
Utilize Vertical Space
Place taller bottles or multi-level items on stackable shelves. Hang spray bottles from a tension rod. Use door organizers for items that are lightweight and frequently accessed. Remember, the goal is to get items off the cabinet floor and make them visible and accessible.
Contain Smaller Items
Use your smaller bins and baskets to group items. For example, all sponges go in one bin, scrubbing brushes in another. This prevents tiny items from getting lost in the back of the cabinet and maintains a tidy look. Labeling these bins (with a label maker or a simple piece of tape and marker) can make it even easier to maintain the system, especially for other household members.
Label Everything (Optional but Recommended)
While optional, labeling can significantly improve the long-term success of your organization. Clearly label bins, shelves, or zones so everyone knows where things belong. This is particularly helpful for families or shared living spaces, reducing the chances of items being misplaced. Labels help reinforce your decision to organize kitchen under sink area with purpose.
Consider Child Safety
If you have young children or pets, the under-sink area often contains hazardous materials. Ensure all toxic cleaners are stored in containers with child-resistant caps. Install childproof latches or locks on the cabinet doors to prevent accidental access. Safety should always be a top priority when deciding how to organize kitchen under sink area.
Step 7: Maintain Your Organized Under-Sink Area
The work doesn’t stop once everything is neatly arranged. To ensure your under-sink area stays functional and clutter-free, ongoing maintenance is essential.
The “One In, One Out” Rule
Adopt the “one in, one out” rule, especially for items like cleaning supplies. When you buy a new bottle of dish soap, make sure the old, empty one is discarded. This prevents over-accumulation and keeps your inventory manageable. This simple rule helps maintain the balance you achieved when you first decided to organize kitchen under sink area.
Regular Quick Tidy-Ups
Spend a few minutes once a week or every couple of weeks to do a quick tidy-up. Straighten items, wipe away any new spills, and ensure everything is returned to its designated spot. This prevents small messes from escalating into full-blown chaos again.
Annual Deep Dive
Just like your initial organization, schedule an annual deep dive. This involves emptying everything out again, checking expiration dates, cleaning, and reassessing if your current system is still working for your needs. Over time, your habits or products might change, requiring minor adjustments to your under-sink organization.
Troubleshooting Common Under-Sink Challenges
Even with the best intentions, organizing under the sink can present unique hurdles. Here are solutions to common problems:
Leaks and Water Damage
Problem: You notice dampness, stains, or a musty smell indicating a leak.
Solution: Immediately remove all contents. Dry the area thoroughly. Identify the source of the leak (faucet, pipes, garbage disposal) and fix it or call a plumber. Replace any water-damaged cabinet liners or wood. Prevention is key: regular checks and a good waterproof liner can mitigate damage.
Awkward Plumbing Obstacles
Problem: Pipes, a large garbage disposal, or an oddly shaped drain make it difficult to fit standard organizers.
Solution: This is where careful measuring and specialty products come in. Look for U-shaped pull-out drawers designed to fit around pipes. Use small, modular bins that can be arranged around obstructions. Tension rods can create hanging space above pipes. Custom-cut shelving might also be an option for truly unique spaces.
Odor Problems
Problem: Persistent bad smells even after cleaning.
Solution: Ensure there are no hidden leaks or mold growth. Place an open box of baking soda or activated charcoal in the cabinet to absorb odors. If the smell persists, it might indicate a more serious plumbing issue (like a bad P-trap seal) that requires a professional plumber.
Limited Budget
Problem: Can’t afford expensive pull-out systems or custom solutions.
Solution: Don’t despair! Many effective organizing solutions are budget-friendly. Use repurposed shoeboxes or sturdy gift boxes as bins. Look for affordable plastic bins at dollar stores or discount retailers. Tension rods are inexpensive. DIY cardboard dividers can create sections within bins. The key is creative thinking and utilizing what you already have or can find cheaply to organize kitchen under sink area effectively.
Conclusion
Congratulations! You’ve successfully navigated the journey to organize kitchen under sink area. From the initial purge to implementing a smart storage system and establishing a maintenance routine, you’ve transformed a neglected space into a highly functional and tidy area. No more rummaging, no more hidden messes—just easy access to everything you need.
Remember, an organized under-sink cabinet isn’t just about aesthetics; it’s about making your daily life a little bit easier and your kitchen more efficient. By following these steps and committing to regular upkeep, you’ll enjoy the benefits of a clutter-free and productive kitchen for years to come. Take pride in your newly organized space, and enjoy the calm it brings to your kitchen routine!