Recessed lighting can transform even the smallest kitchen into a bright, welcoming space. To optimize its layout, place fixtures strategically above work areas like countertops and sinks, ensuring even illumination without cluttering the ceiling. Use dimmable lights to adjust brightness for different tasks and moods, and consider spacing them evenly to avoid shadows.
In short, for small kitchens, focus on layered lighting—combining task, ambient, and accent lights—while keeping fixtures minimal and well-placed. This approach maximizes space and functionality while creating a sleek, modern look that feels spacious and inviting.
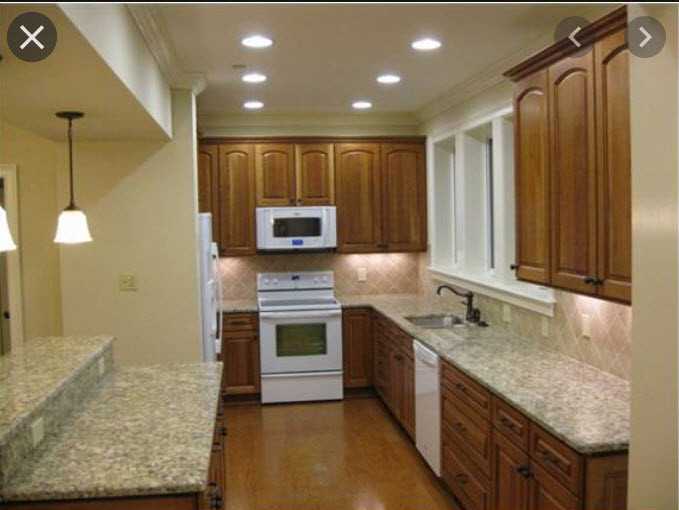
Designing the perfect recessed lighting layout for small kitchens might seem tricky at first, but with the right plan, you can achieve a well-lit, stylish space that maximizes every square inch. As small kitchens often struggle with limited natural light and compact dimensions, strategic lighting becomes essential to make the area feel brighter, larger, and more functional. The key is to choose the right fixture placement to highlight work zones, avoid dark corners, and add depth to the overall design. By carefully planning where to install your recessed lights—focusing on task areas like counters and cooking zones—you can create a balanced, inviting environment that feels open and comfortable without overwhelming the space.

Recessed lighting layout for small kitchens
Designing the perfect lighting plan for a small kitchen can be challenging. Recessed lighting offers a clean and sleek look that can make your space feel larger and more inviting. Proper placement is key to ensuring your small kitchen is well-lit without feeling cluttered.
Understanding the Basics of Recessed Lighting
Recessed lights, also called can lights or downlights, are fixtures installed into the ceiling. They provide a streamlined appearance and direct light downward. These lights are versatile, suitable for task, ambient, or accent lighting.
Because small kitchens often lack space for bulky fixtures, recessed lighting helps maximize ceiling height and space. They create a seamless look, reducing visual clutter in your small kitchen area.
Why Choose Recessed Lighting for Small Kitchens?
Recessed lighting offers many benefits for small kitchens. It creates even illumination, reduces shadows, and enhances the overall brightness of the space. This type of lighting also saves space, as fixtures do not protrude from the ceiling.
Furthermore, recessed lights can be easily combined with other lighting types to customize your kitchen’s ambiance. Whether for cooking, cleaning, or eating, the right layout ensures every task has proper lighting.
Factors to Consider Before Planning Your Layout
- Ceiling height: Higher ceilings allow for more spaced-out lights, while lower ceilings need careful placement to avoid a cramped look.
- Kitchen layout: The arrangement of cabinets, appliances, and work zones influences where to position lights.
- Lighting zones: Identify main zones, such as cooking area, sink, prep space, and dining zone, to plan targeted lighting.
- Natural light: Use windows and skylights to supplement recessed lights and avoid over-lighting.
Planning Your Recessed Lighting Layout
Understanding the Basic Layout Pattern
A common approach is to divide the ceiling into zones based on the kitchen layout. This allows you to space recessed lights evenly across the room for balanced illumination.
In small kitchens, a simple grid pattern often works best. This involves placing lights in rows parallel to the main work areas for maximum effectiveness.
Determining the Number of Lights Needed
| Room Size | Number of Recessed Lights |
|---|---|
| Up to 75 sq ft | 2 to 3 lights |
| 75 to 150 sq ft | 3 to 4 lights |
| Over 150 sq ft | 4 or more lights |
Use this as a guideline but adjust based on your kitchen’s specific layout and lighting needs. Remember, each light should provide approximately 100 to 150 lumens per square foot of space.
Optimal Placement of Recessed Lights
Spacing Between Lights
For general lighting, space recessed lights approximately 24 to 30 inches apart. This spacing prevents overly bright spots or shadows in your small kitchen.
Position lights directly over key work zones, such as the stove, sink, and prep areas, for targeted task lighting. This ensures sufficient brightness where cooking and cleaning happen most.
Placement Tips to Avoid Shadows
- Install lights slightly in front of or above work surfaces to reduce shadows cast by your body.
- Combine recessed lighting with under-cabinet lights for better task visibility.
- Be cautious not to place lights directly in line with windows to prevent glare from natural sunlight.
Layering Your Lighting for Small Kitchens
Using multiple layers of light creates a dynamic and functional space. Recessed lighting works well as ambient lighting, but consider adding accent or task lighting where needed.
Ambient Lighting
Recessed lights should provide a soft, even glow across the entire room. Use dimmable fixtures to adjust brightness during different times of the day or activities.
Task Lighting
Brighten specific areas like countertops, stove, and sink with focused lighting. Combining recessed lights with under-cabinet lights enhances visibility and safety.
Accent Lighting
Highlight decorative elements or architectural features with small, adjustable recessed lights. This adds depth and visual interest to your small kitchen.
Choosing the Right Fixtures and Bulbs
Select fixtures with a trim style that complements your kitchen’s design. For small spaces, flat or baffle trims provide a clean look and reduce glare.
Use LED bulbs for energy efficiency and longevity. Choose color temperatures around 2700K to 3000K for a warm and inviting atmosphere. Ensure the wattage and lumens match your lighting needs for a well-lit kitchen.
Installation Tips for Small Kitchens
- Keep recessed lights at least 12 inches away from walls and cabinets to prevent shadows and glare.
- Install dimmers to adjust lighting levels easily, especially when combining multiple layers of light.
- Ensure proper insulation and ventilation, especially if installing in ceilings with insulation or other ceiling structures.
Maintaining and Upgrading Recessed Lighting
Regularly clean fixtures and bulbs to maintain brightness and efficiency. If bulbs flicker or dim over time, replace them promptly with compatible LED options.
Consider upgrading fixtures to smart or wireless-controlled options for added convenience and flexibility in your small kitchen lighting plan.
Additional Tips for Small Kitchen Lighting Success
- Plan your layout before starting installation to avoid costly adjustments later.
- Balance brightness and shadows to create a comfortable environment for cooking and socializing.
- Test different lighting schemes with temporary fixtures to find what works best for your space and style.
Effective recessed lighting layout allows you to make the most of your small kitchen’s space. With thoughtful planning and proper placement, your kitchen can be both functional and visually appealing.
Interior Design Tips: Dining & Kitchen LIGHTING Do’s and Don’ts!
Frequently Asked Questions
How should I determine the optimal placement of recessed lights in a small kitchen?
Proper placement involves focusing on key work areas like the countertops, sink, and stove. Position the lights approximately 12-18 inches apart along the perimeter or above these zones to provide even illumination. Avoid placing lights directly over the sink to prevent glare and water splashes. Using a layered approach with ambient and task lighting enhances overall visibility and reduces shadows.
What is the ideal number of recessed fixtures for a small kitchen?
Typically, 3 to 5 recessed lights suffice for a small kitchen, depending on its size and layout. Prioritize illuminating the main workspaces and avoid overcrowding the ceiling with fixtures, which can create an overwhelming appearance. Consider the brightness of each light to ensure consistent and ample lighting without wastage.
How can I incorporate dimmer switches into my recessed lighting setup for flexibility?
Installing dimmer switches allows you to adjust the brightness based on your needs, creating a welcoming ambiance while remaining functional. Choose compatible dimmers for your specific light fixtures and wiring. This setup helps save energy and extends the lifespan of bulbs, giving you control over the lighting atmosphere in your small kitchen.
Are there specific styles or sizes of recessed lights that work best in compact spaces?
Select smaller, slim-profile recessed lights to maintain a clean look without overwhelming the space. Trim styles like baffle, reflector, or eyeball can add visual interest and direct light effectively. Choose adjustable fixtures if you want to aim light precisely on particular work areas, ensuring maximum efficiency in a confined setting.
What considerations should I keep in mind regarding ceiling height when planning recessed lighting?
In small kitchens with standard ceiling heights (8 feet or slightly higher), standard-sized recessed fixtures work well. If your ceiling is lower, opt for shallower or shallow-mount fixtures to avoid a cramped appearance. Proper spacing prevents shadows and ensures even light distribution, making the space feel larger and more inviting.
Final Thoughts
A well-planned recessed lighting layout for small kitchens enhances both functionality and ambiance. Position fixtures evenly to avoid shadows and ensure ample light over counters and work areas. Use adjustable fixtures to direct light precisely where needed, maximizing space.
Choosing compact fixtures saves space without sacrificing illumination quality. Focus on layering light to create a balanced and inviting atmosphere. Planning thoughtfully makes small kitchens feel brighter and more open.
In summary, an effective recessed lighting layout for small kitchens balances practicality and aesthetic appeal. Proper placement and fixture choice make a significant difference. Implement these tips to achieve a well-lit, comfortable kitchen environment.