Transform your space affordably and stylishly with these 7 DIY aesthetic room decor ideas. Learn essential tips for beginners to create a beautiful, personalized room on a budget. From wall art to organization, discover simple projects that make a big impact.
Ever feel like your room is missing that special something? You scroll through decor magazines or Pinterest, seeing gorgeous, styled spaces, and wish you could achieve that look without breaking the bank. It’s totally normal to feel a bit overwhelmed when you’re just starting out with decorating.
But guess what? Creating an aesthetic and inviting room is absolutely within your reach! You don’t need a huge budget or years of design experience. We’re going to dive into some super fun and easy DIY projects that will help you express your personal style.
Get ready to discover simple hacks and creative ideas that will make your room feel like a cozy, stylish sanctuary. Let’s make your space a reflection of you!
Why DIY Aesthetic Room Decor?
Creating an “aesthetic” room is all about making a space that feels uniquely yours and visually pleasing. It’s a way to express your personality and create a vibe that makes you happy. For many, the challenge is achieving this look without spending a fortune.
DIY projects are the perfect solution! They allow you to be hands-on, tailor everything to your taste, and often save a significant amount of money compared to buying pre-made decor. Plus, the process of creating something with your own hands is incredibly rewarding.
This approach is especially brilliant for students or renters who might not be able to make permanent changes to their living spaces. You can personalize your room with temporary, stylish touches that are easy to take with you when you move. If you’re also looking to refresh your kitchen with a similar budget-friendly mindset, check out our guide on minimal kitchen decor ideas for inspiration.
7 DIY Aesthetic Room Decor Ideas for Beginners
Ready to get creative? Here are seven fantastic DIY ideas that are perfect for beginners and will instantly elevate your room’s aesthetic. We’ll cover everything from wall art to cozy touches!
1. Gallery Wall with Personal Touches
A gallery wall is a fantastic way to add personality and visual interest to any blank wall. It’s a collection of art, photos, and decorative items arranged together. The beauty of a DIY gallery wall is its flexibility – you can mix and match frames, sizes, and styles to create a look that’s entirely your own.
Essential Tips:
- Gather Your Items: Start by collecting photos, prints, postcards, small mirrors, or even pressed flowers. Think about a theme or color palette to tie it all together.
- Frame Smartly: You don’t need expensive frames. Thrift stores, dollar stores, or IKEA often have affordable options. Consider painting old frames a uniform color for a cohesive look.
- Layout Planning: Before you hang anything, lay out your items on the floor or use paper templates on the wall to visualize the arrangement. Measure and mark where each piece will go.
- Spacing is Key: Aim for consistent spacing between frames. A good rule of thumb is to leave about 2-4 inches between items.
This project is incredibly adaptable. For a minimalist aesthetic, stick to black and white photos and simple frames. For a bohemian vibe, mix in natural elements and colorful prints. For more inspiration on framing and arrangement, check out Artpreneur’s guide to hanging a gallery wall.
2. DIY Macrame Plant Hangers or Wall Hangings
Macrame is a craft that involves knotting cords to create decorative pieces. It’s back in style and adds a wonderful boho-chic or minimalist texture to a room. Macrame plant hangers are not only beautiful but also a great way to incorporate greenery, and macrame wall hangings can be a stunning focal point.
Essential Tips:
- Start Simple: Look for beginner-friendly patterns that use basic knots like the square knot and half hitch.
- Choose Your Cord: Cotton rope is a popular choice for macrame. It’s soft, easy to work with, and comes in various thicknesses and colors.
- Follow Tutorials: YouTube is an amazing resource for free macrame tutorials. Search for “beginner macrame plant hanger” or “easy macrame wall hanging.”
- Materials Needed: You’ll typically need macrame cord, scissors, and a measuring tape. For plant hangers, you might also need a metal or wooden ring.
A simple macrame plant hanger can be made in an afternoon and instantly adds a touch of warmth and style. You can hang them near a window to catch the light and bring a bit of the outdoors in. For a good overview of common macrame knots, Martha Stewart offers clear instructions.
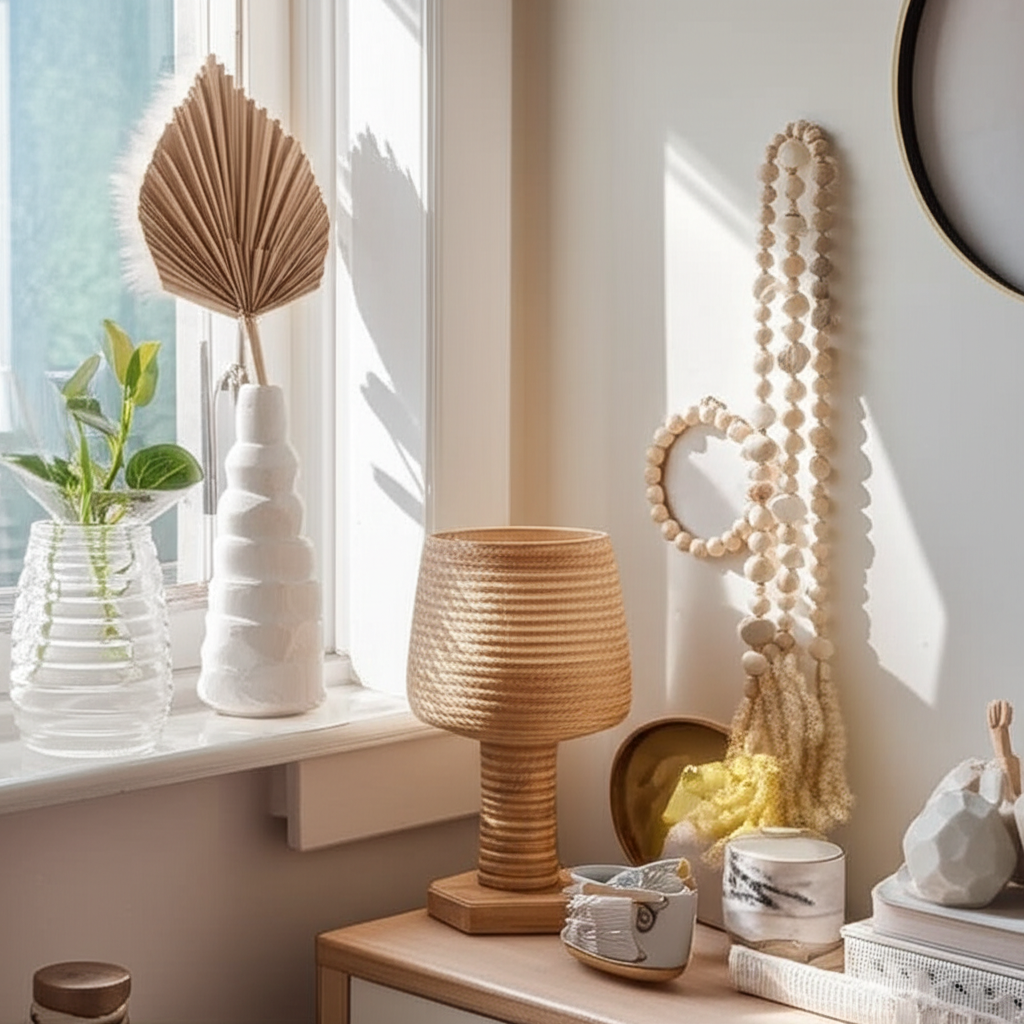
3. Upcycled Jar or Bottle Vases
Don’t toss those empty jars and bottles! They can be transformed into beautiful vases or decorative storage. This is one of the most eco-friendly and budget-friendly DIY ideas out there.
Essential Tips:
- Clean Thoroughly: Make sure your jars and bottles are sparkling clean and any labels are removed.
- Paint or Decorate: You can paint them with acrylic paint, spray paint, or even use chalk paint for a matte finish. Consider wrapping them with twine, yarn, or ribbon for texture.
- Add Embellishments: Glue on beads, use stencils, or decoupage them with pretty paper or fabric.
- Style Them: Use them to hold fresh flowers, dried branches, pens, makeup brushes, or even fairy lights for a magical glow.
A collection of painted glass jars can create a charming display on a shelf or windowsill. For a cohesive look, try painting them in a palette of complementary colors. This is a fantastic way to add pops of color and unique shapes to your decor. For more eco-conscious decorating ideas, explore our eco-friendly kitchen decor tips that align with sustainable DIY principles.
4. DIY Abstract Canvas Art
Creating your own abstract art might sound intimidating, but it’s surprisingly simple and incredibly forgiving. Abstract art is all about color, shape, and texture, allowing for a lot of creative freedom.
Essential Tips:
- Choose Your Canvas: You can buy blank canvases at craft stores, or even use a piece of thick cardboard or wood if you’re on a tight budget.
- Select Your Colors: Pick a color palette that complements your room. You can go bold and vibrant or soft and muted.
- Experiment with Tools: Beyond brushes, try using palette knives, sponges, old credit cards, or even your fingers to apply paint.
- Focus on Texture: Mix mediums like gel medium or sand with your paint to create interesting textures.
- Don’t Overthink It: Let your intuition guide you. There’s no right or wrong way to create abstract art.
A large, DIY abstract canvas can become a stunning statement piece. For a modern aesthetic, try geometric shapes and clean lines. For a more organic feel, use fluid brushstrokes and blended colors. You can find endless inspiration and techniques on platforms like Pinterest or YouTube tutorials.
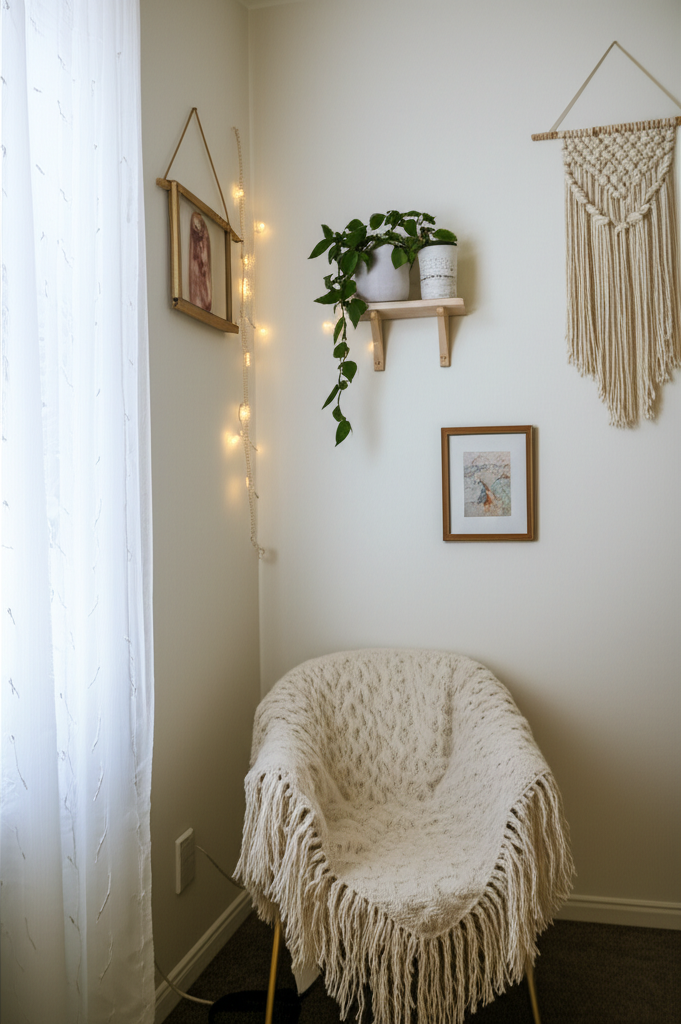
5. String Light Ambiance
Fairy lights or string lights are a magical way to add warmth and a cozy aesthetic to any room. They are incredibly versatile and can be used in so many creative ways to enhance your decor.
Essential Tips:
- Choose the Right Lights: Opt for LED lights as they are energy-efficient and stay cool to the touch. Consider warm white for a cozy feel or colored lights for a fun vibe.
- Drape and Drape: Hang them around your headboard, along a wall, drape them over a mirror, or weave them through a sheer curtain.
- In Jars or Bottles: As mentioned before, string lights look enchanting inside clear jars or bottles.
- Create Shapes: Use small nails or adhesive hooks to create shapes or words on the wall with the lights.
- Battery-Operated vs. Plug-in: Battery-operated lights offer more flexibility in placement, while plug-in lights are great for larger installations.
String lights are perfect for creating a relaxing atmosphere in a bedroom or a cozy nook. They can instantly make a space feel more inviting and whimsical. For safety, ensure you’re using lights designed for indoor use and keep them away from flammable materials.
6. DIY Floating Shelves
Floating shelves are a stylish and practical way to add storage and display space without taking up much room. They give a clean, modern look and are surprisingly easy to make yourself.
Essential Tips:
- Choose Your Wood: Pine or poplar boards are good, affordable options. You can also use reclaimed wood for a rustic aesthetic.
- Measure and Cut: Decide on the length and depth of your shelves. You’ll need a saw to cut the wood to size.
- Mounting Hardware: You’ll need floating shelf brackets, which are designed to be hidden within the shelf. Follow the bracket manufacturer’s instructions carefully for secure installation.
- Finishing Touches: Sand the wood smooth and apply your desired finish – paint, stain, or a clear sealant.
- Secure Installation: Always ensure you are drilling into wall studs for maximum stability. If you’re unsure, consult resources like This Old House on how to locate studs.
Once installed, you can use these shelves to display books, plants, photos, or decorative objects. For a minimalist look, keep the shelves uncluttered. For a bohemian vibe, mix in textured items and small plants. If you’re inspired by clean lines and smart storage, you might also enjoy our post on stylish kitchen storage accessories that bring order and beauty to small spaces.
7. Fabric Wall Tapestry or Banner
A large fabric tapestry or a simple DIY banner can add color, texture, and a focal point to your room. This is a fantastic way to introduce patterns or artwork without the commitment of painting or hanging heavy frames.
Essential Tips:
- Choose Your Fabric: Look for fabric with a pattern or color you love at a fabric store or even repurpose a large scarf or a vintage sheet.
- Simple Hemming: Fold over the edges of the fabric twice and sew a hem to prevent fraying. If you don’t sew, you can use fabric glue for a no-sew option.
- Add a Dowel Rod: Insert a wooden dowel rod through the top hemmed edge.
- Hang It Up: Attach string or twine to the ends of the dowel rod and hang it from a hook or nail.
- Get Creative: You can also create simple banners by cutting triangles or rectangles from fabric and attaching them to a string.
A tapestry can instantly transform a plain wall, adding warmth and style. Consider the scale of your room when choosing the size of your fabric art. A large tapestry can make a small room feel cozier, while a well-placed banner can add personality to a larger space.
Budget-Friendly Decorating: Smart Shopping Tips
Decorating on a budget is all about being resourceful and creative. Here are some smart shopping tips to help you get the most aesthetic bang for your buck.
Where to Find Affordable Decor Items:
- Thrift Stores & Flea Markets: These are treasure troves for unique frames, vases, decorative objects, and even fabric.
- Dollar Stores: Great for craft supplies, plain jars, basic frames, and small decorative items.
- Online Marketplaces: Platforms like Facebook Marketplace, Craigslist, or Gumtree can offer fantastic deals on gently used furniture and decor.
- Craft Store Sales: Keep an eye out for sales on canvases, paints, craft supplies, and home decor items.
- Repurpose & Upcycle: Look around your home for items you can give a new life to, like old clothing, jars, or furniture.
DIY Material Cost Comparison (Estimate)
Here’s a general idea of how DIY can be more budget-friendly:
| Decor Item | Store-Bought (Estimated Cost) | DIY (Estimated Cost) | Savings (Estimated) |
|---|---|---|---|
| Small Macrame Plant Hanger | $20 – $40 | $5 – $15 (cord, ring) | $15 – $25 |
| Set of 3 Painted Jars | $15 – $30 | $3 – $8 (jars, paint) | $12 – $22 |
| Medium Abstract Canvas Art | $50 – $150+ | $10 – $30 (canvas, paint) | $40 – $120+ |
| Small Floating Shelf Kit | $30 – $60 | $15 – $30 (wood, brackets) | $15 – $30 |
Note: Prices are estimates and can vary based on location, quality of materials, and specific project details.
Styling Your Aesthetic Space: Putting It All Together
Once you’ve created your DIY decor pieces, the next step is to arrange them to create a cohesive and aesthetically pleasing room. It’s all about balance, harmony, and personal expression.
Key Styling Principles for Beginners:
- Color Palette: Stick to a consistent color scheme. This doesn’t mean everything has to be the exact same shade, but choose 2-3 main colors and a few accent colors to tie your decor together.
- Texture Play: Mix different textures to add depth and interest. Combine smooth surfaces with rough ones, soft fabrics with hard materials.
- Balance and Symmetry: Try to balance visual weight in the room. If you have a large item on one side, place a few smaller items on the other to create equilibrium.
- Focal Point: Decide on a focal point for your room – this could be your DIY gallery wall, a large art piece, or a statement piece of furniture. Arrange other decor around it.
- Declutter: An aesthetic room is often a tidy room. Ensure you have smart storage solutions for items you don’t want on display.
Don’t be afraid to move things around until it feels right. Sometimes, the best arrangement is found through experimentation. Take photos of different layouts to see what you prefer.
Frequently Asked Questions (FAQ)
How do I choose an aesthetic for my room?
Start by thinking about what colors, moods, and styles you are drawn to. Look at inspiration online (Pinterest, Instagram) and save images you love. Common aesthetics include minimalist, bohemian, modern, cottagecore, and vintage. Don’t feel pressured to pick just one; you can blend elements to create your unique style.
What are the easiest DIY decor projects for absolute beginners?
Some of the easiest projects include painting jars and bottles, creating simple string light arrangements, making a basic fabric banner, or starting a small gallery wall with personal photos. These require minimal tools and skills but offer a high impact.
Where can I find affordable materials for DIY projects?
Great places include dollar stores, thrift stores, craft store clearance sections, and online marketplaces. You can also repurpose items you already own, like old jars, fabric scraps, or even cardboard.
How much does it usually cost to decorate a room with DIY?
The cost can vary greatly depending on the complexity of your projects and the materials you choose. However, DIY projects are almost always significantly cheaper than buying new. You can often decorate a room affordably for under $100-$200 by focusing on DIY and smart shopping.
Can I make my room look aesthetic without buying new furniture?
Absolutely! You can use DIY decor items like art, textiles, and lighting to transform the look and feel of a room with existing furniture. Painting furniture, adding new hardware, or creating DIY slipcovers are also great ways to update furniture on a budget.
What if I make a mistake on my DIY project?
Don’t worry! Mistakes are part of the learning process. Most DIY projects have room for error. Paint can often cover mistakes, or you can find creative ways to incorporate them into the design. For example, an uneven edge on a painted jar might add character!
How do I make sure my DIY decor looks intentional and not messy?
Cohesion is key. Use a consistent color palette across your DIY projects and existing decor. Grouping items thoughtfully, like on a gallery wall or shelf, and ensuring good lighting will make your DIY elements feel curated and intentional.
Conclusion
Creating an aesthetic room doesn’t have to be a daunting or expensive task. With these 7 DIY ideas and essential tips, you have the tools to transform your space into a stylish, personalized haven. Remember, the most beautiful rooms are those that reflect your personality and make you feel happy and comfortable.
From the simple charm of upcycled jars to the visual impact of a DIY gallery wall, each project offers a chance to get creative and add your unique touch. Embrace the process, have fun experimenting, and don’t be afraid to make it your own. Happy decorating!