Tired of a chaotic cabinet? This guide reveals practical kitchen hacks for under sink storage, helping you reclaim wasted space. Learn to declutter, strategize, and implement smart organization solutions, turning your messy cupboard into a model of efficiency and accessibility. You’ll master techniques to navigate pipes, utilize vertical space, and keep your cleaning supplies and essentials neatly organized with ease.
Kitchen Hacks for Under Sink Storage
The space under your kitchen sink. For many, it’s a dark, mysterious cavern where cleaning supplies go to get lost, sponges disappear, and half-empty bottles gather dust. It’s often the most neglected cabinet in the entire kitchen, yet it holds so much potential for efficient storage. What if you could transform that chaotic void into a perfectly organized, highly functional area where everything has its place and is easy to find?
You’re in luck! This comprehensive guide is packed with brilliant kitchen hacks for under sink storage that will help you conquer the clutter once and for all. We’ll walk you through a step-by-step process, from emptying and cleaning to choosing smart organizers and implementing a system that actually works, even with those tricky pipes. Get ready to turn your under sink area from a disaster zone into a dynamic hub of tidiness and accessibility!
Key Takeaways
- Start with a Full Declutter: Remove everything from your under sink space to get a clear picture of what needs to be stored and what can be discarded.
- Assess Your Unique Space: Measure your cabinet dimensions and identify obstacles like plumbing, garbage disposal, or water filters to choose the right storage solutions.
- Embrace Vertical and Pull-Out Solutions: Maximize every inch with tiered shelves, stackable bins, tension rods, and sliding organizers, specifically designed for under sink storage.
- Strategize Around Obstacles: Plan your layout to work with pipes and other fixtures, using U-shaped organizers, turntables, or modular bins to create functional zones.
- Implement Smart Protection: Use a waterproof mat or shelf liner to safeguard your cabinet base from spills and leaks, making cleaning easier and preventing damage.
- Label Everything Clearly: Once organized, label bins and containers for easy access and to ensure every item has a designated home, simplifying future tidying.
- Maintain Regularly: Schedule quick monthly check-ins to prevent clutter from accumulating again, ensuring your organized under sink storage remains functional and tidy.
Step 1: Declutter and Empty Everything
Before you can organize, you must declutter. This step is crucial and often overlooked. You can’t truly understand your under sink storage needs until you know exactly what you’re working with, and what you’re *not* working with.
Remove Every Single Item
Pull everything out from under the sink. Yes, everything! Lay it all out on your kitchen floor or countertop. This allows you to see the true extent of what you’ve accumulated. You might be surprised by how many duplicate items or forgotten bottles you find.
Sort, Purge, and Discard
- Keep: Items you use regularly and are still in good condition.
- Discard:
- Empty or nearly empty bottles.
- Expired cleaning products.
- Broken sponges, brushes, or rags.
- Anything you haven’t used in over a year and don’t foresee needing (be honest with yourself!).
- Hazardous waste: For items like old paint, harsh chemicals, or batteries, check your local municipal guidelines for proper disposal. Don’t just toss them in the regular trash.
- Relocate: Items that don’t belong under the kitchen sink. This might include toiletries, office supplies, or pantry items that somehow migrated. Find them a proper home elsewhere in your house.
Clean the Cabinet Interior
Now that the under sink storage area is empty, it’s the perfect time for a deep clean. Wipe down the bottom, sides, and back of the cabinet. Use an all-purpose cleaner to tackle any grime, spills, or dust. This fresh start will make your new organization system feel even more satisfying.
- Check for Leaks: While the cabinet is empty, inspect the pipes and the base for any signs of water damage, leaks, or dampness. Address any issues before you put items back in.
- Install a Liner (Optional but Recommended): Consider adding a waterproof shelf liner or a cabinet mat to protect the base of your under sink storage from future spills and moisture. This also makes cleaning much easier down the line.
Step 2: Assess Your Needs and Identify Challenges
With a clean, empty canvas, it’s time to think strategically about your under sink storage. What do you *really* need to store here, and what obstacles will you encounter?

Visual guide about Kitchen Hacks for Under Sink Storage
Image source: m.media-amazon.com
Categorize Your Remaining Items
Group the items you decided to keep into categories. Common categories for under sink storage include:
- Dishwashing supplies (dish soap, dishwasher detergent, sponges, brushes)
- All-purpose cleaners
- Specialty cleaners (glass cleaner, stainless steel cleaner, oven cleaner)
- Trash bags and recycling bags
- Small appliances (blender parts, immersion blender)
- Pest control (rarely used, but sometimes stored here)
- Pet food or supplies (if applicable)
- Paper towels or backup rolls
Seeing your items in categories helps you decide how many bins or organizers you’ll need for your under sink storage.
Measure Your Space and Note Obstacles
This is a critical step for choosing the right under sink storage solutions. Grab a measuring tape and note down:
- Width: From side wall to side wall of the cabinet.
- Depth: From the front of the cabinet to the back.
- Height: From the base to the top of the cabinet.
Crucially, pay attention to the plumbing. The pipes, garbage disposal unit, and any water filtration systems are the primary challenges in under sink storage. Measure the dimensions of these obstacles and note their placement. Are they in the center? To one side? How much clearance do you have around them? This information will guide your organizer choices, ensuring you select items that fit around these permanent fixtures.
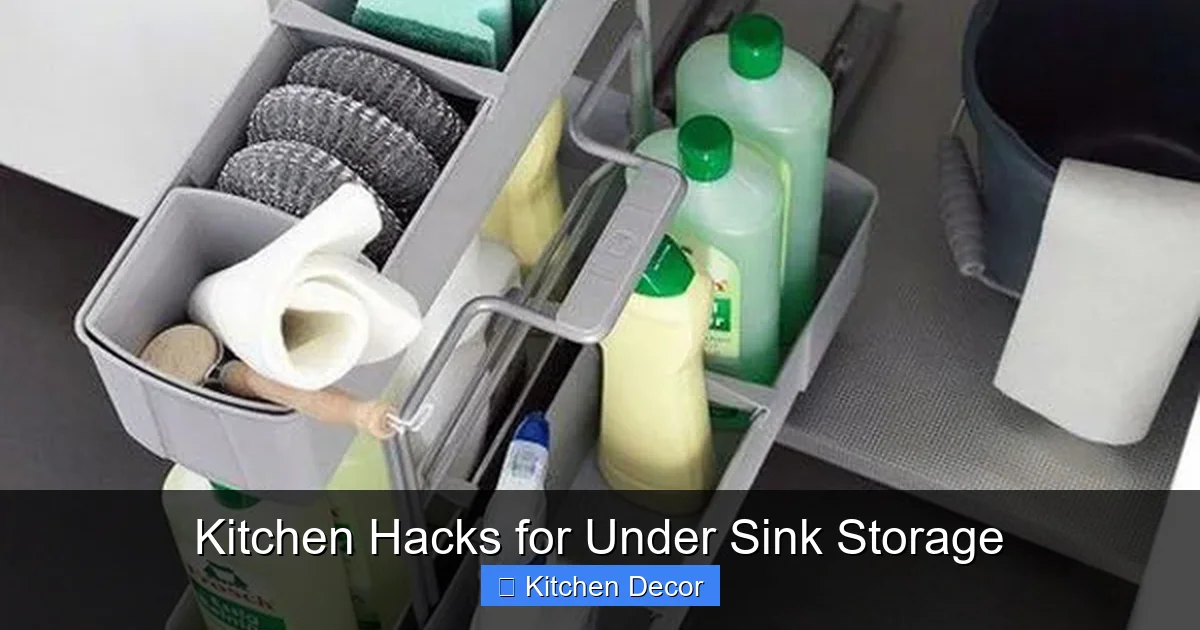
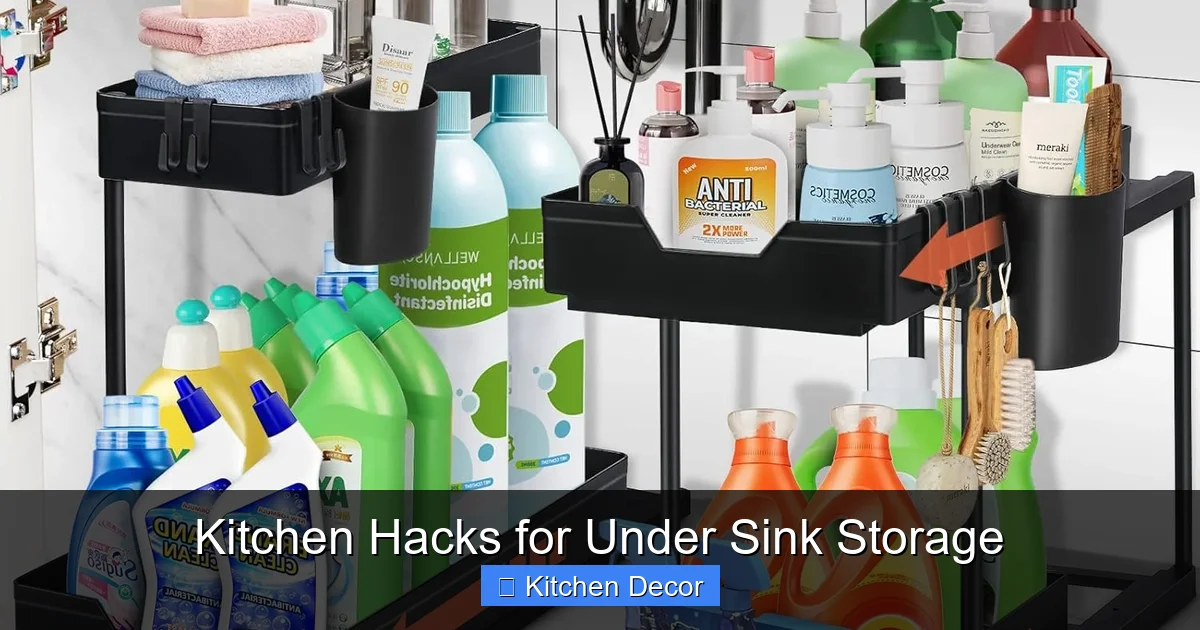
Step 3: Choose Smart Storage Solutions
Now for the fun part: selecting the right tools for your under sink storage transformation! There’s a vast array of products designed specifically for this awkward space.
Visual guide about Kitchen Hacks for Under Sink Storage
Image source: m.media-amazon.com
Pull-Out Organizers and Sliding Shelves
These are game-changers for under sink storage. Instead of reaching deep into the cabinet, you can simply pull out a drawer or shelf to access items at the back. They come in various sizes and configurations, often with a U-shaped design to accommodate pipes.
- Benefits: Excellent accessibility, maximizes depth, keeps items contained.
- Best for: Dish soap, sponges, spray bottles, cleaning rags.
- Tip: Look for units that can be adjusted in height or have multiple tiers for even more vertical storage.
Tiered Shelving Units
If you have enough height in your under sink storage, tiered shelving units are fantastic for creating vertical space. These are usually wire racks with two or three shelves.
- Benefits: Utilizes vertical space, great for stacking shorter items.
- Best for: Cans of air freshener, small bottles, spare sponges, trash bags on higher shelves.
- Tip: Ensure the height of your bottles will fit on the shelves once installed.
Stackable Bins and Containers
Clear, stackable bins are versatile and cost-effective. They allow you to group similar items together and make use of vertical space without the need for fixed shelves. Clear bins are particularly useful because you can see what’s inside at a glance.
- Benefits: Budget-friendly, flexible, good for categorizing.
- Best for: Sponges, cleaning brushes, small cloths, backup toiletries, pet supplies.
- Tip: Choose bins with lids if you want to keep dust out or stack them higher. Measure to ensure they fit side-by-side or around pipes.
Tension Rods for Vertical Storage
A simple tension rod can work wonders for under sink storage! Install one across the width of your cabinet at the top. You can then hang spray bottles by their nozzles, freeing up valuable floor space.
- Benefits: Inexpensive, easy to install, frees up cabinet floor.
- Best for: Spray bottles (all-purpose cleaner, glass cleaner, disinfectant).
- Tip: Make sure the tension rod is sturdy enough to hold the weight of multiple full bottles.
Over-the-Cabinet Door Organizers
Don’t forget the back of your cabinet doors! Over-the-cabinet door organizers come in various forms:
- Small baskets or shelves: Great for frequently used items like dish soap, hand soap refills, or scrub brushes.
- Towel bars: Perfect for hanging small hand towels or cloths.
- Plastic caddies: Ideal for storing sponges, rubber gloves, or small cleaning tools.
These are excellent kitchen hacks for under sink storage as they utilize often-wasted space.
DIY Solutions and Command Hooks
You don’t always need to buy specialized organizers. Be creative!
- Magazine Holders: Turn plastic magazine holders on their side to store foil, plastic wrap, or even small spray bottles.
- Command Hooks: Stick these to the inside walls or door of your cabinet for hanging gloves, small brushes, or cloths.
- Plastic Bins from Dollar Stores: These are great for containing smaller items like magic erasers or dishwasher pods.
Turntables (Lazy Susans)
A turntable is brilliant for deep under sink storage. It allows you to spin items around to easily reach bottles at the back without having to pull everything out.
- Benefits: Excellent for deep cabinets, keeps items accessible, great for round bottles.
- Best for: Tall bottles of cleaning solution, air fresheners, backup dish soap.
- Tip: Look for turntables with a lip to prevent items from falling off when spun.
Mesh Baskets and Caddies
Mesh baskets, either freestanding or with handles, are fantastic for collecting items like sponges, scrub brushes, or even pet supplies. Caddies with handles are particularly useful because you can pull them out entirely and carry them to where you need your cleaning supplies, making your under sink storage highly portable.
- Benefits: Portable, breathable, keeps items together.
- Best for: Cleaning toolkits, frequently used items you might carry around the house.
Step 4: Strategize Your Layout
With your chosen tools in hand, it’s time to plan the arrangement within your under sink storage. This step is about making the most of the space, especially around those pesky pipes.

Visual guide about Kitchen Hacks for Under Sink Storage
Image source: i.pinimg.com
Create Zones
Think about how you use your under sink storage. Divide the space into logical zones:
- Dishwashing Zone: Closest to the sink, for dish soap, sponges, dishwasher detergent.
- General Cleaning Zone: For all-purpose sprays, glass cleaner, etc.
- Backup/Less Used Zone: For extra supplies, trash bags, or items used infrequently.
This zoning makes it easier to find what you need quickly and ensures frequently accessed items are always within reach.
Navigate Around Pipes and Disposal
This is where your measurements come in handy.
- U-Shaped Organizers: Many pull-out drawers are specifically designed with a U-shape to fit around the central pipe.
- Modular Bins: Use smaller, individual bins that can be placed on either side of the pipes or stacked in available gaps.
- Turntables: Often work well in corners or on one side of the disposal unit, allowing access to items that would otherwise be difficult to reach.
- Vertical Space: Utilize the height above and around the pipes with tension rods or small tiered shelves where space allows.
Prioritize Accessibility
- Front and Center: Place your most frequently used items (like dish soap and daily spray cleaner) at the front of the cabinet or in easily accessible pull-out organizers.
- Back and Sides: Less frequently used items, like specialty cleaners or extra paper towels, can go further back or to the sides.
Step 5: Implement and Organize
It’s time to put your plan into action! This is where your under sink storage truly transforms.
Place Your Organizers
Begin by installing any fixed organizers like pull-out shelves or tension rods. Then, arrange your bins, caddies, and turntables according to your layout strategy. Make sure everything fits as planned, and adjust if necessary.
Load Your Items Thoughtfully
Start placing your categorized items into their designated organizers. Here are some kitchen hacks for under sink storage placement:
- Tall bottles: Stand them upright in pull-out drawers, on a turntable, or hang them from a tension rod.
- Small items: Contain them in small bins or drawers to prevent them from getting lost.
- Heavy items: Keep heavier items on the bottom shelf or directly on the cabinet base for stability.
- Trash Bags: Folded and stored in a magazine holder or a small bin, or rolled up and placed vertically.
Label Everything
Once everything is in its place, add labels to your bins, containers, and even the shelves if needed. This is a game-changer for maintaining your under sink storage organization. Labels help everyone in the household know where things belong and where to find them.
- Types of Labels: Use a label maker, pre-made labels, or even simple masking tape and a marker.
- Be Specific: Instead of “Cleaning,” try “Dishwashing,” “All-Purpose,” or “Glass Cleaner.”
Protect the Base (If You Haven’t Already)
If you didn’t do it in Step 1, now is a great time to install a waterproof mat or shelf liner. This barrier protects your cabinet from potential leaks, spills, and moisture, making cleanup incredibly easy and preventing costly damage to your kitchen cabinets over time.
Step 6: Maintain Your Organized Space
Organization isn’t a one-time event; it’s an ongoing process. With these kitchen hacks for under sink storage, you’ve done the hard work, now keep it that way!
Regular Check-ins
Schedule a quick 5-10 minute check-in once a month or every few weeks. This allows you to:
- Quickly tidy up any misplaced items.
- Wipe down any dust or small spills.
- Identify nearly empty bottles that need replacing.
- Ensure everything still serves a purpose and belongs in your under sink storage.
The “One-In, One-Out” Rule
To prevent future clutter, adopt the “one-in, one-out” rule. When you buy a new cleaning product or item for your under sink storage, make sure to use up or discard an old, similar item. This prevents accumulation and keeps your system lean and efficient.
Keep it Functional, Not Just Pretty
Remember, the goal of these kitchen hacks for under sink storage is to make your life easier. If a system isn’t working, don’t be afraid to adjust it. Move bins, change labels, or even swap out organizers if you find a better solution. Your needs might change over time, and your under sink organization should adapt with you.
Troubleshooting Common Under Sink Storage Issues
Even with the best planning, you might encounter specific challenges. Here are some common problems and solutions for your under sink storage.
Dealing with Leaks
Problem: You notice dampness, drips, or actual puddles.
Solution:
- Immediate Action: Remove all items, dry the area thoroughly, and place a bucket or towel to catch drips.
- Identify Source: Check all pipe connections, the faucet base, and the garbage disposal for the source of the leak.
- Call a Professional: If you can’t identify or fix the leak yourself, call a plumber immediately to prevent further damage.
- Preventative Measure: A good waterproof liner (as mentioned in Step 1 and 5) can contain small leaks and give you time to react.
Battling Odors
Problem: A persistent musty or unpleasant smell.
Solution:
- Deep Clean: Thoroughly clean the entire cabinet with a deodorizing cleaner (like a vinegar-water solution or baking soda paste).
- Check for Source: Look for old spills, damp rags, or even tiny food particles under the disposal that might be causing the smell.
- Odor Absorbers: Place an open box of baking soda, activated charcoal, or a small bowl of white vinegar in the cabinet to absorb odors. Replace regularly.
- Ventilation: Ensure the cabinet door isn’t sealed too tightly; sometimes a little airflow can help.
Maximizing Small Under Sink Spaces
Problem: Your cabinet is particularly narrow or shallow.
Solution:
- Go Vertical Aggressively: Tiered shelves and tension rods are your best friends. Maximize every inch of height.
- Slim Bins: Opt for slender, clear bins that can slide in and out easily.
- Door Organizers: Lean heavily on over-the-door solutions to free up interior space.
- Minimalism: Be extra strict with your decluttering. Only store absolute essentials under a very small sink.
Accommodating Tall Bottles
Problem: Your cleaning spray bottles or tall bottles don’t fit upright with shelves or other organizers.
Solution:
- Tension Rods: Hang spray bottles from a tension rod to utilize the upper part of the cabinet.
- Turntables: These often provide enough open space for tall bottles to stand freely.
- Remove Top Shelf: If using a multi-tiered organizer, sometimes removing the top shelf on one side can create space for taller items while still allowing for a lower shelf.
- Lay Flat: For bottles that can safely be stored on their side without leaking (e.g., unopened refills), consider lying them down in a shallow bin.
Conclusion
Congratulations! You’ve just equipped yourself with an arsenal of kitchen hacks for under sink storage. From the initial purge to strategic placement and ongoing maintenance, you now have a clear roadmap to transform that messy, forgotten space into a highly efficient, organized hub. No more fumbling for cleaning supplies, no more digging through clutter – just effortless access and a sense of calm every time you open that cabinet door.
Embrace the challenge, be patient with the process, and enjoy the lasting satisfaction of a beautifully organized under sink area. Your future self (and your sanity) will thank you for taking the time to implement these brilliant organization strategies!