Quick Summary: Turn a tiny corner into an epic travel-themed craft nook with simple storage, a versatile work surface, strong lighting, and travel-inspired decor — all on a budget using thrifted finds, pegboards, IKEA-style hacks, and smart DIYs.
Small Craft Room Design Ideas on a Budget: Epic Travel Nook
Hi — I’m Mila, your friendly home decor stylist. Small craft rooms can feel tight and messy. You want a pretty, inspiring space but not a huge spending spree.
This guide shows easy, budget-friendly steps to create a travel-themed craft nook. You’ll get storage tips, layout ideas, DIY projects, and styling tricks that save money and add big personality.
Follow the step-by-step plan below and by the end you’ll have a compact, stylish craft space that feels like a mini adventure hub. Let’s create your epic travel nook.
Why a travel-themed craft nook works for small spaces
Travel themes add color and story without bulky furniture. Maps, postcards, and souvenirs are lightweight decor. They make a small room feel curated and personal.
Plus, travel themes pair well with modular storage and wall-mounted solutions. That means more floor space for crafting and better flow in small rooms.
Quick planning checklist
- Measure the space (length, width, height).
- Decide a main work surface size.
- Choose three storage solutions: wall, vertical, under-desk.
- Pick a color palette (2 neutrals + 1 accent).
- Set a budget and prioritize essentials first.
Step-by-step: Build your epic travel nook
1. Measure and map the space
Use a tape measure and draw a simple floor plan on paper. Mark windows, doors, outlets, and light switches.
Keep a note of where natural light hits. That helps place your desk and lighting later.

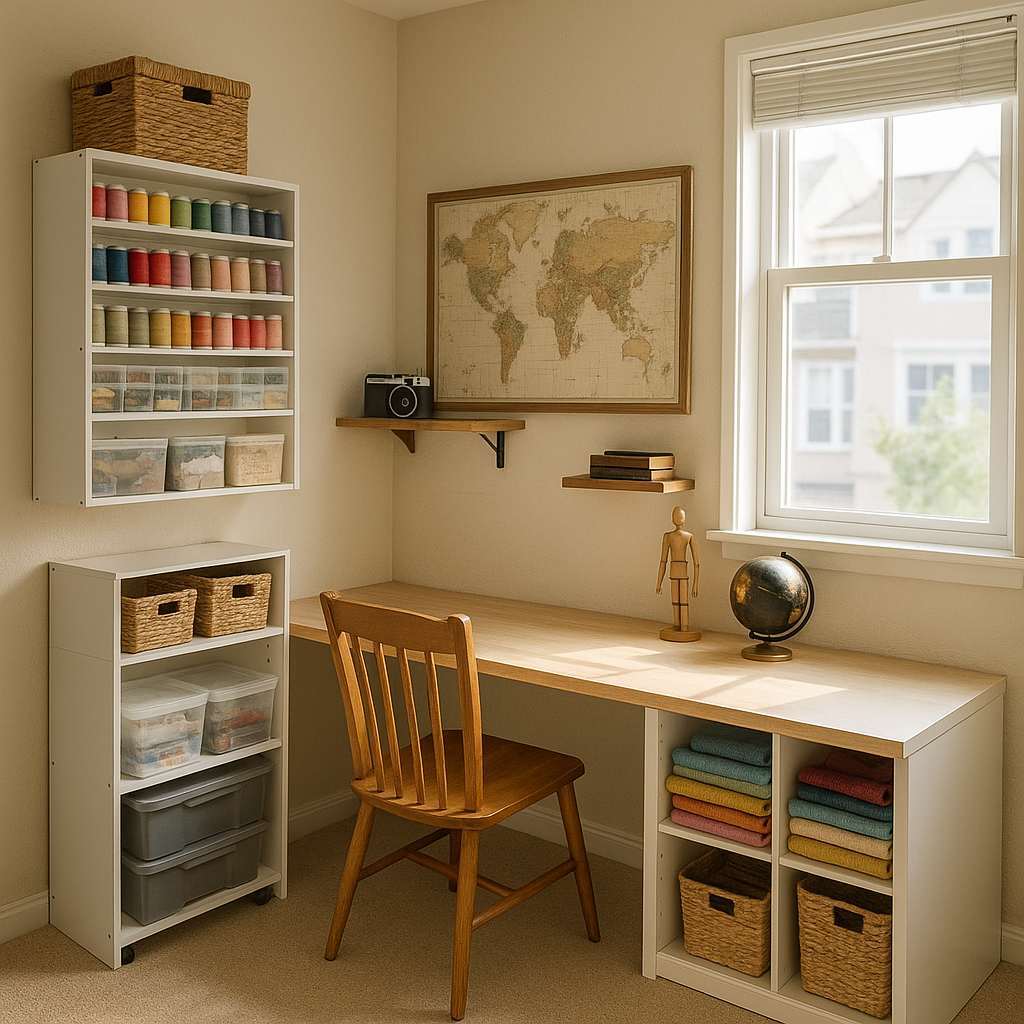
2. Choose a compact work surface
Pick a desk or table that fits the wall and leaves walking room. For very small spaces, a 30–36 inch wide tabletop works well.
- Wall-mounted fold-down desk: saves floor space.
- Small console table: stylish and multi-use.
- Repurposed door or plank on brackets: DIY and cheap.
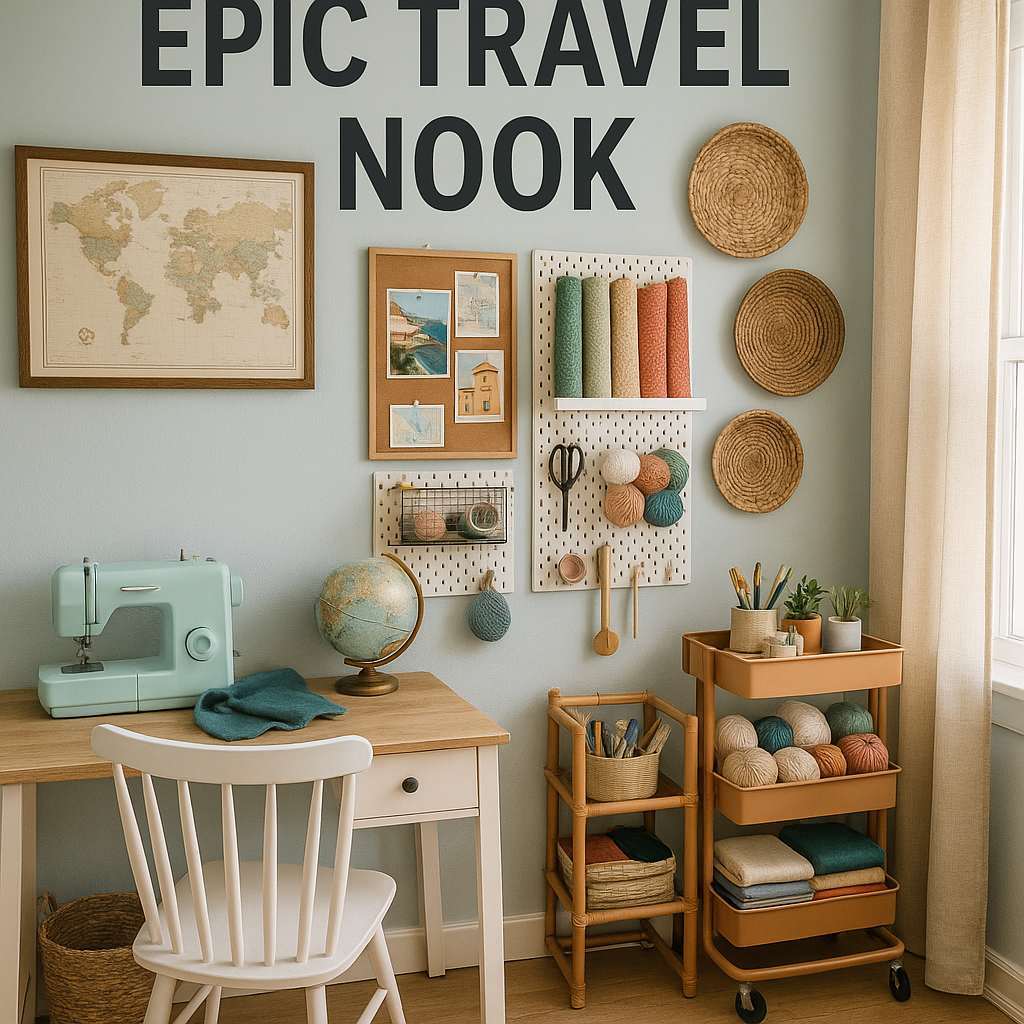
3. Plan smart storage — vertical and modular
Vertical storage saves floor space. Use shelves, pegboards, and tall skinny cabinets.
- Install an open shelving unit for baskets and colorful bins.
- Mount a pegboard above your desk for tools and scissors.
- Use under-desk rolling carts for paper and supplies.
| Storage Type | Why it helps | Budget-friendly options |
|---|---|---|
| Wall shelves | Free up floor space and display decor | Thrifted wood, IKEA brackets, DIY crates |
| Pegboard | Flexible tool storage within arm’s reach | MDF painted white, hardware store hooks |
| Rolling carts | Moveable storage for messy projects | IKEA RASKOG or thrifted bar carts |
4. Lighting: bright and cozy
Good light reduces eye strain and makes colors true. Aim for layered lighting.
- Task lamp with LED daylight bulbs at the desk.
- Overhead fixture or flush mount for general light.
- Accent string lights or a small table lamp for a cozy feel.
LED bulbs use less power and last longer. For safety and quality info, check energy guidance from the U.S. Department of Energy: energy.gov LED lighting tips.
5. Create zones for tasks
Divide your nook into clear zones: prep, craft, and storage. Even small spaces benefit from zoning.
- Prep zone: small area for cutting and measuring.
- Craft zone: main tabletop with tool access.
- Storage zone: shelves and bins nearby.
6. Use multi-purpose furniture
Double-duty pieces save money and space.
- A bench with storage can seat guests and hold fabric.
- Drop-leaf desk expands for bigger projects.
- Cube shelves hold supplies and act as side tables.
Decor ideas for a travel vibe on a budget
Decor should tell a story without cluttering. Mix three travel elements to keep it cohesive.
Color palette
Pick two neutrals (cream, gray) and one pop color (navy, teal, mustard). Keep most items neutral so the accent pops.
Wall art and maps
- Use a single large map or a collage of postcards for impact.
- Frame thrifted postcards or print vintage travel posters cheaply online. For high-quality public domain images, see resources at the Library of Congress: loc.gov.
- Hang a corkboard for stamped tickets and travel notes.
Souvenirs as decor
Cherished items look intentional when grouped together. Try a small shelf for three favorite finds. Use similar-sized containers for cohesion.
Textiles
Add a rug with a subtle pattern, a throw pillow in the accent color, and a curtain that softens the light.
DIY projects that save money
These easy projects cost little and add big personality.
- DIY pegboard: paint a piece of MDF and add hooks. Cost: under $25.
- Map decoupage desk: glue cut map pieces onto a tabletop and seal.
- Postcard garland: string through postcard corners and hang above desk.
| Project | Estimated Cost | Time | Difficulty |
|---|---|---|---|
| Pegboard tool wall | $15–$35 | 1–2 hours | Easy |
| Map decoupage desk | $10–$40 | 2–4 hours (plus drying) | Easy–Medium |
| Postcard garland | $5–$15 | 30–60 minutes | Easy |
Where to source supplies on a budget
Look beyond big-box stores. Thrift shops, flea markets, and online marketplaces have hidden gems.
- Thrift stores: frames, small tables, baskets.
- Facebook Marketplace or Craigslist: desks, shelves.
- IKEA and Target: affordable organizers and bins.
- Dollar stores: labels, jars, small tools.
For students and renters, check university buy-and-sell groups or campus thrift sales. Many campuses post student resources at their .edu sites — a good place to learn about local swap events.
Layout examples for common small spaces
Below are quick layouts for different room types. Choose the one that fits your floor plan.
Tiny corner (nook under a window)
- Fold-down desk under the window.
- Floating shelf above desk for supplies.
- Small rolling cart tucked beside desk.
Narrow room or hallway
- Long, narrow table along one wall.
- Vertical shelving opposite the table.
- Pinboard above the table for projects.
Closet-to-craft conversion
- Install a shallow desk and shelves inside the closet.
- Add a curtain or sliding door to close it off.
- Good task lighting and tidy bins keep it usable.
Organization systems that actually work
Organization is the key to a small craft room. Use consistent labels and containers.
- Clear bins for visual sorting.
- Small jars for buttons, pins, and beads.
- Magazine holders for paper and patterns.
- Label everything — easy to find and put away.
For label templates and printable designs, many libraries and schools offer free resources. Check local library websites (.gov or .edu) for free printables and classes.
Budget breakdown: What to buy first
Prioritize purchases to make the biggest impact.
- Work surface (desk or tabletop).
- Task lighting.
- Essential storage (pegboard/shelves and bins).
- Budget decor (map, postcards, one rug).
- Extras (rolling carts, fancy organizers).
Start small and add in phases. You’ll avoid buyer’s regret and stay within budget.
Eco-friendly and thrift tips
Reusing and repurposing is cheaper and kinder to the planet.
- Refinish thrifted furniture with non-toxic paint.
- Use jars and tins for storage instead of buying plastic.
- Swap supplies with friends or craft groups online.
For DIY finishing tips and safe products, check guidance from reputable resources like the U.S. Environmental Protection Agency: epa.gov Safer Choice.
Small safety and ergonomics tips
Work comfortably to avoid strain. Small changes help a lot.
- Use a chair with good back support.
- Keep the desk at elbow height.
- Use mats or trays for cutting to protect surfaces.
- Store heavy items low to avoid accidents.
Examples and cost-saving swaps
Here are realistic swaps that save money without losing style.
- Buy an inexpensive desk; paint it instead of buying a designer piece.
- Use printable art instead of framed posters.
- Replace pricey bins with painted shoeboxes or baskets.
| Designer Look | Budget Swap | Estimated Savings |
|---|---|---|
| Branded pegboard system | DIY painted pegboard + thrifted hooks | $30–$80 |
| New wood desk | Refinish secondhand table | $40–$150 |
| Framed travel prints | Printables + thrifted frames | $10–$50 |
Maintenance plan: Keep your nook tidy
Small daily habits make a big difference.
- Spend 10 minutes at the end of each session to tidy up.
- Replenish commonly used supplies weekly.
- Do a monthly inventory to avoid duplicates.
Resources and further reading
Want more step-by-step or technical info? These reliable resources can help:
- Energy-efficient lighting tips: energy.gov
- Public domain images and historical travel posters: Library of Congress
- Safer finishing products: epa.gov
FAQ
1. Can I create a travel-themed craft nook in a rented space?
Yes. Use removable hooks, tension rods, and command strips to avoid damage. Keep decor lightweight and easy to remove.
2. What is the cheapest way to get good storage?
Repurpose cardboard boxes, paint thrifted baskets, or use inexpensive cube shelves. Clear shoe boxes and jars work great for small items.
3. How do I keep my small craft room from feeling cluttered?
Limit visible items to a few favorites and store the rest. Use closed bins and keep surfaces mostly clear. Follow the “one in, one out” rule for supplies.
4. Is a pegboard necessary?
No, but it’s very helpful. If you don’t want a pegboard, use magnetic strips, rails, or wall pockets for similar function.
5. How do I make a small desk feel bigger?
Use light colors and clear or mirrored accessories. Keep the area under the desk open and use vertical storage instead of bulky drawers.
6. Can I make a travel nook on a very tight budget (under $100)?
Yes. Focus on a DIY desk (or repurpose a table), a thrifted shelf, a pegboard, and inexpensive lighting. Use printables for art and small jars for storage.
7. Where should I buy craft supplies affordably?
Look for coupons at local craft chains, buy in bulk online, or check thrift shops for fabric and frames. Student groups and community sales are also great sources.
Conclusion
Creating a small craft room design on a budget is totally doable. Pick a compact work surface, invest in good lighting, and use vertical storage to free floor space. Add travel-inspired decor that tells your story without cluttering the room.
Start with essentials, DIY where you can, and shop secondhand. In a few weekends, you’ll have an epic travel nook that invites creativity and feels like a mini escape.
If you want, I can help you map your specific space. Send measurements and photos, and I’ll suggest a custom layout and low-cost shopping list. Happy crafting — Mila.