Embarking on a small kitchen makeover can transform a cramped space into a functional and beautiful culinary haven. This comprehensive checklist guides you through every step, from initial planning and budgeting to strategic design choices and clever storage solutions. Learn how to maximize every inch, choose the right appliances, and add personal touches to create a kitchen that feels spacious and works efficiently for you. With smart planning and creative ideas, your small kitchen will feel larger and more organized than you ever imagined.
Small Kitchen Makeover Checklist
Is your small kitchen feeling cramped, outdated, and just plain inefficient? You’re not alone! Many homeowners dream of a spacious kitchen, but the reality is that many of us live with compact cooking areas. The good news? A small kitchen makeover doesn’t have to mean a complete tear-down or a massive budget. In fact, with smart planning and clever design choices, you can transform your tiny kitchen into a highly functional, beautiful, and inviting space that feels much larger than it is.
This comprehensive guide is your ultimate small kitchen makeover checklist. We’ll walk you through every step of the process, from initial brainstorming and budgeting to choosing the perfect finishes and adding those final personal touches. Our goal is to empower you with practical tips, simple language, and a friendly approach to help you achieve the small kitchen of your dreams. Get ready to unlock the full potential of your compact culinary corner!
Key Takeaways
- Start with a Solid Plan: Define your goals, set a realistic budget, and gather inspiration before any physical work begins. Accurate measurements are crucial for a successful small kitchen makeover.
- Declutter Ruthlessly: Before adding anything new, purge unnecessary items and optimize your existing storage to understand your true needs and maximize available space.
- Embrace Smart Design Principles: Use light colors, ample lighting, and reflective surfaces to create an illusion of space. Opt for compact, integrated, and multi-functional elements.
- Prioritize Vertical and Hidden Storage: Leverage walls with shelves, hooks, and clever cabinet organizers. Look for opportunities to store items within drawers, behind doors, and in unexpected nooks.
- Choose Appliances Wisely: Select smaller, counter-depth, or integrated appliances that fit your lifestyle without overwhelming the limited space. Multi-purpose appliances are also excellent choices.
- Balance DIY and Professional Help: Identify tasks you can confidently tackle to save money, but don’t hesitate to call in experts for plumbing, electrical, or complex structural changes to ensure safety and quality.
- Add Personality Through Details: Small finishing touches like hardware, lighting fixtures, and carefully chosen decor can make your small kitchen feel welcoming, personal, and complete.
Step 1: Dream Big, Plan Smart – The Foundation of Your Makeover
Every successful small kitchen makeover starts with meticulous planning. This isn’t just about picking paint colors; it’s about understanding your needs, your budget, and the limitations and opportunities of your space.
Define Your Goals and Needs
Before you lift a hammer or buy a single item, take time to think about what you dislike about your current kitchen and what you hope to achieve with the makeover. Do you need more counter space? Better storage? A brighter feel? Are you an avid chef who needs specific appliances, or do you mostly use your kitchen for quick meals and coffee?
- Functionality First: What activities happen in your kitchen? Cooking, eating, entertaining, working? Prioritize these functions.
- Wishlist vs. Must-Haves: Make two lists. One for absolute necessities (must-haves) and another for things you’d love to have if the budget and space allow (wishlist).
- Identify Pain Points: Pinpoint what frustrates you most. Is it a lack of storage, poor lighting, or an awkward layout? Addressing these will be key to a successful small kitchen makeover.
Set a Realistic Budget
Money talks, especially in a renovation. A clear budget will guide all your decisions and help you avoid overspending. Remember that a small kitchen makeover can range from a few hundred dollars for cosmetic changes to tens of thousands for a full overhaul.
- Break It Down: Allocate funds for different categories: cabinetry, countertops, appliances, flooring, lighting, plumbing, electrical, labor, and a contingency fund (always add 10-20% for unexpected issues).
- DIY vs. Professional: Decide what you can confidently do yourself to save money versus what requires a professional.
- Prioritize Spending: If your budget is tight, decide where to splurge (e.g., a good quality countertop) and where to save (e.g., DIY painting).
Practical Tip: Get quotes from at least three different contractors or suppliers for major items to ensure you’re getting a fair price.
Gather Inspiration and Create a Mood Board
This is the fun part! Start collecting ideas that resonate with you. This will help you define your style and communicate your vision to others.
- Visuals Are Key: Use Pinterest, Instagram, home decor magazines, and websites to find images of small kitchens you love. Pay attention to colors, materials, layouts, and clever storage solutions.
- Create a Mood Board: Physically or digitally collage your favorite images, fabric swatches, paint chips, and material samples. This helps create a cohesive vision for your small kitchen makeover.
- Focus on Small Space Solutions: Look specifically for designs that maximize space, like integrated appliances, vertical storage, and light color palettes.
Measure Everything Accurately
Measure twice, order once! This cannot be stressed enough, especially in a small kitchen where every inch counts. Inaccurate measurements can lead to costly mistakes and delays.
- Use a Reliable Tape Measure: Measure walls, windows, doors, existing appliances, and plumbing/electrical outlets.
- Draw a Floor Plan: Sketch out your kitchen’s layout, noting all dimensions, including ceiling height. Mark the location of windows, doors, and permanent fixtures.
- Consider Clearances: Account for door swings (cabinets, pantry, refrigerator) and traffic paths. You need enough space to move comfortably and open appliance doors.
Step 2: Declutter and Optimize – Making Space Before You Start
Before any new items come into your small kitchen, it’s essential to clear out the old. This step is crucial for understanding the true potential of your space and what you genuinely need.
The Big Purge: Out with the Old
This is often the most therapeutic part of a small kitchen makeover. Go through every drawer, cabinet, and shelf.
- Keep, Donate, Toss: Sort items into these three categories. Be ruthless! If you haven’t used it in a year, or if it’s broken, get rid of it.
- Consolidate Duplicates: Do you have three spatulas or five mismatched mugs? Keep only what you truly need and use.
- Food Inventory: Check expiration dates and dispose of old food items. Organize spices and pantry staples.
Practical Tip: Temporarily move all kitchen items out of the space into another room. This gives you a blank slate and allows you to be more objective when deciding what comes back in.
Assess Current Storage Solutions
Once decluttered, look at your existing storage. What works? What doesn’t? This assessment will inform your new storage choices for your small kitchen makeover.
- Identify Wasted Space: Are there deep cabinets where items get lost? Awkward corners? Gaps above cabinets? These are opportunities for improvement.
- Note Inefficiencies: Do you have to dig through piles to find what you need? Is heavy bakeware stored in a high cabinet?
Temporary Kitchen Setup
If you’re undertaking a significant small kitchen makeover, you’ll need a temporary setup. Plan this in advance to minimize stress.
- Essentials Only: Set up a microwave, a hot plate, a mini-fridge, and some basic utensils in another room (e.g., dining room, garage).
- Washing Station: Plan where you’ll wash dishes – a utility sink, bathroom sink, or even a laundry tub.
Step 3: Strategic Design Choices for Small Spaces
Design is your secret weapon in a small kitchen makeover. Certain choices can make a compact space feel open, airy, and larger than its actual footprint.
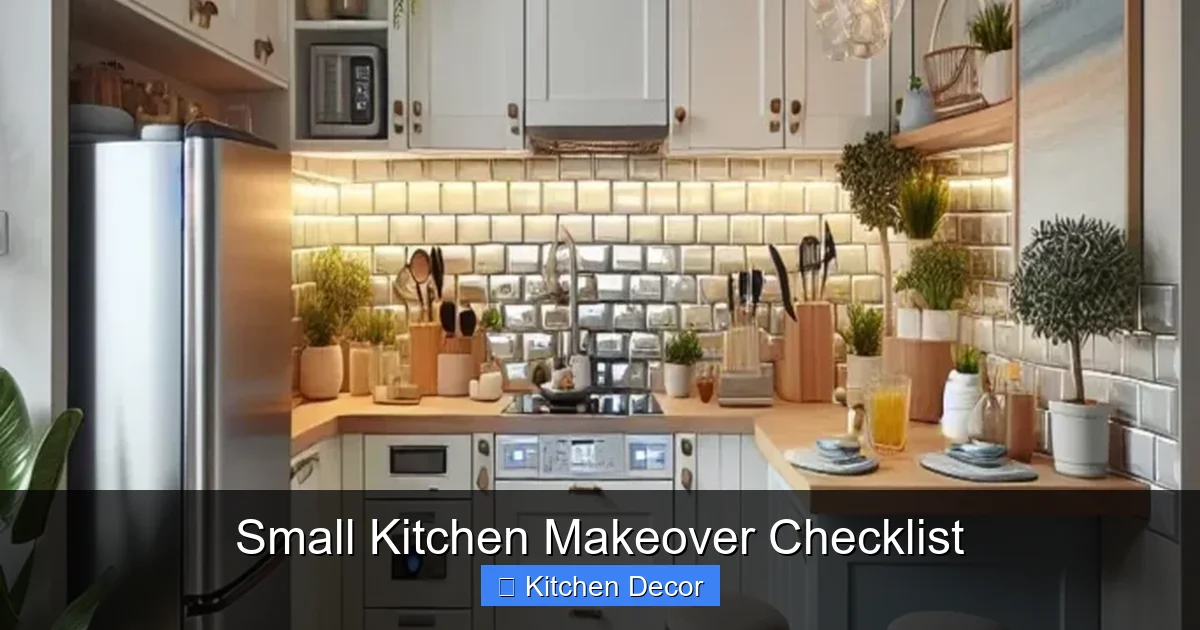
Visual guide about Small Kitchen Makeover Checklist
Image source: i.pinimg.com
Color Palette Power: Light & Bright
Colors play a huge role in how a room feels. For a small kitchen, light and neutral colors are your best friends.
- Whites, Greys, and Creams: These colors reflect light, making the space feel more open and expansive. They also provide a clean, fresh backdrop.
- Monochromatic Schemes: Using different shades of the same color can create a seamless look, blurring boundaries and making the room feel larger.
- Pops of Color: Introduce color through accessories, artwork, or a small accent wall rather than overwhelming the entire space.
Practical Tip: Consider extending your wall color onto the ceiling. This can make the walls seem taller and the room feel more expansive.
Lighting Magic: Illuminate and Expand
Good lighting is paramount in a small kitchen. It not only makes tasks easier but also dramatically affects the perceived size of the room.
- Layered Lighting: Combine different types of light:
- Ambient Light: General illumination (e.g., flush mount ceiling fixture, recessed lights).
- Task Lighting: Focused light for work areas (e.g., under-cabinet lighting for countertops, pendant over a small island).
- Accent Lighting: For atmosphere (e.g., dimmable lights, lighting inside glass cabinets).
- Maximize Natural Light: Keep window treatments minimal and light. Don’t block windows with heavy curtains.
- Reflective Surfaces: Mirrors, glossy finishes, and glass elements can bounce light around, making the space feel brighter and bigger.
Flooring That Works Hard
Your flooring choice can influence the perception of space and tie the whole small kitchen makeover together.
- Continuity is Key: Using the same flooring material throughout the kitchen and adjacent areas (if possible) creates an uninterrupted visual flow, making both spaces feel larger.
- Light Colors and Simple Patterns: Similar to walls, lighter flooring can open up a small kitchen. Avoid busy, large patterns that can overwhelm the space.
- Durable Materials: Choose materials that can withstand kitchen traffic and spills, such as vinyl planks, tiles, or engineered wood.
Backsplash Brilliance
A backsplash protects your walls and adds a decorative element. In a small kitchen, it’s an opportunity to add subtle style.
- Subtle and Seamless: Opt for simple patterns, smaller tiles, or a continuous slab material that doesn’t chop up the visual line.
- Reflective Materials: Glazed tiles or stainless steel can reflect light and contribute to a brighter feel.
- Extend Vertically: Running the backsplash all the way up to the ceiling (if practical) can draw the eye upward, enhancing the feeling of height.
Step 4: Smart Storage Solutions – Every Inch Counts
This is where a small kitchen truly shines – by making every single inch count. Smart storage is the backbone of any successful small kitchen makeover.
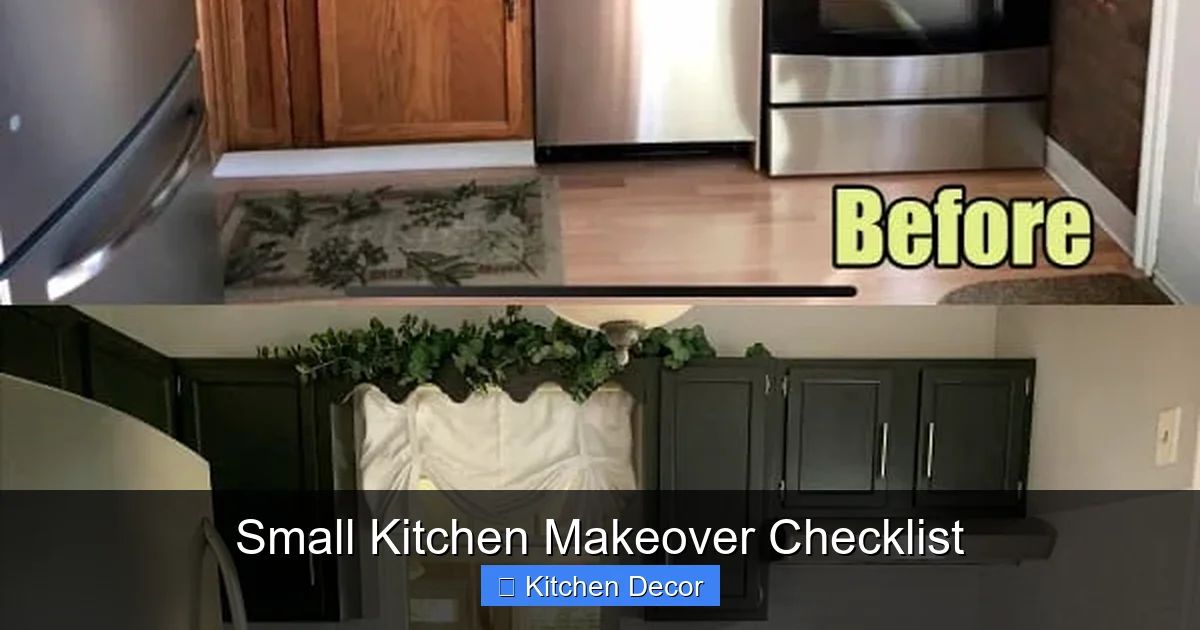
Visual guide about Small Kitchen Makeover Checklist
Image source: i.ytimg.com
Vertical Storage is Your Best Friend
When you can’t expand outwards, expand upwards!
- Tall Cabinets: Take cabinets all the way to the ceiling to maximize storage. Store rarely used items on the top shelves.
- Open Shelving: A few well-placed open shelves can make a small kitchen feel less bulky than solid upper cabinets, especially if they hold attractive items. Just don’t over-clutter them.
- Wall-Mounted Solutions: Magnetic knife strips, pot racks, and wall organizers free up valuable drawer and counter space.
Smart Cabinetry and Shelving
The right cabinetry can transform storage efficiency.
- Pantry Pull-Outs and Lazy Susans: These maximize accessibility in deep or corner cabinets, ensuring nothing gets lost.
- Narrow Cabinets: Don’t dismiss narrow spaces. A 6-inch pull-out can be perfect for spices, oils, or cutting boards.
- Glass-Front Cabinets: If kept tidy, these can visually lighten the upper cabinetry, making the space feel more open.
- Toe-Kick Drawers: Utilize the space beneath your cabinets for shallow storage, perfect for platters or pet bowls.
Drawer Organizers and Inserts
Taming the chaos within your drawers is essential.
- Customizable Dividers: Keep utensils, gadgets, and spices neatly organized.
- Stackable Inserts: Maximize vertical space within drawers for smaller items.
Wall-Mounted Storage
Look beyond traditional cabinets.
- Pegboards: A versatile solution for hanging pots, pans, and utensils. Can be painted to match your decor.
- Hooks: Simple hooks under shelves or on the side of cabinets for mugs, towels, or oven mitts.
Consider Multi-Functional Furniture
Every piece of furniture in a small kitchen should ideally serve more than one purpose.
- Kitchen Island on Wheels: Provides extra prep space, storage, and can be moved out of the way when not needed. Some even have drop-leaf extensions for dining.
- Folding Tables/Stools: Perfect for occasional dining or extra workspace, then fold away when not in use.
- Bench Seating with Storage: If you have a small dining nook, a built-in bench can offer hidden storage beneath the seat.
Step 5: Appliance Selection – Size Matters
When it comes to a small kitchen makeover, your appliance choices are critical. Resist the urge to buy oversized appliances that will swallow your precious space.
Compact and Counter-Depth Appliances
Manufacturers offer a wide range of smaller-footprint appliances designed for urban living and small spaces.
- Slim Refrigerators: Look for models that are narrower or counter-depth to avoid them protruding into your walkway.
- 18-inch Dishwashers: A standard dishwasher is 24 inches; an 18-inch model can save valuable cabinet space and is often sufficient for 1-2 people.
- Apartment-Sized Ranges: These are typically 20 or 24 inches wide, compared to the standard 30 inches.
Integrated Appliances for a Seamless Look
Appliances that blend seamlessly with your cabinetry create a much cleaner, less cluttered look, making a small kitchen feel larger.
- Panel-Ready Appliances: Refrigerators and dishwashers can be fitted with custom panels to match your cabinetry, disappearing into the design.
- Drawer Microwaves: These sit flush under a countertop or in an island, freeing up counter space.
Microwave Placement and Type
The microwave is often a bulky culprit on a small kitchen countertop.
- Over-the-Range Microwaves: These combine a microwave and an exhaust fan, freeing up counter space.
- Built-In Microwaves: Can be integrated into cabinetry, keeping counters clear.
- Microwave Carts: A dedicated small cart can provide a spot for the microwave and potentially some extra storage.
Step 6: Countertops and Sinks – Practicality Meets Style
These elements are not just functional; they contribute significantly to the aesthetic and perceived spaciousness of your small kitchen.
Material Choices for Small Spaces
The right countertop material can enhance both durability and appearance.
- Light Colors: Opt for light-colored countertops (quartz, granite, laminate) to reflect light and keep the kitchen feeling open.
- Thin Profiles: Thinner countertop slabs (e.g., 1-inch instead of 1.5-inch) can offer a more sleek, modern look that doesn’t feel as heavy in a small space.
- Durable and Easy to Clean: Choose materials that can withstand daily use without excessive maintenance.
Sink Solutions: Undermounts and Compact Bowls
The sink is a key workstation; choose one that fits your needs without sacrificing too much space.
- Undermount Sinks: These install beneath the counter, creating a seamless transition that makes cleanup easier and visually expands counter space.
- Single-Bowl Sinks: While a double sink might be appealing, a single, larger bowl often offers more functional space for washing bigger pots in a small kitchen.
- Small Apron Front Sinks: Some manufacturers offer compact farmhouse sinks that can add character without overwhelming the space.
- Drainboard Sinks: A built-in drainboard can eliminate the need for a separate dish rack, saving counter space.
Maximizing Counter Space
Even with small countertops, there are ways to make the most of them.
- Cutting Board Over Sink: A custom-fit cutting board that sits over your sink provides extra prep area.
- Appliance Garages: If possible, design a small cabinet with a roll-up door to hide small appliances when not in use.
- Keep it Clear: Resist the urge to clutter your countertops with too many gadgets or decorative items. Less is more in a small kitchen.
Step 7: Adding Personality and Finishing Touches
Once the major structural and functional elements of your small kitchen makeover are in place, it’s time to infuse your personality with thoughtful details.
Hardware Upgrades
New cabinet pulls and knobs are a quick and inexpensive way to give your kitchen a fresh, updated look.
- Cohesive Style: Choose hardware that complements your overall kitchen aesthetic – modern, traditional, industrial, etc.
- Sleek Design: In a small space, less ornate, streamlined hardware can contribute to an uncluttered feel.
Window Treatments
Keep them simple and light to maximize natural light.
- Minimalist Blinds or Shades: Think roller blinds, Roman shades, or simple café curtains that don’t block light or overwhelm the window.
- Light Fabrics: If using fabric, choose sheer or light-colored materials.
Greenery and Decor
A touch of life and art can make any small kitchen feel more inviting.
- Small Plants or Herbs: A single potted herb plant or a small succulent adds freshness without taking up much space.
- Thoughtful Artwork: A small piece of art on an empty wall can add a focal point.
- Functional Decor: Beautiful canisters, a stylish fruit bowl, or a unique cutting board can serve as both decor and function.
Smart Plugs and Tech
Modern conveniences can simplify life in a small kitchen.
- Smart Plugs: Control lights or small appliances with your voice or phone.
- Tablet/Phone Holder: Keep recipes visible without sacrificing counter space.
- Under-Cabinet USB Ports: A great way to charge devices without taking up valuable outlet space.
Step 8: The Power of DIY vs. Professional Help
Deciding what to tackle yourself and what to hire out is a crucial part of managing your budget and the complexity of your small kitchen makeover.
What You Can Tackle Yourself
Many tasks are manageable for a DIY enthusiast, saving you money.
- Painting: A fresh coat of paint can instantly transform a kitchen.
- Demolition (Carefully!): Removing old cabinets or flooring, if you know what you’re doing and it’s not structural.
- Installing Hardware: Swapping out cabinet pulls and knobs is a simple update.
- Assembling Flat-Pack Cabinets: If you’re using ready-to-assemble units.
- Simple Decorating: Adding shelves, hanging artwork, organizing drawers.
When to Call in the Pros
For certain tasks, professional expertise is not just recommended, but often required for safety and quality.
- Plumbing: Moving sinks or gas lines requires a licensed plumber.
- Electrical Work: Installing new outlets, moving light fixtures, or major rewiring should always be done by a certified electrician.
- Cabinet Installation: If you’re installing custom or complex cabinetry, especially in a small space where precision is key.
- Countertop Installation: Especially for heavy materials like stone or quartz that require specialized tools and handling.
- Structural Changes: Removing walls or making any structural modifications absolutely requires a qualified contractor and necessary permits.
Practical Tip: Don’t underestimate the complexity of certain tasks. It’s better to pay a professional than to risk damage, injury, or shoddy workmanship that you’ll eventually have to pay to fix.
Troubleshooting Common Small Kitchen Makeover Challenges
Even with the best planning, a makeover project can hit bumps. Here’s how to navigate some common challenges during your small kitchen makeover.
Budget Overruns
It’s easy to go over budget if you’re not careful. This is why a contingency fund is so important.
- Stay Flexible: If a specific item is too expensive, look for alternatives. Can you find a similar look for less?
- Prioritize: Revisit your “must-haves” and “wishlist.” Can anything from the wishlist be postponed or cut entirely?
- DIY Where Possible: If you’ve been considering hiring help for a task, see if you can tackle it yourself to save money.
Decision Fatigue
With so many choices for every single element, it’s easy to feel overwhelmed.
- Take Breaks: Step away from the project for a day or two if you’re feeling bogged down.
- Limit Options: Don’t look at 50 different tiles. Narrow it down to your top 3 and choose from those.
- Trust Your Gut: Often, your first instinct is the right one.
Unexpected Issues (e.g., Plumbing, Electrical)
Opening up walls or floors can reveal unforeseen problems from previous renovations or older homes.
- Allocate Contingency: This is precisely why you set aside extra funds.
- Consult Professionals: Don’t try to fix complex issues yourself. Bring in the experts (plumber, electrician, general contractor) immediately.
- Stay Calm: These things happen. Factor in potential delays and additional costs, and remember it’s all part of the process.
Conclusion
Congratulations! You’ve navigated the exciting journey of a small kitchen makeover. By following this comprehensive checklist, you’re well on your way to transforming your compact culinary space into a highly functional, beautiful, and inviting heart of your home. Remember, the key to a successful small kitchen makeover lies in smart planning, creative solutions for storage, strategic design choices, and a willingness to embrace the unique charm of a smaller footprint.
Every decision you make, from the color of your cabinets to the type of sink, contributes to the overall feel and efficiency of your kitchen. Don’t be afraid to experiment, but always keep your primary goals in mind: maximizing space, improving functionality, and reflecting your personal style. Your small kitchen is full of potential, and with this guide, you’re equipped to unlock every inch of it. Enjoy your newly transformed space – happy cooking, coffee sipping, and memory making!